16
∙
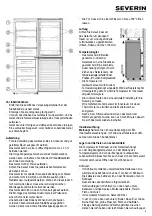
To enable the melt-water to drain freely, always ensure that
the channel and discharge opening in the cabinet are free of
any blockage.
Energy saving tips
∙
The appliance should be set up in a well-ventilated, dry
room.
∙
Do not expose the appliance to direct sunlight, and do not
position it next to any heat sources (radiators, cookers etc.).
If this cannot be avoided, however, suitable insulation must be
installed between the heat source and the unit.
∙
Ensure suf
fi
cient air circulation around the sides of the unit.
∙
The compressor (at the rear) should be cleaned at regular
intervals. Accumulated dust causes an increase in energy
consumption.
∙
Warm food should be allowed to cool down before it is
stored inside.
∙
To prevent an increased build-up of ice, do not leave the
doors of the unit open for too long when loading or taking
out food.
∙
Frequent de-frosting helps to save energy. For detailed
information on cleaning the appliance, please refer to the
section
De-frosting and cleaning
.
∙
Do not set a lower-than-necessary temperature. For detailed
information on the temperature settings, please refer to the
section
Temperature control
.
Operating noise
∙
Certain typical sounds can be heard when the appliance is
switched on. These sounds are:
∙
caused by the electrical
motor within the
compressor assembly;
during compressor
start-up the sound level
will be slightly higher for
a limited period of time.
∙
caused by the cooling
agent
fl
owing through the circuit.
Trouble-shooting
The following table lists possible malfunctions and their
probable causes and solutions. In the event of operational
p roblems, check
fi
rst whether a solution can be found using this
table. If the problem persists, disconnect the appliance from the
mains power and contact our Customer Service Department.
Problem
Possible cause and solution
The appliance is not working at all.
∙
The temperature control is set to ‘
0
’.
→
Use a higher temperature setting.
∙
The wall socket is defective.
→
Check the fuse. If necessary, have the wall outlet
checked by a quali
fi
ed electrician.
The temperature inside the refrigerator
cabinet or freezer compartment is not
low enough.
∙
Too much food has been stored in the appliance.
→
Do not store excessive food (see
product data sheet).
∙
The doors are not properly closed.
→
Ensure that the doors are properly closed.
∙
The door seals are defective.
→
Check the door seals and contact our Customer
Service if necessary.
∙
There is too much dust on the condenser.
→
Clean the condenser regularly.
∙
Insuf
fi
cient ventilation: the unit is too close to a wall or other structure or object.
→
see section ‘
Ventilation
’.
∙
The temperature control is set too low.
→
Use a higher setting.
The normal operating sound changes
or becomes louder.
∙
The unit is not
fi
rmly set on the
fl
oor.
→
Use the adjustable front feet to align the unit
properly.
∙
Adjacent furniture or objects are affected by the running of the cooling unit (i.e. causing
them to vibrate).
→
Keep the stated clearances.
∙
Any objects on top of the unit might be vibrating
→
Remove such objects.
Water is collecting on the bottom of
the unit.
∙
The melt-water drain system is blocked.
→
Remove the blockage and clean the
system.
Excessive build-up of frost on the rear
of the main cabinet.
∙
Hot food has been stored inside the cabinet.
→
Let the food cool down before putting
it in.
∙
The door seals are defective.
→
Check the door seals and contact our Customer
Service, if necessary.
∙
The temperature control is set too high.
→
Use a lower temperature setting.
Excessive build-up of frost inside the
freezer compartment.
∙
It is necessary to de-frost the freezer compartment.
→
See ‘
De-frosting and cleaning
’
∙
See ‘
Excessive build-up of frost on the rear of the main cabinet
‘ (above).
Summary of Contents for KS 9784
Page 94: ...94 30 30 30 4 R600a GR...
Page 95: ...95 R600a 8 2...
Page 96: ...96 1 2 3 4 5 6 7 8 9 70 160...
Page 97: ...97 100 mm 0 3 5 LED Max 24...
Page 98: ...98 5 2 4 24...
Page 99: ...99 0...
Page 100: ...100 1 2 3 4 3 5 6...
Page 101: ...101 7 8 9 180 10 11 12 180 4...
Page 102: ...102 13 14 15 4 KS...
Page 104: ...104 30 30 30 4 R600a RU...
Page 105: ...105 R600a 8 2...
Page 106: ...106 1 2 3 4 5 6 7 8 9 70...
Page 107: ...107 160 100 0 3 5 Max 24...
Page 108: ...108 5 2 4 24...
Page 109: ...109 0...
Page 110: ...110 1 2 3 4 3 5 6...
Page 111: ...111 7 8 9 180 10 11 12 180 4...
Page 112: ...112 13 14 15 4 Severin 2 a x KS...


