background image

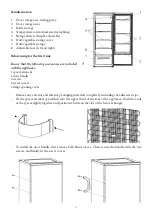
Familiarisation

1.  Door storage area with egg tray
2.  Door storage areas
3. Bottle 

storage

4.  Temperature control and interior lighting
5.  Storage shelves (height-adjustable)
6.  Fruit/vegetable storage cover
7. Fruit/vegetable 

storage

8.  Adjustable foot (left and right)

Before using for the first time

Ensure that the following accessories are included 
with the appliance:

1 spacer element
1 door handle
2 screws
2 screw covers
1 hinge opening cover


 Remove any exterior and interior packaging materials completely, including the adhesive strips. 


 Fit the spacer element (provided) into the upper third of the rear of the appliance. Push the ends 
of the spacer lightly together and position it between the ribs of the heat exchanger. 


 To install the door handle, first remove both blind covers.  Then secure the handle with the two 
screws, and finally fit the screw covers. 


16

Summary of Contents for KS 9822

Page 1: ...lkast Frigor fico Frigorifero K leskab Kylsk p J kaappi Lod wka Gebrauchsanweisung Instructions for use Mode d emploi Gebruiksaanwijzing Instrucciones de uso Manuale d uso Brugsanvisning Bruksanvisnin...

Page 2: ...accepted if damage results from improper use or if these instructions are not complied with Important safety instructions To prevent the risk of personal injury or damage to the unit it must only be...

Page 3: ...cal insulation This unit is designed for storing food only Alcoholic substances may be stored only in properly sealed containers and in upright positions This appliance is not designed for the storage...

Page 4: ...ies are included with the appliance 1 spacer element 1 door handle 2 screws 2 screw covers 1 hinge opening cover Remove any exterior and interior packaging materials completely including the adhesive...

Page 5: ...elative humidity of max 70 Do not use the appliance outdoors Ensure that the plug is accessible and can be removed from the wall socket at any time Do not expose the appliance to direct sunlight and d...

Page 6: ...e small panel from the front of the top cover 4 Reposition the small panel on the other side of the cover 5 Take off the upper hinge by removing the 3 screws Take off the door and place it also on a s...

Page 7: ...oor 7 Remove both adjustable feet and the screws holding the lower hinge and the foot mounting 8 Remove the lower hinge Unscrew the hinge pin and reposition it in the other opening in the hinge Now fi...

Page 8: ...ndle Remove the blind covers on the other side of the door and reposition the handle in the new location Replace the blind covers on the other side 11 Put the unit back in its intended position and wa...

Page 9: ...ttles milk and fruit juice tetra packs Initially the temperature control should be set to position 4 If the cooling effect is too strong lower it to position 1 3 if it is insufficient raise it to 5 7...

Page 10: ...ing table lists the possible malfunctions their probable causes and solutions In the event of operational problems check first whether a solution can be found using this table If the problem persists...

Page 11: ...ctions and provided that it has not been modified repaired or interfered with by any unauthorised person or damaged through misuse This guarantee naturally does not cover wear and tear nor breakables...

Page 12: ...n of the appliance Usable refrigerator capacity litres 250 Usable capacity Freezer unit litres Frost free refrigeration unit freezer unit yes Safe storage time in case of malfunction hrs Freezing capa...

Reviews: