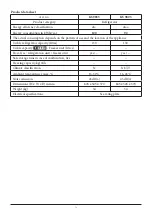
2. Remove the entire top panel (9).
3. Remove the three threaded bolts (6) securing
the upper hinge plate (5) on the right-hand
side.
4. Carefully lift up the door and place it on a
suitable surface to protect it from scratches.
5. Take off the protective corner-piece (7) and
re-fit it in the groove on the right-hand side,
pushing it firmly down.
6. Remove the hinge pin from the upper hinge
plate (5) and screw it back in from the
opposite side.
7. Remove the two screws from the left-hand
side in the upper hinge plate mounting and
re-fit them on the right.
8. Remove the three screws (1) holding the lower hinge plate (2) on the right-hand side.
9. Remove the hinge pin from the lower hinge plate and re-fit it in the next hole.
10. Remove the adjustable foot (4) from the left-hand side and re-fit it on the right.
11. Attach the lower hinge plate (2). Do not tighten the screws for the moment.
12. Replace the door in its new position. Ensure that the hinge pin is inserted into the guide bushing
(hole) on the lower part of the door frame.
13. Attach the upper hinge plate (5) (removed earlier in step 3) on the left-hand side. Ensure that the
hinge pin is inserted into the guide bushing (hole) on the upper part of the door frame. Do not
tighten the screws for the moment.
14. Adjust the closed door to its proper position and tighten the screws of the upper and lower hinge
plates.
15. Replace the top panel (9).
16. Replace the screws (10) und the screw covers (11) in the top panel (9).
17. Put the unit back in its intended position and wait for about two hours before connecting it to
the mains.
Temperature control
The unit is re-activated by connecting it to the mains. It is only switched off
completely when the plug is removed from the wall socket.
The temperature in the refrigerator cabinet can be adjusted by setting the
temperature control. Turning the control clockwise will decrease the
temperature, while turning it anti-clockwise will increase it.
–
After switching on, the temperature control should be set to its maximum setting.
–
After 30 minutes, the setting should be changed to a medium setting, usually sufficient for home
use.
Following a power interruption, or if the unit has been switched off on purpose, it may take 3 to 5
minutes before it switches on again.
In position ‘0’, the cooling function is switched off, though the appliance is still connected to the
mains.
Interior lighting
Changing the light bulb:
–
Remove the plug from the wall socket.
14
Summary of Contents for KS 9825
Page 83: ...R600a 83...
Page 84: ...R600a 84...
Page 85: ...1 2 3 4 5 6 7 8 9 2 70 160 5 cm 10 cm 85...
Page 86: ...1 11 10 2 9 3 6 5 4 5 7 6 5 7 8 1 2 9 10 4 11 2 12 13 5 3 14 15 9 16 10 11 9 17 86...
Page 87: ...30 3 5 0 15 W 3 5 4 1 3 5 7 87...
Page 88: ...88...
Page 89: ...0 45 2 89...
Page 91: ...R600a RUS 91...
Page 92: ...92...
Page 93: ...R600a 1 2 3 4 5 6 7 8 9 2 70 160 93...
Page 94: ...5 10 1 11 10 2 9 3 6 5 4 5 7 6 5 7 8 1 2 9 10 4 11 2 12 13 5 3 14 15 9 16 10 11 9 17 30 3 94...
Page 95: ...5 0 15 3 5 4 1 3 5 7 95...
Page 96: ...0 96...
Page 97: ...45 2 Severin 2 a x KS 97...
Page 100: ...I M No 8560 0000...

