- 26 -
•
If necessary, the door hinge can be
switched from right to left.
•
Warning! Before carrying out any work
on the appliance, always disconnect the
power plug from the mains.
•
To avoid personal injury and material dam-
age, carry out the shift of the door hinge
with two people.
•
We recommend that the door stop only be
changed by qualified persons.
•
Before you start, it is fundamental that you:
ū
Always pay attention to the number of
washers on the trunnion and screws.
ū
Always align the doors so that they close
tightly.
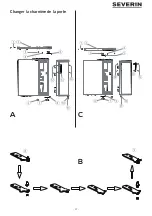
Step A
a) Unscrew the two screws
q
which secure
the appliance top
w
from behind.
b) Take off the appliance top
w
and put it aside.
c) While securing the door, unscrew the 5
screws
e
&
r
which hold the upper door
hinge
t
. Remove both door and hinge.
d) Loosen the screw
s
at the bottom right of
the door, which holds the entry
a
for the
journal, and remove both. Put the door
aside in a safe place.
e) Tilt the device slightly backwards and unscrew
the adjustable front feet
y
of the appliance.
f) Unscrew the screws
u
which hold the
bottom door hinge
i
.
g) Loosen the screws
d
which hold the door
handle
f
and take the blind plugs
g
out of
the drill holes on the right side of the door.
Step B
a) Refer to drawing B when unscrewing the
journal of the lower hinge
i
from the plate.
b) Turn the plate so that its underside is fac-
ing upwards.
c) Then, replace the journal and secure it with
the nut. The newly configured lower door
hinge receives the number
o
.
Step C
a) Using the screws
u
, attach the lower door
hinge
o
to the bottom left side of the appli-
ance.
b) Screw the adjustable front feet
y
back on
the appliance.
c) Put the entry
a
for the journal into the drill
hole on the bottom left of the door and
secure it with the screw
s
.
d) Put the door onto the journal of the bottom
door hinge
o
and press it onto the appliance.
e) While securing the door, attach the upper
door hinge
t
with the screws
e
&
r
on
the top left side of the appliance, in a way
that ensures that the upper journal slides
into the aperture on the door.
f) Using the screws
d
, attach the door handle
f
on the right side of the door. Put the
blind plugs
g
into the drill holes on the left
side of the door.
g) Put on the appliance top
w
and secure it
from behind with the two screws
q
.
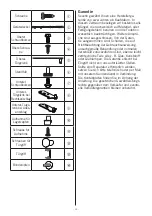
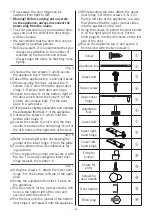
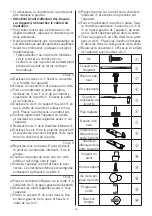
Screw
q
Appliance top
w
Upper bolt
e
Upper screw
r
Upper door
hinge
t
Adjustable
foot
y
Lower bolt
u
Lower right-
hand hinge
i
Lower left-
hand hinge
o
Entry for
journal
a
Screw for
entry
s
Screws for
door handle
d
Door handle
f
Blind plug
g
Summary of Contents for VKS 8807
Page 12: ...12 B A C T ranschlag wechseln...
Page 25: ...25 B A C Switch door hinge side...
Page 28: ...28...
Page 37: ...37 B A C Changer la charni re de la porte...
Page 48: ...B A C Deurscharnier vervangen...


