4
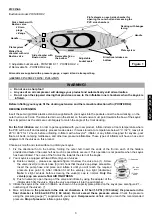
(*) Note:
Each side air chamber is attached to the outer hull by cords accessed by opening the zip fasteners located
on each inner side of the outer hull at the bow, stern and middle of the kayak. If the side chambers have been
displaced, causing distortion of the kayak, you can reposition them. Adjustments must be made with the air
chambers deflated or only slightly inflated. The floor air chamber can also be repositioned (it is not fastened to the
outer hull).
WARNING!
If you leave your product exposed to the hot sun check the pressure and deflate it slightly, otherwise the
material might be overstretched.
The ambient temperature affects the tube’s internal pressure: a variation of 1°C causes a variation of the pressure
in the tube of +/- 4 mbar.
REMOVABLE FIN
Fitting of the fin is recommended whenever you use your kayak in deep water (lake, sea, etc.), where it helps keep the
kayak in a straight line. Fitting of the fin is not recommended for use in shallow water or white water. The fin would be
likely to damage the bottom of the kayak in shallow water and would reduce manoeuvrability in white water. The bow
and stern lines of the kayak have been designed to ensure good handling without the fin.
ADJUSTABLE BUCKET SEATS
The bucket seat can be adjusted to meet your needs. Adjust the belt lengths using the buckles at each end. You can
also adjust the position of the seat by moving it in the raised area; the raised area and the lower part of the seat have
hook-and-loop strips for easy adjustment.
ADDITIONAL DECKING – WATERPROOF SKIRT
POINTER kayaks have a large decking area providing good protection of the occupants and the on-board load.
For the K2, modulable (1 or 2 persons) additional decking (an accessory supplied with certain models) can be fastened
on the main decking using the zip fastener along the edge. If this additional decking is not supplied with your model,
you can purchase it as an option.
The waterproof skirt (K1: supplied, K2: on option) provides still greater protection. Put the skirt on through the narrower
opening, tighten it around the waist with the cord, get into the kayak, then spread the skirt over the decking (skirt
handle to the front); secure the skirt around the flexible fender of the additional decking (if fitted) using the peripheral
cord, under the handle. The handle is used to lift the skirt.
DRAINAGE SYSTEM
Your kayak has a drainage system located at the back. The system comprises 2 orifices with plugs; it prevents the
lower part of the body getting wet when the kayak is used in calm water. It may be a little difficult to insert the plug in a
drain orifice. The tight fit retains the plug until it is removed, for example when the kayak is to be used in white water.
The self-draining bottom is a considerable advantage in white water: it allows rapid removal of water from inside the
kayak and thus improves its performance; it is also an additional safety feature, as a kayak filled with water is difficult
to manoeuvre.
Note: Before inflating your kayak, you can either close the drainage orifice(s) to stay dry, or open it/them to allow water
drainage.
OPERATING INSTRUCTIONS
CAUTION!
BEWARE OF OFFSHORE WINDS AND EBB CURRENTS!
Get informed on local regulations and hazards related to this sport and to water activities.
Obtain information from the local authorities about the area where you plan to use your kayak, tides and currents.
Before using the product, please check it carefully.
A bad distribution of the load can destabilize the kayak and may result in a loss of control.
Do not overestimate your strength, your endurance or your abilities.
Never underestimate the forces of nature.
Always wear a Personal Flotation Device approved by proper authorities.
Do not exceed the authorized number of persons or weight.
Avoid all contact between the buoyancy tubes and sharp objects or aggressive liquids (such as acid).
Your kayak is supplied with a transport bag. Keep it out of the reach of children: suffocation hazard!
Must not be towed by a boat or any other vehicle.
Designed for use in calm water. Less than 300 m from Shelter / France.
E
N
G
L
I
S
H
Summary of Contents for POINTER K1
Page 76: ...76 1 C 4 mbar 0 06 PSI POINTER K2 1 2 K1 K2 300...
Page 77: ...77 1 2 3 4 5 6 60 18 C 25 C 1 5 cm 2 5 3 3 5 4 12...
Page 88: ...88 3 1 4 0 06 60 SEVYTEST 1 Sevytest 1 Sevytest 1 C 4 POINTERTM K2 1 2 K1 K2 2 A C K...
Page 89: ...89 300 1 2 3 4 5 6 60 18 C 25 C 1 5 2 5 3 3 5 4 12 A C K...
Page 90: ...90...
Page 93: ...93 N B 1 C 4 0 06 PSI POINTER K2 1 2 K1 K2 N B 300...
Page 94: ...94 1 2 3 4 5 6 60 18 C 25 C 1 5 2 5 3 3 5 4 12...
Page 95: ...95...
Page 96: ......


