background image

-9-

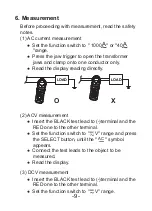
6. Measurement 

Before proceeding with measurement, read the safety 

notes.

(1) AC current measurement


Set the function switch to " 1000

A

" or "40

A


"range.


Press the jaw trigger to open the transformer 

jaws and clamp onto one conductor only.


Read the display reading directly.

(2) ACV measurement


Insert the BLACK test lead to (-)terminal and the 

RED one to the other terminal.


Set the function switch to "

 ▬

 …

V" range and press

the SELECT button, until the " 

AC 

" symbol 

appears.


Connect the test leads to the object to be

measured.


Read the display.

(3) DCV measurement


Insert the BLACK test lead to (-)terminal and the 

RED one to the other terminal.


Set the function switch to "

 ▬

 …

V" range.

LOAD

LOAD

LOAD

LOAD

O

X

Summary of Contents for 2950 CL

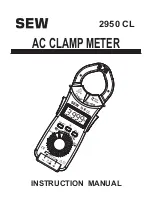
Page 1: ...AC CLAMP METER INSTRUCTION MANUAL 2950 CL 3 999 V C L A M P METER 2950 CL SELECT 1000 HOLD 40 ...

Page 2: ...Index 1 Introduction 2 Safety notes 3 Features 4 Specifications 5 Instrument layout 6 Measurement 7 Maintenance Page 1 2 3 3 4 6 7 8 9 10 11 ...

Page 3: ...esigned and tested according to CE Safety Requirements for Electronic Measuring Apparatus EN 61010 1 EN 61010 2 32 and other safety standards Follow all warnings to ensure safe operation Warning Read Safety Notes next page before using the meter ...

Page 4: ...conductors or bus bars Never clamp around any conductor carrying a voltage above 600V R M S During current measurement to avoid an electric shock accident do not connect the test leads to the instrument To avoid electric shock when measuring live lines wear appropriate protective gear such as insulated rubber gloves and boots Rated environmental conditions 1 Indoor use 2 Installation Category II 6...

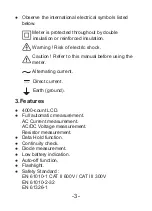
Page 5: ...his manual before using the meter Alternating current Direct current Earth ground 3 Features 4000 count LCD Full automatic measurement AC Current measurement AC DC Voltage measurement Resistor measurement Data Hold function Continuity check Diode measurement Low battery indication Auto off function Flashlight Safety Standard EN 61010 1 CAT II 600V CAT III 300V EN 61010 2 32 EN 61326 1 ...

Page 6: ...200Hz 400 0A 1000A 0 1A 1A AC Voltage Range Resolution Accuracy 4 000V 1mV 1 5 rdg 10mV 40 500Hz 40 00V 10mV 1 5 rdg 5dgt 40 500Hz 400 0V 100mV 750V 1V Input impedance 10MΩ DC Voltage Range Resolution Accuracy 4 000V 1mV 1 0 rdg 5dgt 40 00V 10mV 400 0V 100mV 1000V 1V Input impedance 10MΩ ...

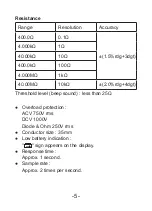
Page 7: ...00 0kΩ 100Ω 4 000MΩ 1kΩ 40 00MΩ 10kΩ 2 0 rdg 4dgt Threshold level beep sound less than 25Ω Overload protection ACV 750V rms DCV 1000V Diode Ohm 250V rms Conductor size 35mm Low battery indication sign appears on the display Response time Approx 1 second Sample rate Approx 2 times per second ...

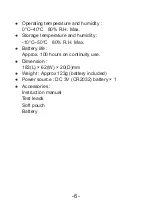
Page 8: ...orage temperature and humidity 10 C 50 C 80 R H Max Battery life Approx 100 hours on continuity use Dimension 183 L 62 W 20 D mm Weight Approx 123g battery included Power source DC 3V CR2032 battery 1 Accessories Instruction manual Test leads Soft pouch Battery ...

Page 9: ...t layout Transformer Jaws Function Switch Flashlight Input Terminal Jaw Trigger SELECT Push Button LCD Flashlight Button Data Hold Button Barrier 1 2 3 3 4 5 6 7 9 8 10 3 999V CLAMP METER 2950 CL SELECT 1000 HOLD 40 ...

Page 10: ... jaws 4 LCD 3 digit LCD 4000 counts 5 Data Hold Button Freeze the reading for all ranges with HOLD indicated 6 Function Switch For function selection 7 Input Terminal and terminal 8 SELECT Push Button For select function a ACV DCV b Ω 9 Flashlight Button For flashlight function 10 Barrier Provide a protective distance from hands to conductor ...

Page 11: ...the display reading directly 2 ACV measurement Insert the BLACK test lead to terminal and the RED one to the other terminal Set the function switch to V range and press the SELECT button until the AC symbol appears Connect the test leads to the object to be measured Read the display 3 DCV measurement Insert the BLACK test lead to terminal and the RED one to the other terminal Set the function swit...

Page 12: ...ower in the circuit being measured Connect the test leads to the object under test and read the display directly 5 Continuity test Insert the BLACK lead to the terminal and the RED one to another Set the function switch to Ω range and press the SELECT button until the symbol appears Connect the test leads to the object under test The buzzer will work when the resistance is less than 25Ω 6 Diode te...

Page 13: ...e a new battery as follows Disconnect the test leads from the instrument and turn off the power Unscrew the battery cover and replace with a new battery 2 Cleaning and storage WARNING To avoid electrical shock or damage to the meter do not get water inside the case Periodically wipe the case with a damp cloth and detergent Do not use abrasives or solvents If the meter is not to be used for a long ...

Reviews: