background image

1. Remove power and disconnect all other connections to the Pi Touch Display Kit

2. Lay the Pi Touch Display Kit face down on a soft surface to avoid scratching

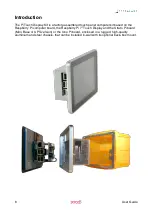
3. Unscrew the two lock nuts to free the back cradle from the aluminium display frame

4. Gently lift the cradle; pay attention not to damage the boards and connectors

5. Locate the microSD card socket, on the Raspberry Pi board, directly behind the white 

flat cable. The flat cable has a large ferrite toroid around it. It is not a problem if the 
toroid slides up or down, but never remove the toroid

6. Gently move the cable to have enough room to insert the microSD card in its socket; 

the card should be inserted with its contacts facing up (toward the back of the unit)

7. Once the card is installed, check that the flat cable is still firmly connected on both 

sides; if not, gently lift the connector’s locks, replace the cable and push the locks back 
in position

8. Ensure that the toroid is not directly in contact with the microSD card, to avoid damage 

to the card when the cradle is re-installed

9. Gently place the cradle back, aligning the mounting screws on the sides; pay attention 

not to damage the boards, connectors, and internal cables

10. Screw the two lock nuts.

Power supply

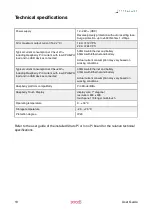
The Pi Touch Display Kit can be powered with DC voltage only through the terminal block 
of the installed Strato Pi or Iono Pi board:

DC: nominal voltage range 12V to 28V.

Respect the correct polarity shown in the schematic diagram (+ -) of the board. The power 
supply circuit implements reverse polarity protection using an auto resetting fuse and 
surge protection.

Never connect the Raspberry Pi micro-USB power plug.

Refer to the user guide of the installed Strato Pi or Iono Pi board for more details.

Wiring and GPIO operations

Refer to the appropriate Strato Pi or Iono Pi board user guide for detailed instructions.

Replacing the RTC backup battery

Both the Strato Pi and the Iono Pi boards have a hardware real time clock with a dedicated 
long-life non-rechargeable back-up battery.

The battery is only used to power the RTC chip when power is not available (when the 
Raspberry Pi is off). Depending on operating conditions it should last up to two years if not 
powered, more if the board receives external power.

Refer to the appropriate Strato Pi or Iono Pi board user guide for detailed instructions on 
replacing the RTC backup battery.

11

User Guide

Summary of Contents for Iono Pi Touch

Page 1: ...Display Kit User Guide November 2019 Revision 011 SPTM20XP Strato Pi Mini Touch Display Kit SPTB30XP Strato Pi Base Touch Display Kit SPTU30XP Strato Pi UPS Touch Display Kit IPTB20RP Iono Pi Touch Di...

Page 2: ...7 Features 8 Usage and connections 10 Hardware installation 10 microSD installation 10 Power supply 11 Wiring and GPIO operations 11 Replacing the RTC backup battery 11 Software installation 12 Techni...

Page 3: ...ities and weapons systems The kit is neither designed nor intended for use in critical military or aerospace applications or environments and for automotive applications or environment Customer acknow...

Page 4: ...this product Hazard levels This manual contains information you must observe to ensure your personal safety and prevent damage to property Safety information in this manual are highlighted by the safe...

Page 5: ...ety standards guidelines specifications and regulations for installation wiring and operations of this product The Raspberry Pi board could generate a substantial amount of heat when the software forc...

Page 6: ...ction for instructions Do not throw lithium batteries into fire do not solder on the cell body do not recharge do not open do not short circuit do not reverse polarity do not heat above 100 C and prot...

Page 7: ...t based on the Raspberry Pi computer board the Raspberry Pi 7 Touch Display and the Strato Pi board Mini Base or UPS version or the Iono Pi board enclosed in a rugged high quality aluminium and steel...

Page 8: ...omposed of Pi Touch Display Mechanical Kit XPTM10X Raspberry Pi version 3 model B Raspberry Pi Touch Display Strato Pi board SPBM20X SPBB30X or SPBU30X or Iono Pi board IPBB20R Optional Wall Mount Bac...

Page 9: ...r acoustic feedback hardware watchdog implemented in the Strato Pi board fully independent from the Raspberry Pi controlled via the GPIO pins of the Raspberry Pi board integrated boot loader for the S...

Page 10: ...pins of the Raspberry Pi board on board LED for battery operations status With Iono Pi board 9 28Vdc power supply with surge and reverse polarity protection and 2 2A resettable fuse 4 power relay outp...

Page 11: ...ional back box is also available for in wall installations Before opening the case disconnect all power sources any connection to external devices including USB cables and disconnect the UPS external...

Page 12: ...the mounting screws on the sides pay attention not to damage the boards connectors and internal cables 10 Screw the two lock nuts Power supply The Pi Touch Display Kit can be powered with DC voltage...

Page 13: ...tions Before opening the case disconnect all power sources any connection to external devices including USB cables and disconnect the UPS external battery Use a non conductive pin or small tool to hel...

Page 14: ...onnected 530mA w o Ethernet and battery 550mA with Ethernet and battery Actual current consumption may vary based on working conditions Typical current consumption at VS 24V including Raspberry Pi 3 c...

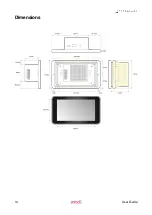
Page 15: ...Dimensions 14 User Guide...

Page 16: ...to gain access to the circuit board Always remove the battery before disposing of this product Installation and use restrictions Standards and regulations The design and the setting up of electrical...

Page 17: ...ial requirements of the 2011 65 EU and 2015 863 EU RoHS directives and harmonised standard The declaration of conformity is available on the Internet at the following address https dev sferalabs cc pi...

Reviews: