Installing the Real Time Clock software
The RTC is based on the Microchip MCP79410 module and is connected to the Raspberry
Pi via its I
2
C serial bus.
Before downloading the installation utility, you should enable I
2
C and install the “i2c-tools”
package.
To enable I
2
C, run the “raspi-config” configuration utility:
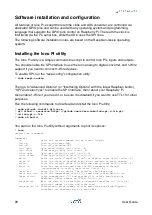
$
sudo raspi-config
Then go to “Advanced Options” (or “Interfacing Options” with the latest Raspbian builds),
“I2C” and select “yes” to enable the I
2
C interface, then reboot your Raspberry Pi.
To install the “i2c-tools” package:
$
sudo apt-get update
$
sudo apt-get install i2c-tools
With these prerequisite installs completed, you should download and run Iono Pi’s RTC
installation script:
$
cd
$
wget http://sferalabs.cc/files/strato/rtc-install
$
chmod 755 rtc-install
$
sudo ./rtc-install
If the script completes with no errors, delete the installation script and reboot:
$
rm rtc-install
$
sudo reboot
Testing the Real Time Clock
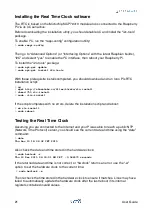
Assuming you are connected to the Internet and your Pi was able to reach a public NTP
(Network Time Protocol) server, you should see the current date and time using the “date”
command:
$
date
Thu Dec 10 18:02:32 CET 2015
Also check the date and time stored in the hardware clock:
$
sudo hwclock -r
Thu 10 Dec 2015 06:03:01 PM CET -0.546570 seconds
If the returned date and time is not correct, or “hwclock” returns an error, use the “-w”
option to set the hardware clock to the current time:
$
sudo hwclock -w
Then recheck the time stored in the hardware clock to ensure it matches. Linux may have
failed to automatically update the hardware clock after the last reboot if its internal
registers contained invalid values.
21
User Guide

