background image


25/11/2019 

LEAK INDICATING UNIT 

LAE 3-8


- 3 - 

1. General 

1.1 Information 

These instructions provide important information on how to use the 
LAE 3-8 indicating unit. The pre-requisite for workplace safety is the 
adherence to all safety and handling instructions specified in this 
manual. 

Furthermore, any local regulations for prevention of accidents that are 
applicable at the site of use of the indicating unit and general safety 
instructions must be complied with. 

1.2  Explanation of Symbols 

In these instructions, warnings are marked with the adjacent symbol.  

The signal word expresses the level of hazard. 

DANGER:


Imminently hazardous situation which, if not avoided, will result in 
death or serious injury. 

WARNING: 

Potentially hazardous situation which, if not avoided, could result in 
death or serious injury. 

CAUTION:


Potentially hazardous situation which, if not avoided, could result in 
minor or moderate injury. 

Information:


Highlights useful tips, recommendations, and information. 

1.3  Limitation of Liability 

All information and instructions in this documentation have been 
compiled considering the applicable standards and regulations, the 
state of the art, and our longstanding experience. 

SGB does not assume any liability in the case of: 

  Noncompliance with these instructions 

 Improper 

use 

  Use by unqualified personnel 

 Unauthorized 

modifications 

  Connection to systems not approved by SGB 

1.4 Copyright 

The contents, texts, drawings, images, and other representations are 
copyrighted and subject to industrial property rights. Any misuse is 
punishable. 

1.5 Warranty 

Conditions 

We provide warranty for the LAE 3-8 indicating unit for a period of 24 
months from the day of installation on site in accordance with our 
General Terms & Conditions. 

The maximum warranty period is 27 months from the date of sale. 

General 


Summary of Contents for LAE 3-8

Page 1: ...Documentation Indicating unit LAE 3 8 for VLX A Ex Read instructions prior to commencing any work As of 11 2019 Art No 605 622...

Page 2: ...ral Data 3 2 Electrical Data 3 3 Field of Application 4 Design and Function 8 4 1 Design 4 2 Displays and Controls 4 3 Alarm 5 Mounting the System 11 5 1 Basic Instructions 5 2 Mounting the Indicating...

Page 3: ...ry CAUTION Potentially hazardous situation which if not avoided could result in minor or moderate injury Information Highlights useful tips recommendations and information 1 3 Limitation of Liability...

Page 4: ...w the leak detector Conditions from Chap 3 3 Field of Application must be adhered to The power supply cannot be disconnected Any claims arising from misuse are excluded 2 2 Obligation of the Operating...

Page 5: ...assembly commis sioning and maintenance of leak detection systems 2 4 Personal Protective Equipment PPE Personal protective equipment must be worn during work Wear necessary protective equipment for...

Page 6: ...Data Power supply 100 to 240 V AC 50 60 Hz Power input 44 W Terminals60 27 61 28 62 Potential free outputs max 1 5 A for 220 V DC 250 V AC 3 3 Field of Application 3 3 1 General use The indicating uni...

Page 7: ...LX A Ex type tools can be mounted within the Ex area and are electrically connected to the indicating unit mounted outside the Ex area A tool is connected to one indicating unit board at a time The in...

Page 8: ...al strip power supply VLX A Ex 1 8 31 3 Terminal strip signal circuit VLX A Ex 1 8 31 4 Terminal strip potential free contacts for alarm forwarding 1 8 31 5 Terminal strip 24 volt for alarm forwarding...

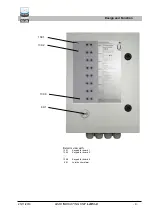
Page 9: ...5 11 2019 LEAK INDICATING UNIT LAE 3 8 9 Exterior view with 139 1 Keypad for board 1 139 2 Keypad for board 2 139 8 Keypad for board 8 69 1 Joint buzzer alarm Design and Function 139 1 139 2 139 8 69...

Page 10: ...Function Turn off audible alarm signal Briefly press the Mute button once the acoustic signal turns off and the red LED flashes No function 4 3 Alarm In the event of an alarm acknowledge the audible...

Page 11: ...Chap 7 5 3 Electrical Cables Mains connection LAE and power supply for VLX A Ex tool 5 wire 1 5 mm2 without ferrule or with ferrule without plastic collar Potential free relay contacts 6 wire 1 5 mm2...

Page 12: ...n in the case of alarm and power failure 60 62 As above but contacts closed 63 23 64 24 Channel 2 no function 63 65 As above no function 66 25 67 26 Channel 3 no function 66 68 As above no function 4...

Page 13: ...for serial data transfer 1 8 24 3 Fuse F3 100 mA fuse for switching power supply 141 Terminal strip for keypad 1 8 31 1 Terminal strip mains power supply 230 V AC 31 2 Terminal strip mains power suppl...

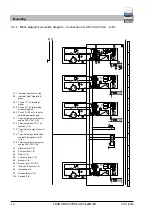
Page 14: ...24 V DC 71 Sound off switch 1 8 86 Indicating unit 87 Leak detector 1 8 139 Keypad 1 8 51 51 51 51 52 52 52 52 53 53 53 53 53 53 53 53 54 54 54 54 54 54 54 54 11 11 11 11 60 60 60 L1 L1 N N PE 60 7 7...

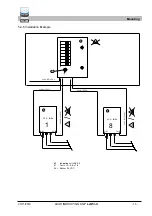
Page 15: ...Installation Example 86 Indicating unit LAE 3 8 87 Tool VLX A Ex 1 8 96 1 Buzzer 24 V DC Mounting 87 86 87 Ex 230 V AC 50 Hz Ex Ex Ex Ex pot frei 51 52 pot frei 51 52 1 8 51 52 51 52 54 53 54 53 VLX...

Page 16: ...Operation indicator lights up 6 Determination of the audible alarm for the individual connected channels For this purpose establish the alarm status at the re spective connected devices probes or ser...

Page 17: ...25 11 2019 LEAK INDICATING UNIT LAE 3 8 17 7 Dimensions and Drilling Pattern Dimensions and Drilling Pattern 295 400 260 360 7 8...

Page 18: ...n shall lose its validity Number short title Satisfied regulations 2014 30 EU EMC Directive EN 61000 6 3 2007 A1 2011 EN 61000 6 2 2005 EN 61000 3 2 2014 EN 61000 3 3 2013 2014 35 EU Low voltage Direc...

Page 19: ...25 11 2019 LEAK INDICATING UNIT LAE 3 8 19 10 T V Nord certification Certification...

Page 20: ...019 20 Text Text Legal notice SGB GmbH Hofstr 10 57076 Siegen Germany Phone 49 271 48964 0 E mail sgb sgb de Web www sgb de Photos and sketches are not binding for the scope of delivery Subject to cha...

Reviews: