background image

Page  14  of  40

METER - 

local operator interface (LOI) - VL601

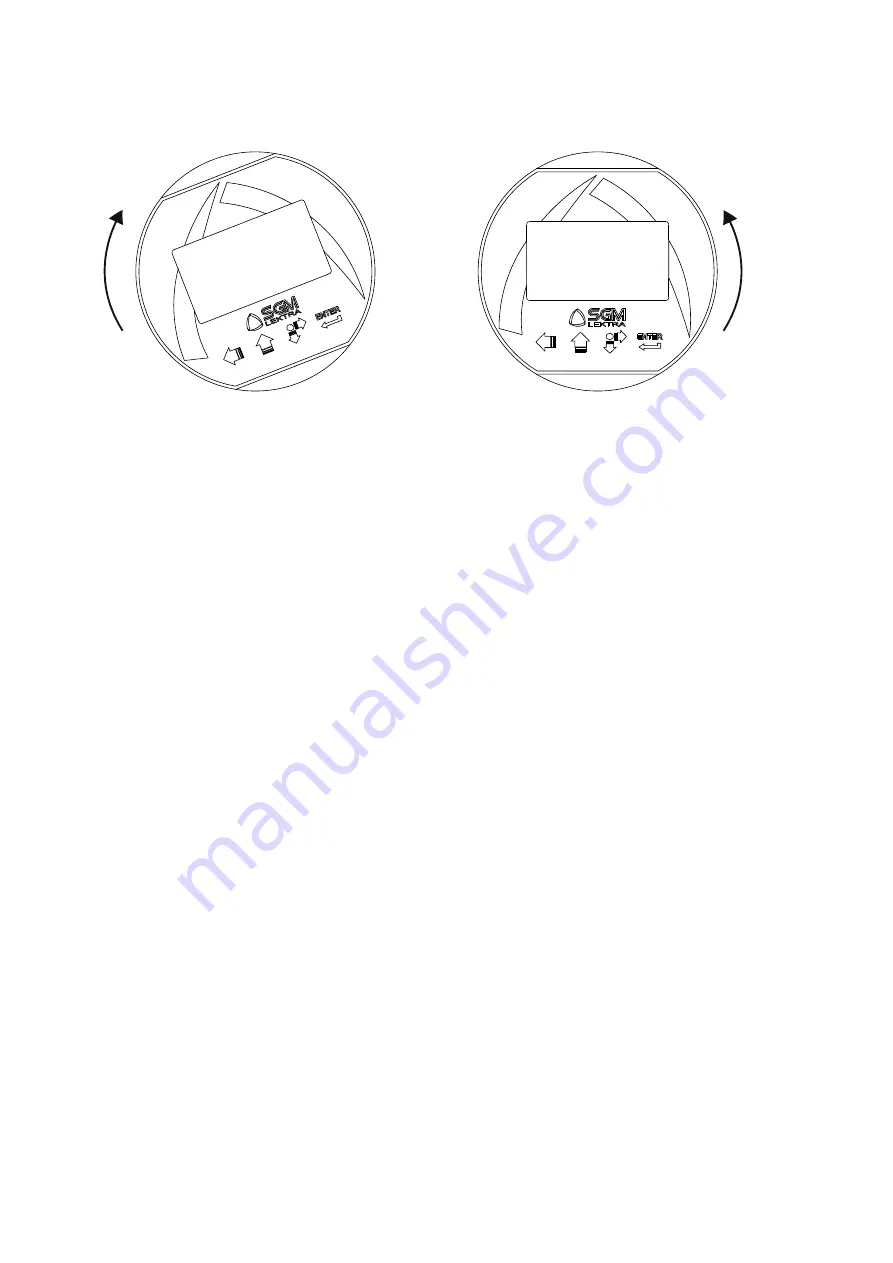
The VL601 programming module can be mounted and removed from the METER without affecting the unit operation. 

Unscrewing the cap, the VL601 module can be mounted (by clockwise rotation until it clicks) or dismounted (by rotation 

counterclockwise) as shown in fi gure.

LOCK

UNLOCK

Summary of Contents for METER

Page 1: ...METER ultrasonic level transmitter technical documentation EN Rev P ...

Page 2: ...CT 3 PERFORMANCE SPECIFICATIONS 4 DIMENSIONS 5 INSTALLATION 6 ELECTRICAL CONNECTIONS 7 LOCAL OPERATOR INTERFACE LOI VL601 8 QUICK SETUP 9 ADVANCED SETUP 10 FACTORY TEST AND QUALITY CERTIFICATE pag 3 pag 4 pag 5 pag 6 pag 7 pag 11 pag 13 pag 15 pag 23 pag 40 ...

Page 3: ...inal term of guarantee whereas if the Product is replaced it will have 12 twelve months of guarantee The warranty will be null if the Client modifies repair or uses the Products for other purposes than the normal conditions foreseen by instructions or Contract In no circumstances shall SGM LEKTRA be liable for direct indirect or consequential or other loss or damage whether caused by negligence on...

Page 4: ...r 2 1 IDENTIFICATION Each meter has an adhesive identifi cation plate on which are the meter main data The following picture describes the information and data on the identifi cation plate METER1F4D 24Vdc 20 30Vdc MU0081604506 2 3 1 Mod P S S N 1 2 3 4 1 Product code 3 Serial number 2 Power supply ...

Page 5: ...s Analog output 4 20mA max 750ohm 4 wires versions Relays output 4 wire only n 2 3A 230Vac n o Digital communication MODBUS RTU for 4 wire vers opt HART for 2 wire vers Max measure range max 0 25 6m max 0 40 10m In case of non perfectly reflecting surfaces the maximum distance value will be reduced Blind distance 0 25m 6m versions 0 40m 10m versions Temperature compensation digital from 30 to 80 C...

Page 6: ...Page 6 of 40 4 DIMENSIONS METER dimensions 4 1 MECHANICAL DIMENSIONS ...

Page 7: ...nstall the sensor near the load zone a Make sure that in the sensor emission beam lobe α there are no obstacles f s that can be intercepted as level Make sure that there is not foam presence on the product surface to be measured 5 1 2 Blind distance During installation is important to remember that in the sensor vicinity there is a blind zone or BLIND DISTANCE of 0 25m for 6m max METER range or 0 ...

Page 8: ... from the bottom nozzle 10mm METER can be installed in an extension pipe to turn away the sensor from the maximum level point The exten sion pipe must be flat and without joints welds etc also the pipe terminal part must be cut at 45 and with the borders without burr METER 6mt METER 10mt D mm Lmax mm D mm Lmax mm 57 180 80 240 80 240 100 300 100 300 D L ...

Page 9: ...the liquid surface of floating bodies can be avoided with the use of level measurement inside of pipes by pass pipe or calm pipe with 57mm min diameter The pipe must have a length greater or equal than the empty distance also must have some of vent holes to allow the pipe regular filling and emptying In the programming menu to the PRODUCT parameter must select the LIQUID PIPE option Foam Internal ...

Page 10: ... sensor programming parameters FILTER this parameter is present in the Quick Setup menu and in the Advanced Configuration SETUP menu increasing the parameter value decreases the sensor sensitivity to the level measurement sudden variations F WINDOW this parameter is present in theAdvanced Configuration SERVICE menu decreasing the parameter programmed value increases the sensor immunity to false ec...

Page 11: ...rough the glands 4 Do not use sleeves terminals because they might interfere with the VL601 module insertion 5 Close the cap and tighten the cable glands 6 2 HUMIDITY INFILTRATIONS To avoid the humidity infiltration inside the housing is recommended for electrical connections use a cable with a 6 12mm outer diameter and fully tighten the M20 cable gland fully tighten the cap position the cable so ...

Page 12: ...electing the UID address the METER transmitters in MODBUS RTU network read on your PC monitor all measures in reading and METER operation data programming all METER configuration parameters storing on files data logger function METER measures in reading and operating states 1 2 3 USB RS485 6 3 2 2 wires METER HART Hand Held connection or HART PC MODEM 1 METER __ METER0__ METER2__ METER7__ with HAR...

Page 13: ...eters the configuration is done by setting a value eg in the SET DISTANCE 4mA parameter is possible to change the the corresponding distance value in mm press to select the digit to be modified the digit is highlighted in inverse press to change the high lighted digits number press to save the set value and exit automatically Press to exit without storing LEFT ARROW button Exit configuration Back ...

Page 14: ...01 programming module can be mounted and removed from the METER without affecting the unit operation Unscrewing the cap the VL601 module can be mounted by clockwise rotation until it clicks or dismounted by rotation counterclockwise as shown in figure LOCK UNLOCK ...

Page 15: ...ameter Default Values 6000mm 6mt max range 10000mm 10mt max range Liquids 20 250mm 6mt max range 400mm 10mt max range Distance mm 0mm Disabled RL1 0mm Disabled RL2 300mm 6mt max range 500mm 10mt max range METER quick setup 8 QUICK SETUP 8 2 QUICK SETUP MODE From RUN mode press ENTER to access the Quick Setup menu Select the parameters by moving the cursor with SCROLL and confirm with ENTER press L...

Page 16: ...NT BLIND DISTANCE DISPLAY RL1 THRESHOLD RL2 THRESHOLD 3500 mm SET DISTANCE 4mA 8 2 2 SET DISTANCE 20mA Press ENTER to display the distance value associated with 20mA output Use SCROLL and UP ARROW to modify that value in the example the 20mA distance is 500mm Press ENTER to confirm SET DISTANCE 4mA SET DISTANCE 20mA MEDIUM FILTER COEFFICENT BLIND DISTANCE DISPLAY RL1 THRESHOLD RL2 THRESHOLD 0500 m...

Page 17: ...isplay the previous setting Press SCROLL to select the medium type Press ENTER to confirm SET DISTANCE 4mA SET DISTANCE 20mA MEDIUM FILTER COEFFICENT BLIND DISTANCE DISPLAY RL1 THRESHOLD RL2 THRESHOLD LIQUIDS SOLIDS LIQUIDS PIPE MEDIUM LIQUIDS SOLIDS LIQUIDS PIPE ...

Page 18: ... to 99 1 maximum speed 99 maximum slowness The function is deactivated with 0 immediate response Press ENTER to confirm SET DISTANCE 4mA SET DISTANCE 20mA MEDIUM FILTER COEFFICENT BLIND DISTANCE DISPLAY RL1 THRESHOLD RL2 THRESHOLD 20 FILTER COEFFICENT Fast resp 5 10 Normal resp 20 Slow resp 40 100 METER quick setup ...

Page 19: ...s or 400mm 10m max vers SET DISTANCE 4mA SET DISTANCE 20mA MEDIUM FILTER COEFFICENT BLIND DISTANCE DISPLAY RL1 THRESHOLD RL2 THRESHOLD 0250 mm BLIND DISTANCE 8 2 6 DISPLAY Press ENTER to access the settings change With the SCROLL button is possible to select the data to display Press ENTER to confirm SET DISTANCE 4mA SET DISTANCE 20mA MEDIUM FILTER COEFFICENT BLIND DISTANCE DISPLAY RL1 THRESHOLD R...

Page 20: ...COEFFICENT BLIND DISTANCE DISPLAY RL1 THRESHOLD RL2 THRESHOLD 0700 mm RL1 THRESHOLD When confirming with the ENTER button the maximum level threshold value storage in the example 700m the METER activates RL1 with the following default settings for level alarm threshold 1 MIN MAX MAX maximum level alarm 2 DELAY 0 sec no switching delay 3 SECURITY YES relay de energized and contact open during the m...

Page 21: ...Alarm Min level alarm zone 3000mm METER reference point RL2 THRESHOLD RL2 MIN LEVEL ALARM HYSTERESIS When confirming with the ENTER button the maximum level threshold value storage in the example 3000mm the METER activates RL2 with the following default settings for level alarm threshold 1 MIN MAX MIN minimum level alarm 2 DELAY 0 sec no switching delay 3 SECURITY YES relay de energized and contac...

Page 22: ...ify any false echo signals that may cause measurement errors 1 5 4 3 2 m D 721mm G 020 57 2KHz The rectangle placed at the echo line base indi cates the measurement range within which the echo signal in reception is considered always valid for the distance measurement This interval value is variable depending on the measurement conditions min 2 5 of the measured distance Echo signal normalization ...

Page 23: ...SABLE VALUE MIN MAX 0000mm DELAY 00 s NO YES DISABLE ENABLE UPPER LOWER DELAY FILL EMPT ENABLE DISABLE RL1 PUMP DISABLE ENABLE EMPTING FILLING VALUE 0000mm VALUE 0000mm DELAY 00 s DISABLE ENABLE RL2 DIAGNOSTIC MIN MAX HYSTERESIS mm MIN MAX HYSTERESIS mm 040 mm 9 2 SETUP From RUN mode holding down UP ARROW press ENTER to the ad vanced configuration mode access Press SCROLL to select the menu and pr...

Page 24: ...4mA ACTUAL LEV 20mA RELAYS 9 2 3 MEDIUM Position the cursor on MEDIUM press ENTER to access 3 configurations are possible LIQUIDS liquids measurement SOLIDS granular solids measurement LIQUIDS PIPE liquids measurement in pipe reference Press SCROLL to select the product type Press ENTER to confirm LEFT ARROW to exit without changes Default value LIQUIDS LIQUIDS SOLIDS LIQUIDS PIPE MEDIUM SET DISTA...

Page 25: ... cursor on ACTUAL LEV 4mA press ENTER to access Self distance learning function that is associated with the 4mA lower val ue Make sure that the level corresponds to 0 ENTER to associate the actual measure with 4mA output value OK TO CONFIRM LEFT ARROW to exit without changes SET DISTANCE 4mA SET DISTANCE 20mA MEDIUM FILTER COEFFICIENT BLIND DISTANCE ACTUAL LEV 4mA ACTUAL LEV 20mA RELAYS 9 2 7 ACTU...

Page 26: ... MIN MAX DELAY SAFETY ANABLE DISABLE MIN MAX HYSTERESIS 9 2 8 1 2 MIN MAX Position the cursor on VALUE press ENTER to access It s possible to select if the relay works as maximum level threshold or minimum level threshold With the SCROLL button you can select the operation mode Press ENTER to confirm LEFT ARROW to exit without changes Default value MAX for RL1 MIN for RL2 VALUE MIN MAX DELAY SAFET...

Page 27: ...ess ENTER to confirm LEFT ARROW to exit without changes Default value YES VALUE MIN MAX DELAY SAFETY ANABLE DISABLE MIN MAX HYSTERESIS NO YES 9 2 8 1 5 ENABLE DISABLE Position the cursor on ENABLE DISABLE press ENTER to access Select ENABLE to activate relay threshold Select DISABLE to not activate relay threshold With the SCROLL button you can select the operation mode Press ENTER to confirm LEFT...

Page 28: ... resents the pump starting point EMPTY case or pump stopping point FILLING case Use UP ARROW and SCROLL to modify the value Press ENTER to confirm LEFT ARROW to exit without changes Default value 0 UPPER LOWER DELAY FILL EMPT ENABLE DISABLE 0900 mm VALUE 9 2 8 2 2 LOWER Position the cursor on LOWER press ENTER to access The lower threshold is expressed in mm distance from the sensor Rep resents th...

Page 29: ...ut changes Default value EMPTING UPPER LOWER DELAY FILL EMPT ENABLE DISABLE DISABLE ENABLE 9 2 8 3 RL2 DIAGNOSTIC Position the cursor on RL2 DIAGNOSTIC press ENTER to access If it becomes necessary the METER functional control it s possible to ena ble the RL2 alarm output function In this case enabling the function RL2 is energized in normal operation RL2 LED on and is de energized LED RL2 off saf...

Page 30: ...VALUES LCD CONTRAST WELCOME TEXT SETUP DISPLAY DIAGNOSTIC SERVICE INFO 9 4 1 DISPLAY VALUES Position the cursor on DISPLAY VALUES press ENTER to access It s possible to select if one value with big digits or two values are shown on the display in RUN mode Select the parameters by moving the cursor with SCROLL and confirm with ENTER LEFT ARROW to exit without changes DISPLAY VALUES LCD CONTRAST WEL...

Page 31: ...MARY VALUE SECONDARY VALUE METER advanced configuration DISTANCE mm LEVEL mm LEVEL OUTPUT mA TEMPERATURE C PRIMARY VALUE SECONDARY VALUE DISTANCE mm LEVEL mm LEVEL OUTPUT mA TEMPERATURE C 9 4 2 LCD CONTRAST Position the cursor on LCD CONTRAST press ENTER to access it s possible to adjust the contrast of LCD simply increasing or decreasing the value of a parameter from 0 to 63 Use UP ARROW and SCRO...

Page 32: ... METER during the ignition phase Use UP ARROW up scroll and SCROLL down scroll to change the digit ENTER to move the digit to the right To confirm press ENTER repeatedly until leave the parameter LEFT ARROW to exit without changes Default value SGM LEKTRA METER DISPLAY VALUES LCD CONTRAST WELCOME TEXT SGM LEKTRA METER WELCOME TEXT METER advanced configuration ...

Page 33: ...ect the parameters by moving the cursor with SCROLL and confirm with ENTER ALARM CONFIGURATION MEASURE STATUS FROZEN GAIN MAX GAIN TH PEAK VALUES OUTPUT SIMUL SETUP DISPLAY DIAGNOSTIC SERVICE INFO 9 6 1 ALARM CONFIGURATION Position the cursor on ALARM CONFIGURATION press ENTER to access To enable or disable each diagnostic alarms with UP ARROW or SCROLL chose the desired item and press ENTER with ...

Page 34: ...N MEASURE STATUS FROZEN GAIN MAX GAIN TH PEAK VALUES OUTPUT SIMUL 000 FROZEN GAIN 9 6 4 MAX GAIN TH Position the cursor on MAX GAIN TH press ENTER to access It s possible to change the max value of gain If the gain reaches this value the GAIN error code is activated Use UP ARROW and SCROLL to modify the value Press ENTER to confirm LEFT ARROW to exit without changes Default value 200 ALARM CONFIGU...

Page 35: ...ROW to return to the previous menu DISPLAY VALUES RESET VALUES 9 6 6 OUTPUT SIMULATION WARNING entering in the SIMULATION function the current output is not in function of the level measurement To restore the current as a measured level function press the LEFT ARROW button 3 times RUN mode Position the cursor on OUTPUT SIMULATION press ENTER to access It s possible to force the analog output to a ...

Page 36: ...ss ENTER to access It s possible to choose a analog output value during diagnostic errors 21 5 mA forces the current output to 21 5mA 3 85 mA forces the current output to 3 85mA HOLD LAST VALUE maintains the output at the last valid value With the SCROLL button you can select the operation mode Press ENTER to confirm LEFT ARROW to exit without changes Default value HOLD LAST VALUE OUTPUT SAFE MODE...

Page 37: ...rea where the echo reception is active Normally it is positioned around the real echo signal and all echoes detect ed within the F_WINDOW are deemed valid Example F_WINDOW parameter set to 5 The METER detects an echo signal which is 4 meters from the sensor Suddenly the echo signal disappears and a new echo signal to 3 5 mt away from the sensor is detected Each time the echo signal will be emitted...

Page 38: ...e METER default settings OUTPUT SAFE MODE SET UID LANGUAGE FREQUENCY F_WINDOW RESTORE SETTING OK TO CONFIRM 9 8 7 INFO menu INFO SGM LEKTRA METER FIRMWARE REV IC 9 8 8 INFO Position the cursor on INFO press ENTER to access In addition to information about the manufacturer are displayed the firmware revision and the configuration index SETUP DISPLAY DIAGNOSTIC SERVICE INFO FIRMWARE REV I C SGM LEKT...

Page 39: ...Page 39 of 40 ...

Page 40: ...ertify that the equipment is conform to the technical requirements on Technical Data and it is made in conformity to the procedure Quality Control Manager Production and check date Ultrasonic sensor LTH Electronics Ltd Chaul End Lane Luton Bedfordshire LU4 8EZ England Telephone 44 0 1582 593693 Fax 44 0 1582 598036 lo email sales lth co uk web www lth co uk ...

Reviews: