PAGE 9
PAGE 8
ASSEMBLY
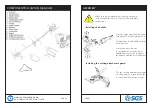
Installing the metal blade
• Place the collar ring (3) on the shaft
thread.
• Insert the key wrench (1) into the
gear case locking hole.
• Secure metal blade (4) between col-
lar ring (3) and washer (5).
• Place the washer (6)
• Screw the nut (7).
Installing the nylon line
• Place the collar ring (3)
on the shaft thread.
• Insert the key wrench (1)
into the gear case locking
hole.
• Screw the nylon spool (8)
on the shaft thread.
• Check the spool is secured tightly
ASSEMBLY
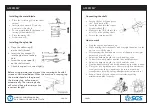
Connecting the shaft
• Loosen the knob (A) and press
the “Push”button (B).
• Insert the shaft into the connec-
tor and release (B).
• Make sure the (B) locks into the
hole (C) on the working shaft.
• Secure the turning nut (A).
How to work
• Start the engine and warm it up.
• While holding the front handle with your right hand, put on the
unit on your left shoulder.
• After passing the front handle to your left hand, put the right
harness on your shoulder.
• Adjust the harness length to a comfortable position.
• Connect the waist harness and the front middle harness.
• Adjust the harness length to a comfortable position.
• Grip the handles firmly with both hands using your whole hand.
• Place your feet slightly apart so that your weight is distributed
evenly across both legs, and always be sure to maintain a
steady stance, keeping cutting attachment below waist level.
• Keep all parts of your body away from rotating cutting
attachment and hot surfaces.
Before using trimmer head, mount the trimming knife with 3
screws as illustrated below. When the machine is running, tap
the trimmer head on the ground,
the trimmer line will come out
automatically. The trimming knife
will cut and keep the trimmer line
in correct length.
WWW.SGS-ENGINEERING.COM
CALL FOR ASSISTANCE:
01332 576 850


