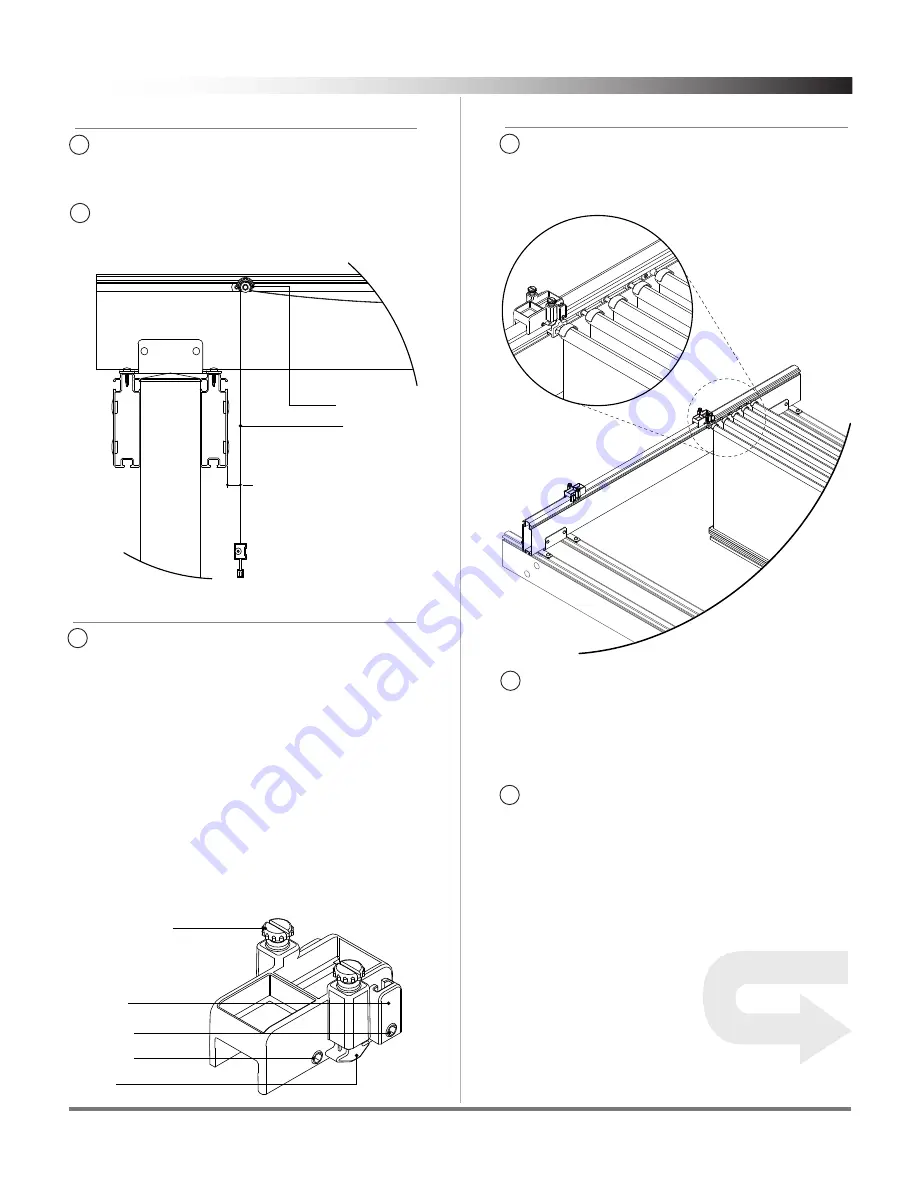
Step 17 - Locking canopies into position
A
Once the canopies are inserted, position the last cross-
member about 1” away from the inside of the header
beam as shown below.
B
Once positioned, tighten the set screw on the roller
lock pin using the supplied allen wrench
(J)
Roller lock pin
Drop handle
1 inch
Step 18 - Preparing the top lock brackets
A
Before installing the top lock brackets, use the adjust-
ing screw to adjust the tension. The recommended
tension setting procedure is to turn the adjustment
screw clockwise until it stops, and then back the
adjustment screw out six full revolutions. Use the
notch in the screw to count each revolution. Repeat
this procedure for each top lock bracket.
WARNING: The locking system is designed to release
the canopies in high winds to protect the canopies. The
adjusting screws can be used to adjust the tension. Do
not overtighten, as this could increase the chance for
canopy damage in high winds.
Adjustment screw
Set screw 1
Stop plate
Set screw 2
Plunger
Step 19 - Installing top lock brackets
A
Retract the canopies and position the top lock bracket
on top of the track and orient as shown in the figure
below
B
Once positioned, tighten set screw 1 on both sides of
the top lock bracket using the supplied allen wrench
(J).
Make sure that the top lock brackets are
completely pushed down on the track before tighten-
ing.
C
Tighten set screw 2 on both sides once again making
sure that the back end of the top lock is pushed down
onto the track before tightening.
STEP 19 CONTINUED ON NEXT PAGE
ShadeTree Cool Living, LLC
-
for questions or assistance, call
800-894-3801
8
ShadeTree Canopy Systems
Assembly Instructions
Basic Pergola - Freestanding


