background image

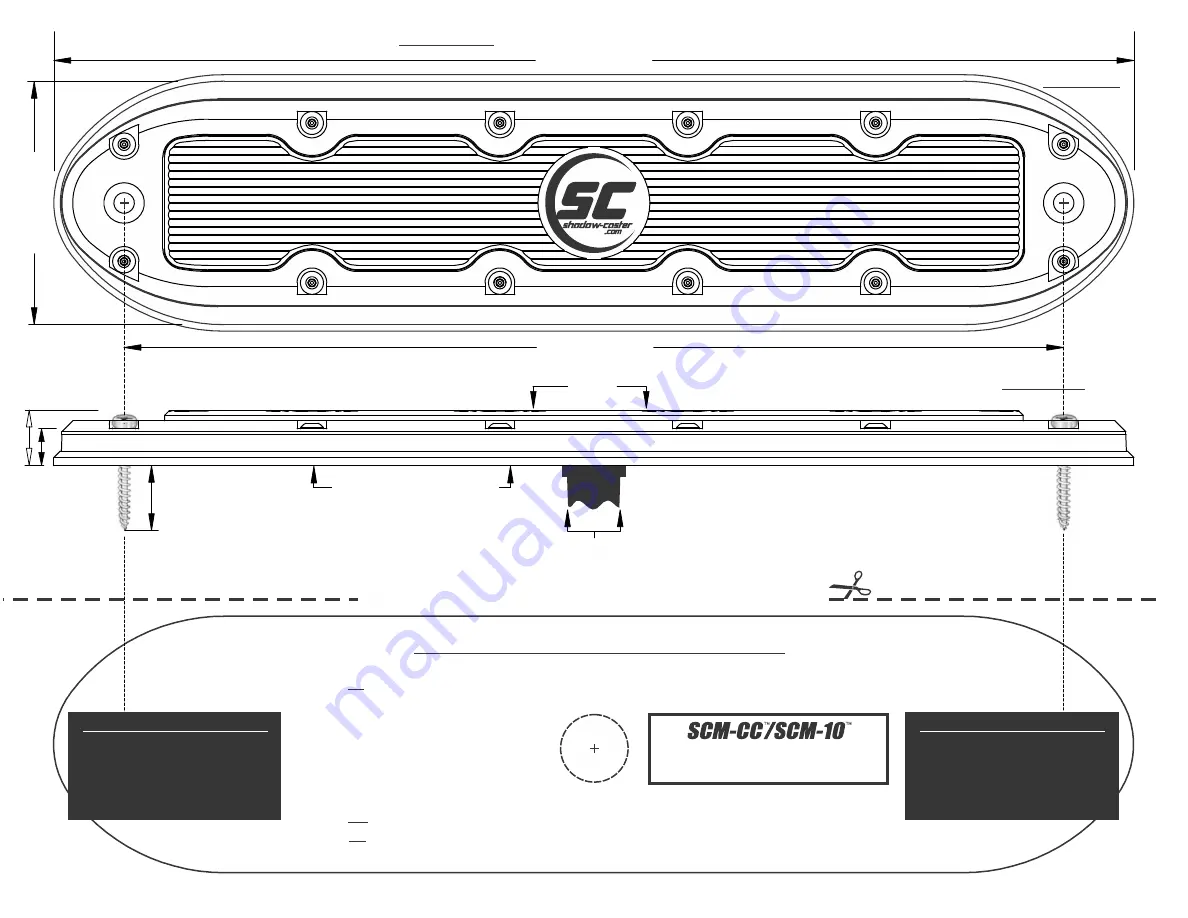
10.00” [254mm]

8.70” [221mm]

2.375” [60mm]

.5” [13mm]

Height

1” [25mm]

316 Stainless

Phillips Head

Self-Tapping

Screws

.35” [9mm]

1” (#8)

Stainless screw

Top

Top View

Side View

Bottom Base Plate

Installation Diagram


PLEASE READ INSTRUCTIONS INSIDE TEMPLATE

DO NOT USE TEMPLATE

TO MARK SCREW HOLES

DO NOT USE TEMPLATE

TO MARK SCREW HOLES

FOR CENTER WIRE HOLE USE THE FOLLOWING:

1st -  DRILL PILOT HOLE AT CENTER FOR THE WIRE, THEN USE 5/8” DRILL ALL THE
         WAY THROUGH

2nd - RUN WIRE THROUGH THE HOLE AND MARK ONE MOUNTING HOLE LOCATION

3rd -  FOLLOW STEPS ON FRONT OF SHEET FOR DRILLING MOUNTING HOLES

.5" [12.5mm]

Typical Power Requirements

3.5 Amps@12v

18 Gauge

Tinned Wire

Installation Diagram

TAPE

HERE

TAPE

HERE

SCM-CC / SCM-10 (10/13)

TAPE

HERE

TAPE

HERE

Scale 1:1 (If in doubt ask)

SCM-CC/SCM-10

WARNING!

 Do Not Use ACETONE To Clean The Polycarbonate Lens. Use Alcohol and Soft Cloth.


WHEN PRE-DRILLING SCREWS:

FIRST PRE-DRILL

CENTER HOLE AND RUN

WIRE. THEN MARK YOUR

SCREW HOLES WITH DRILL BIT

OR PENCIL WHILE USING
ACTUAL LIGHT HOUSING

WHEN PRE-DRILLING SCREWS:

FIRST PRE-DRILL

CENTER HOLE AND RUN

WIRE. THEN MARK YOUR

SCREW HOLES WITH DRILL BIT

OR PENCIL WHILE USING
ACTUAL LIGHT HOUSING

Summary of Contents for Color-Caster SCM Series

Page 1: ...oggling the Power Switch will cycle through the available colors in the sequence of Blue White Green and Red When the power is turned off for more than 10 seconds the lights will reset and return to the Blue Color State Push Button The push button interface requires the installation of apush button switch This will access the additional features listed below Shadow Caster provides a marine grade O...

Page 2: ...ARK ONE MOUNTING HOLE LOCATION 3rd FOLLOW STEPS ON FRONT OF SHEET FOR DRILLING MOUNTING HOLES 5 12 5mm Typical Power Requirements 3 5 Amps 12v 18 Gauge Tinned Wire Installation Diagram TAPE HERE TAPE HERE SCM CC SCM 10 10 13 TAPE HERE TAPE HERE Scale 1 1 If in doubt ask SCM CC SCM 10 WARNING Do Not Use ACETONE To Clean The Polycarbonate Lens Use Alcohol and Soft Cloth WHEN PRE DRILLING SCREWS FIRS...

Page 3: ... in the center hole location only Shown on template If mounting to an aluminum hull use a foam or rubber spacer for galvanic isolation to prevent corrosion For more information visit us at www shadow caster com Feed the cable through the hull into the boat 6 With the light against the hull in the location to be mounted use the actual mounting holes of the light to mark one mounting hole Drill that...

Page 4: ...nd rinsed every time the boat is pulled out ofthe water to prevent marine growth buildup and biofouling Shadow Caster Marine LED lights are constructed with the highest quality stainless steel However minimal staining can occur If staining does occur apply naval jelly per manufacturers Instructions For additional maintenance tips refer to our website www shadow caster com Do not use acetone becaus...

Page 5: ... Before returning any product for repair customers are required to contact Shadow Caster at 727 474 2877 for a RMA Return Merchandise Authorization number THIS LIMITED WARRANTY DOES NOT EXTEND TO ANY PRODUCTS WHICH HAVE BEEN DAMAGED AS A RESULT OF ACCIDENT MISUSE ABUSE such as use of incorrect input voltages improper or insufficient ventilation improper installation failure to follow the operating...

Page 6: ...n the registration directions sheet in the product s packaging This number is also on the product If you cannot find this serial number please contact Shadow Caster at 727 474 2877 2 Visit our website at www shadow caster com 3 On the top menu bar of the home page you will see a contact us drop down tab Hover over this tab and click on the product registration tab 4 Fill out the required fields on...

Page 7: ...shadow caster com 3 On the top menu bar of the home page you will see a Support drop down tab Hover over this tab and click on the product registration tab 4 Fill out all required fields on the page 5 When you are done filling out the required fields click the send button at the bottom of the page This will validate the registration 6 If you have any question please contact customer support at 727...

Reviews: