background image


U80II User’s Manual


- 5 - 

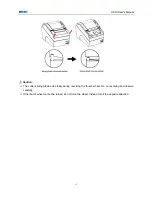
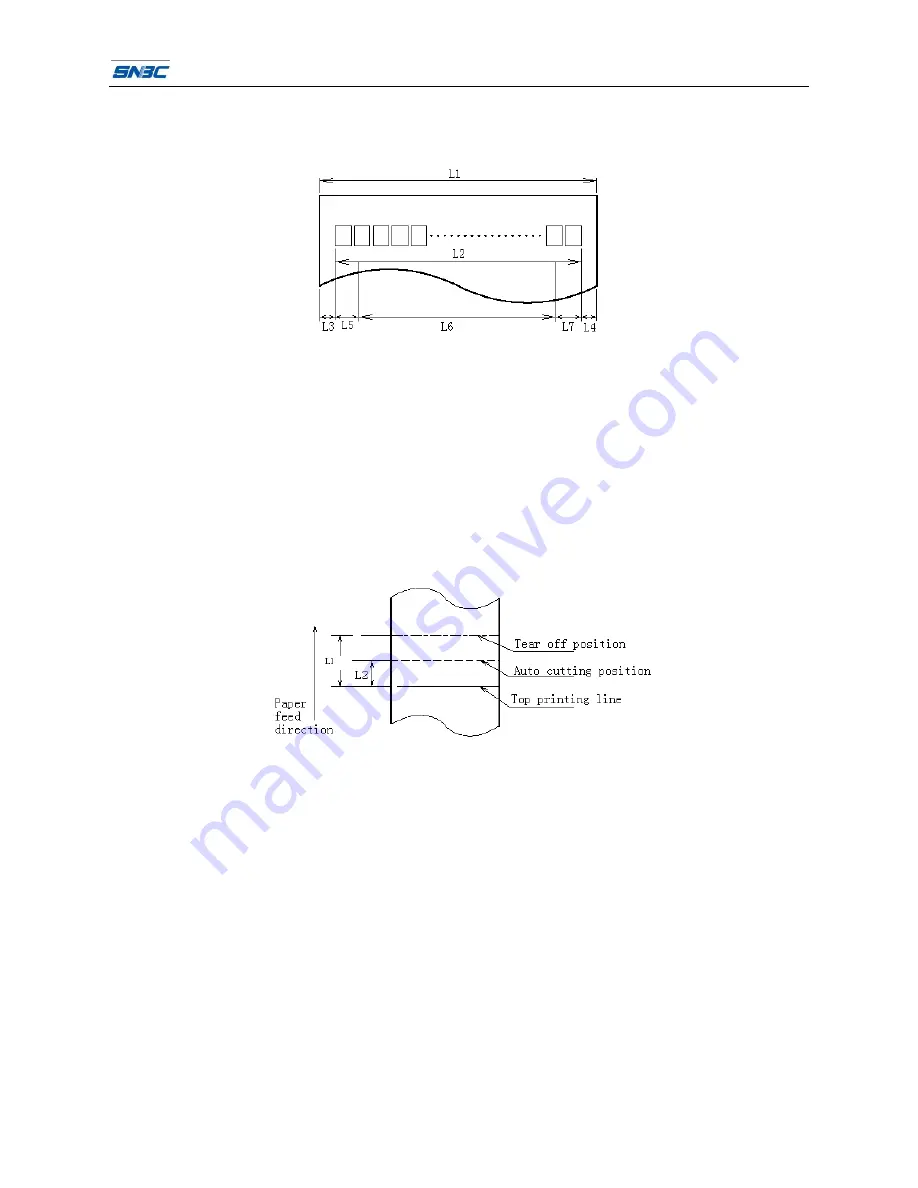
2.4 Print and tear off position 

2.4.1 Print position 


z

  L1: Paper holder width: 83.5±0.5mm 

z

  L2:Max Print width: 72mm 

z

  L3: Distance between left end of print-head and left side of paper house (Fixed) 1.75±1mm 

z

  L4:Distance between right end of print-head and right side of paper house(Fixed) 1.75±1mm 

z

  L5: Left margin (default:0mm)   

z

  L6: Print area width. Can set by command (See Programming Manual) 

z

  L7: Right margin (default: 0mm)   

2.4.2 Tear off position 


L1 (Distance between Top printing line and Tear off position): about 28mm   

L2 (Distance between Top printing line and Auto cutting position): about 11.6mm 

Summary of Contents for U80II

Page 1: ...USER S MANUAL Receipt Printer U80II Shandong New Beiyang Information Technology Co Ltd...

Page 2: ...ess written permission of SNBC Copyright Copyright 2014 by SNBC Printed in China Version 1 0 Trademarks Our registered trademarks Warning and Caution Warning Items shall be strictly followed to avoid...

Page 3: ...ndensation do not turn on the power until it has completely evaporated 7 Connect the DC adapter to an appropriate grounding outlet Avoid sharing a single electrical with large power motors and other d...

Page 4: ...omponents 6 3 1 Outline and Parts 6 3 2 Error LED and Buzzers 7 3 2 1 Error LED 7 3 2 2 Description of LED and Error Status 7 4 Installation 8 4 1 Unpacking 8 4 2 Printer installation 8 4 3 Connecting...

Page 5: ...ce Signal 14 6 1 Parallel interface 14 6 2 RS 232 serial interface 15 6 3 USB interface 15 6 4 Ethernet interface 15 6 5 Power interface definition 16 6 6 Cashdrawer interface signal definition 16 7 T...

Page 6: ...interface USB Ethernet and is available for WINDOWS 2000 XP Server 2003 VISTA WIN7 WIN8 Server2008 and Linux 1 2 Features Low noise high printing speed Easy paper loading Easy use and maintenance Mark...

Page 7: ...PDF417 QR Fonts Type Font A 12 24 Font B 9 17 kanji 24 24 Kanji Font B 16 x 16 Characters 95 Alphanumeric 13 types International characters Traditional Simplified Chinese Japanese Korean optional Com...

Page 8: ...s min Max Paper type 0 06 0 08mm Thermal paper or paper with the same thickness Operation voltage 24VDC Max dynamic current 1 5A 24VDC Cutter lifetime 1500 000 cuts reference paper with thickness of 0...

Page 9: ...r under high temperature high humidity and strong light conditions 2 3 2 Mark paper In mark paper mode U80II determines the cut position and the initial printing position by referencing the position o...

Page 10: ...ouse Fixed 1 75 1mm z L4 Distance between right end of print head and right side of paper house Fixed 1 75 1mm z L5 Left margin default 0mm z L6 Print area width Can set by command See Programming Man...

Page 11: ...ns ERROR LED is always off Under some error conditions e g paper end ERROR LED will flash c Feed button 3 Feed paper function Printer will feed paper when the FEED BUTTON is pressed down under normal...

Page 12: ...f the printer and should be kept with the printer 3 2 Error LED and Buzzers 3 2 1 Error LED LED Status Description Power Indicator Green POWER On Printer is powered on Off Printer is powered off Error...

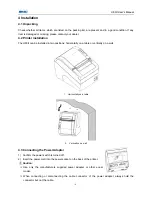
Page 13: ...d in two positions horizontally on a table or vertically on a wall 1 Horizontally on a table 2 Vertically on a wall 4 3 Connecting the Power Adapter 1 Confirm the power switch is turned off 2 Insert t...

Page 14: ...allel interface 3 Connect the other end of the interface cable to the host 4 5 Connecting the Cash Drawer 1 Confirm the printer power is turned off 2 Insert the cash drawer cable into the cash drawer...

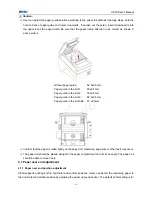
Page 15: ...de in the slot 2 76 0 5mm Paper guide in the slot 3 69 5 0 5mm Paper guide in the slot 3 4 57 0 5mm Confirm that the paper is rolled tightly on the paper roll otherwise paper jam or other fault may oc...

Page 16: ...ows the current level and it can be adjusted to a different position by moving the click wheel Notes The standard configuration of the printer is without the function of paper near end 4 8 Power on pr...

Page 17: ...ould clean the mark sensor Steps for mark sensor cleaning are as follows 1 Turn off the printer 2 Pull the latch to open the back cover of the printer 3 Keep the back cover open clean the dust and dir...

Page 18: ...l 13 Caution The cutter sliding blade acts slowly during revolving the thumb wheel Go on revolving and observe carefully If the thumb wheel cannot be turned do not force the wheel instead turn it the...

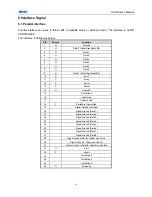
Page 19: ...gnificant Bit 10 P nAck 11 P Busy 12 P Perror 13 P Select 14 H nAutoFd 15 Not defined 16 Logic Gnd 17 Chassis Gnd 18 P Peripheral Logic High 19 Signal Ground nStrobe 20 Signal Ground Data 1 21 Signal...

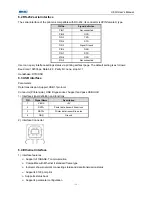
Page 20: ...e stop bit 1 Handshake DTR DSR 6 3 USB interface Parameters Data transmission Support USB1 1protocol Connector Printer side USB B type socket Support and pass USB HUB 1 Interface signal definition and...

Page 21: ...transmission 3 RX Data receiving 4 NC Reserve 5 NC Reserve 6 RX Data receiving 7 NC Reserve 8 NC Reserve Socket figure of Interface module 6 5 Power interface definition Power supply interface signal...

Page 22: ...ash drawer status test signal 4 VDR Cash drawer driving power 5 DRAWER 2 Cash drawer 2 driving signal 6 GND Circuit share ground Caution Do not connect or disconnect signal cable when printer power is...

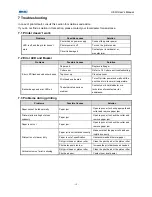
Page 23: ...er beeps and error LED on These indicate a serious problem Contact your local distributor or a technician of manufacturer for assistance 7 3 Problems during printing Problems Possible Causes Solution...

Page 24: ...er adapter under the printer so that the power adapter would become an internal part of the printer the power adapter will be inside of the printer 8 4 Wall Mounting The printer can be mounted vertica...

Page 25: ...ke sure that the plugs are fully inside the holes and do not stick out 3 Screw the two screws in the plastic plugs and keep10mm space between the screw head and the wall surface 4 Regulate the paper n...

Page 26: ...Sleep mode if there is not any printing job for 5 minutes in Ready mode 3 Printer will awake automatically and enter into Active mode when printing job comes and will enter into Ready mode again afte...

Reviews: