background image

~ 17 ~

Although each Vintage Keeper cooling unit has been carefully tested at every stage of manufacture, occasional problems 
arise, the majority of which are due to rough or careless handling during shipping or installation. Other issues may occur 
due to improper cabinet assembly, power interruption or surge, low line voltage (less than your unit rating of 105V or 
240V), or failure to clean the unit regularly (see illustration below). The following may help you determine what the prob-
lem may be; what steps you can take to correct it, and what further steps may be required. Additional Trouble-Shooting 
information and downloadable documents are available in the “Support” area of our website: 

www.koolrproducts.com

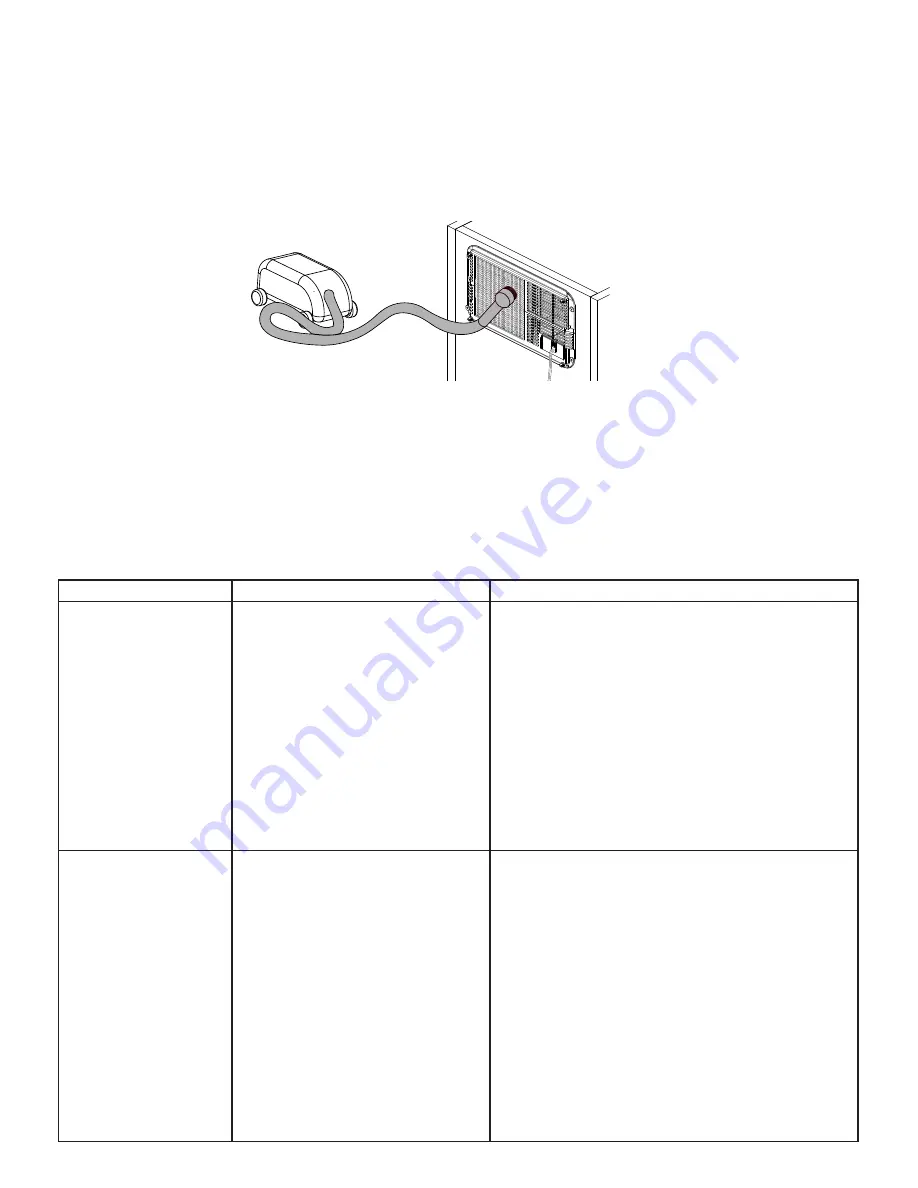
&/($1,1*7+(&2,/

,03257$17127(

In order to provide maximum protection for your valuable wine collection, the following steps are highly advisable. 
First and foremost, have your wine collection adequately insured. Second, install a battery-powered heat-sensitive alarm 
to warn of any loss of cooling due to power interruption. Third, monitor your storage and ambient conditions on a regular,  

GDLO\EDVLV)RXUWKLQVWDOODKLJKTXDOLW\VXUJHVXSSUHVVRUWRSURWHFWDJDLQVWVXGGHQSRZHUÁXFWXDWLRQV)LIWKFOHDQWKH

unit as directed, on a regular basis. Every 3 to 4 months vacuum the cooling unit coils (check our website for more info). 
Be advised, also, that Koolr Products Inc. or Shanghai Koolspace Co. Ltd. cannot in any event be liable or responsible for 
incidental or consequential damages. 

Coil is located at the top of back 
panel, vacuum it periodically.

7528%/(6+227,1**8,'(

IF:

CHECK:

THEN:

COOLING UNIT DOES 

NOT RUN AT ALL WHEN 

PLUGGED IN

‡

Is the unit plugged in?

‡

Is the power supply operational?

‡

Is the LED display functional?

‡

 Is there any evidence of shipping 

damage on the cooling unit or 

packaging materials?

‡

Note that the unit has a 1-minute cautionary delay 

between plugging in and full start-up; this is a 

built-in safeguard to protect the compressor in the 

event of sudden power failure

‡

Note that the power supply must be a dedicated, 
separately-fused and grounded 15 Amp, 120V line 
or 7.5 Amp, 240 V line rated for your unit. Must not 

use an extension cord. Do not share the outlet with 

other appliances

‡

If the unit is receiving power yet fans or compressor 
fail to run, unplug for ten minutes, then try again. 

for more help please go to :

www.koolrproducts.com/support.html


(Troubleshooting)

COOLING UNIT RUNS BUT 

DOES NOT COOL

SUFFICIENTLY

‡

Is the storage temp properly set?

‡

Is the cabinet properly assembled?

‡ ,VDLUÁRZWRDQGIURPWKHFRROLQJ

unit unobstructed?

‡

Is the ambient air temperature 

ZLWKLQWKHVSHFLÀHGUDQJH"

‡

Are any exterior surfaces of the 

cabinet exposed to sunlight?

‡

Note that the unit may take a few days to achieve 

the desired storage temperature, even in a properly 

located, airtight cabinet

‡

Take steps to reduce ambient temperatures and 

compensate for additional heat gain if any cabinet 

walls receive direct sunlight

‡

Take steps to improve circulation of air to and from 

the unit

‡

Adjust the legs to level the door for proper mag-

netic gasket seal 

‡

Increase your SET TEMPERATURE

‡

Clean the grill areas 

If the problem persists, go to our website at 

www.koolrproducts.com/support.html

(Troubleshooting) and perform the “cooling unit diag-

nostic” in the support section.

Summary of Contents for Vintage Keeper 240

Page 1: ...ASSEMBLY OPERATION MANUAL 240...

Page 2: ...iable or responsible for incidental or consequential damages See Warranty Place unit in a clean area and allow access to the exterior surfaces for periodic vacuuming of the condensor coil See troubles...

Page 3: ...ttom Hinge Washer x 1 Shelves x 12 Handle and Lock x 1 Cooling Unit Bolts in cooling unit box x 2 C Allen Key in cooling unit box x 1 E Hooks x 2 TOP LEFT REAR TOP RIGHT REAR x 1 x 1 TOP LEFT FRONT TO...

Page 4: ...6 TO TAB PLACE SPACER ON BACK 29 5 1 63 5 520 SPACER F L O O R 4 LEFT BACK PLACE AGAINST WALL LABEL SIDE UP LAY BACK ON FLOOR AGAINST WALL 7 3 5 72 8 1 6 6 86 1 58 5 0 7 7 3 7 1 5 7 6 6 172 3 2 127 7...

Page 5: ...BOTTOM OUTSID E BACK BOTTOM OUTSID E BACK BOTTOM 6 O K 6 N O LEFT SPACER BOTTOM OUTSIDE BACK BOTTOM OUTSIDE BACK BOTTOM 35 66 1 6 6 8 3 6 6 35 66 1 1 386 2 1 27720 8 4 PULL OUT SPACER 2 REST BOTTOM ON...

Page 6: ...ER LEFT R IG H T LEFT R IG H T HAND PRESS IN BOTTOM REAR CONNECTOR PLATES CHOOSE WHICH SIDE TO PLACE THE HINGE RIGHT OR LEFT 3 INSTALL BOTTOM CONNECTOR PLATES HINGE 1 BOTTOM LEFT FRONT CONNECTOR HINGE...

Page 7: ...S S P R E S S NO HINGE NO HINGE 4 167 723 1 723 211 725 3 7 6 TAP IN CONNECTORS TIGHTLY NO GAP WITH CLOSED HAND OR RUBBER MALLET SAVE REMAINING CONNECTOR PLATES IF YOU DECIDE TO CHANGE HINGE SIDE REPE...

Page 8: ...8 5 TOP OUTS ID E BA CK TOP INSTALL HINGE IN TOP 167 225 PLACE WASHER FIRST 3 225 21 1 7 6 225 21 72 27720 1 67 1 7 81 7 83 12 ON BOTTOM HINGE ONLY TOP OUTS ID E BA CK WASHER A TOP...

Page 9: ...9 6 CELLAR BOTTOM INSTALL SHELVES 3 5 1 72 2 1 7 67 TAB REFERENCE START AT BOTTOM CLICK SHELF OVER TABS FRONT LONGER SHORTER...

Page 10: ...VEL TO OPENING 6 9 2 127 KEEP UNIT LEVEL C 2 76 IN COOLING 81 7 2 675 7 1 1 PUSH THROUGH GET HELPER TO 38 520 16 1 7 81 7 9 85 1 FASTENING 3 81 7 7 UP 16 85 1 67 1 1 TIGHT 10 7 PLACE COOLING UNIT IN C...

Page 11: ...5 6 7 5 1 6 6685 1 22 6 HINGE 2 167 2256 1 1 6 PLACE WASHERS FIRST 3 2256 21 1 7 6 2256 21 72 27720 1 INSTALL TOP HINGES TURN BOTH CENTER LEGS 7851 2817 5 2 6 TO RAISE LEGS SLIGHTLY TOP ON BOTTOM HING...

Page 12: ...12 10 L E F T REMOVE STICKERS LEVEL CELLAR COMPENSATE FOR YOUR FLOOR PLACE LOGO...

Page 13: ...D LEVEL DOOR TIP ADJUST REAR LEG ON NON HINGED SIDE TO HELP LEVEL DOOR ADJUST HINGES IF REQUIRED 13 NEVER MOVE LOADED CABINET EMPTY FIRST PLACE DOLLY AT BACK BACK...

Page 14: ...IGHTEN LEGS FULLY PRY OFF CONNECTOR PLATE REUSE LEG FOR TOP HINGE 14 6 66 0 REMOVE COOLING UNIT AND SHELVES LAY CELLAR DOWN FULLY TIGHTEN LEGS PRY OFF ALL CONNECTOR PLATES WITH FLAT SCREWDRIVER BOTTOM...

Page 15: ...y will blink alternating with the temperature reading 7KLV IXQFWLRQ LV GLVDEOHG LQ WKH UVW KRXUV RRO RZQ SHULRG RU DIWHU DQ UHVHW IRU DQRWKHU KRXUV The unit will restart and continue the cooling and c...

Page 16: ...Wine Cabinets have minor differences in temperature depending on where articles are stored Top to Bottom differences will be present in any Cellar due to layering and pressure differences The coldest...

Page 17: ...eriodically 7528 6 227 1 8 IF CHECK THEN COOLING UNIT DOES NOT RUN AT ALL WHEN PLUGGED IN Is the unit plugged in Is the power supply operational Is the LED display functional Is there any evidence of...

Page 18: ...u must monitor your unit s performance on a daily basis If there is an apparent problem or Alarm condition you must disconnect the power supply to avoid potential damage to your wine collection It is...

Page 19: ......

Page 20: ...ASSEMBLY OPERATION MANUAL 240...

Reviews: