User’s guide
HRT/D
-
8
-
HS
Operation
5.1
PREPARATION
1.
Clear the working surface.
2.
Check that all the heating elements are connected to the control units.
3.
Check that no scraps of material remain in the reflectors.
4.
Switch off all the control units (position "
").
5.
Turn on the main switch (position
I
).
5.2
SWITCHING ON HEATING
ELEMENTS
Each heating element can be switched on and controlled
individually.
1.
Switch on control unit with switch
H
.
5.3
SETTING THE TEMPERATURE
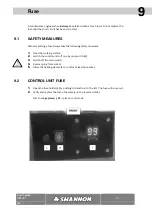
The temperature of the filament can be set using the temperature control.
1.
When turning on the on/off switch, the display will show the value that was last saved (keeping the
machine on a certain value for >20 seconds will make it remember this value).
2.
Press the right button (arrow up) to increase the value, up to 99 (keeping this pressed in will make
the value cycle much faster)
3.
Press the left button (arrow down) to decrease the value, down to 00 (keeping this pressed in will
make the value cycle much faster)
4.
Press both buttons at the same time to go directly to 00. Doing this also resets the machine.
5.4
TROUBLE SHOOTING
5
Error message
Meaning
Solution
E1
The wire is loose (not connected)
Turn off the machine, check the filament, and reset the
machine
(see
§9.1
for changing filament)
Note: Between the values 00 and 04, this fault cannot be
detected
E2
The wire is loose (spark detection)
Check the connection of the filament
Check the filament, and reset the machine
This fault can also be reset by the arrow down button
(see
§9.1
for changing filament)
E9
Broken circuit board
Contact the supplier for a new circuit board
Empty display
No power
Alert a maintenance engineer
Check the fuse (see
§10.1
)
Check the power supply cable
Contact the supplier if necessary
80


