
OPERATING INSTRUCTIONS
OPERATING INSTRUCTIONS
IRONING HINTS
WARNING!
To prevent fire, do
not leave iron unattended while
connected.
•
Sort articles to be ironed according
to the type of fabric. This will reduce
the need to adjust the temperature
for different types of garments.
•
If you are not sure of the fiber
content of a garment, test a small
area such as a seam or inside hem
section before ironing a visible area.
Start with a low temperature setting
and gradually increase to find the
best setting.
•
When reducing the temperature to
iron sensitive fabrics, allow
approximately 2 minutes for the iron
to cool to the new temperature
setting.
•
Fabrics such as velour, wool, linen
and silk are best ironed with an
ironing cloth to prevent shine marks.
EMPTYING THE IRON
1. Always empty iron after each use.
2. When finished using the iron, turn
the variable steam control to“0” and
the temperature control dial to "MIN".
3. Unplug the iron from the electrical
outlet.
4. Set variable steam control to "MAX".
5. Turn the iron upside down over the
sink with the tip pointing downward
and allow the water to flow from the
opening.
6. Set variable steam control to "0".
7. Allow iron to cool in an upright
position before storing.
WARNING!
Use caution when
emptying the iron. Burns may
occur from touching hot metal
surfaces, hot water or steam.
STORAGE
1. Always turn the variable steam
control to “0” after you have
emptied the water tank.
2. Allow the iron to cool down.
3. Always store the iron in the upright
position to protect the soleplate.
4. From time to time, clean the exterior
of the iron with a damp cloth and
wipe dry.
5. If you use spray starch, wipe the
soleplate occasionally with a soft
damp cloth to prevent the build-up of
deposits.
6. If the iron has not been used for a
few weeks, hold the iron horizontally
and allow to steam for 2 minutes
before ironing.
SELF-CLEANING
In order to remove calcium and built-up
particles, the self-cleaning system should be
run at least once a month.
• Fill the water beaker provided halfway
and then pour into the water reservoir.
• Set the variable steam control to the no
steam position.
• Insert the main plug into the wall socket.
• Set the temperature control dial to the
maximum temperature.
• Wait until the thermostat light goes off and
steam iron has reached preset
temperature.
• Remove the plug from the wall socket.
• Hold the steam iron horizontally over a
sink.
• Turn the variable steam control to
“Self-Clean ” position. Hot water and
steam will be emitted from the soleplate.
Swing the steam iron lightly back and forth
gently to allow lime and dust particles to
come out.
• When the water reservoir is empty, shift
the variable steam control from “Self-
Clean” position to “0”.
• Stand the iron upright and insert the plug
into the wall socket to let the iron heat up
again.
• Move the iron over a clean cotton cloth to
clean the soleplate and let the remaining
water on the soleplate evaporate.
5. As soon as the iron has reached the
desired temperature, the temperature
ready light will turn off.
This appliance is for HOUSEHOLD USE
ONLY and may be plugged into any
120V AC polarized electrical outlet. Do
not use any other type of outlet.
For Dry Ironing
BEFORE FIRST USE
Remove any labels, stickers or tags
which may be attached to the body or
the soleplate of the iron before using
the iron.
Before you start using your iron, read all
the instructions in the manual and do
the following in order to eliminate any
odor and small white residue particles
and to ensure optimum steam
performance.
1. Fill the iron with regular tap water.
(See page 5 for filling instructions.)
2. Set the temperature control dial to its
highest setting and the variable
steam control to “0”.
3. When the temperature ready light
goes off, the iron has reached the
selected temperature. Set the
variable steam control to the highest
setting.
4. Keep the iron in a horizontal position
and allow it to steam until the water
runs out. Press the blast of steam
button to eliminate white residue
particles.
5. Repeat this procedure for two or
three fillings of water.
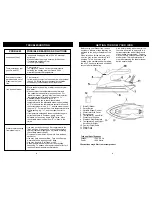
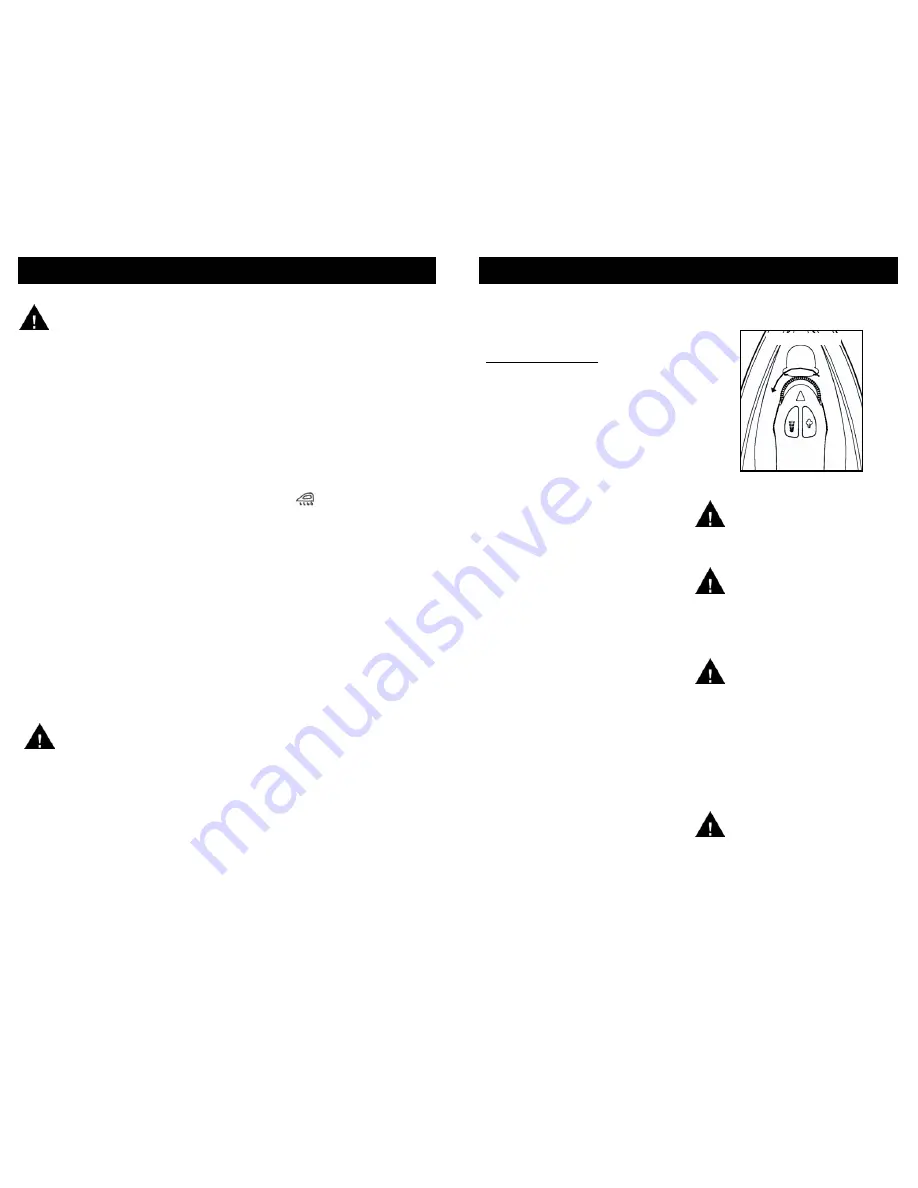
Fig. 1
STEAM IRONING
CAUTION!
DO NOT aim iron
at face, towards yourself, or
anyone else while using or
adjusting steam. Burns or
serious injury may occur.
WARNING!
Before filling the
iron with water, be sure the
iron is not plugged into the
electrical outlet. The iron may
be filled with water while it is
hot.
CAUTION!
TO PREVENT THE
RISK OF BURNS, use caution
when filling iron with water.
Burns can occur from touching
hot metal parts, hot water, or
steam.
DRY IRONING
NOTE:
Because of the soleplate design,
ordinary tap water may be used with this
iron. However, in very hard water areas,
we recommend using distilled or
demineralized water.
1. Turn temperature dial to "MIN" and
turn the variable steam control all
the way to the left to "0". (Fig. 1)
2. Plug the cord into a polarized, 120V
AC electrical outlet. The temperature
ready light will come on, indicating
that the iron is receiving power.
3. Turn the temperature dial to the
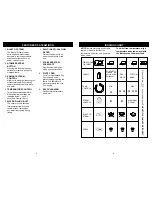
desired setting. (See "Ironing Guide"
for a guide to temperature selection.)
4. Place iron on its heel (on a stable,
protected surface) while iron is
warming to desired temperature.
For dry ironing, turn the variable steam
control dial all the way to the right to “0”.
This will cut off the steam flow if water is
in the water tank. All marked settings on
the temperature dial can be used for dry
ironing.
WARNING
: Never fill the iron
with fabric conditioner,
starches or any other liquid, as
these will damage the steam
mechanism. Do not use
contaminated water.
7
4


