background image

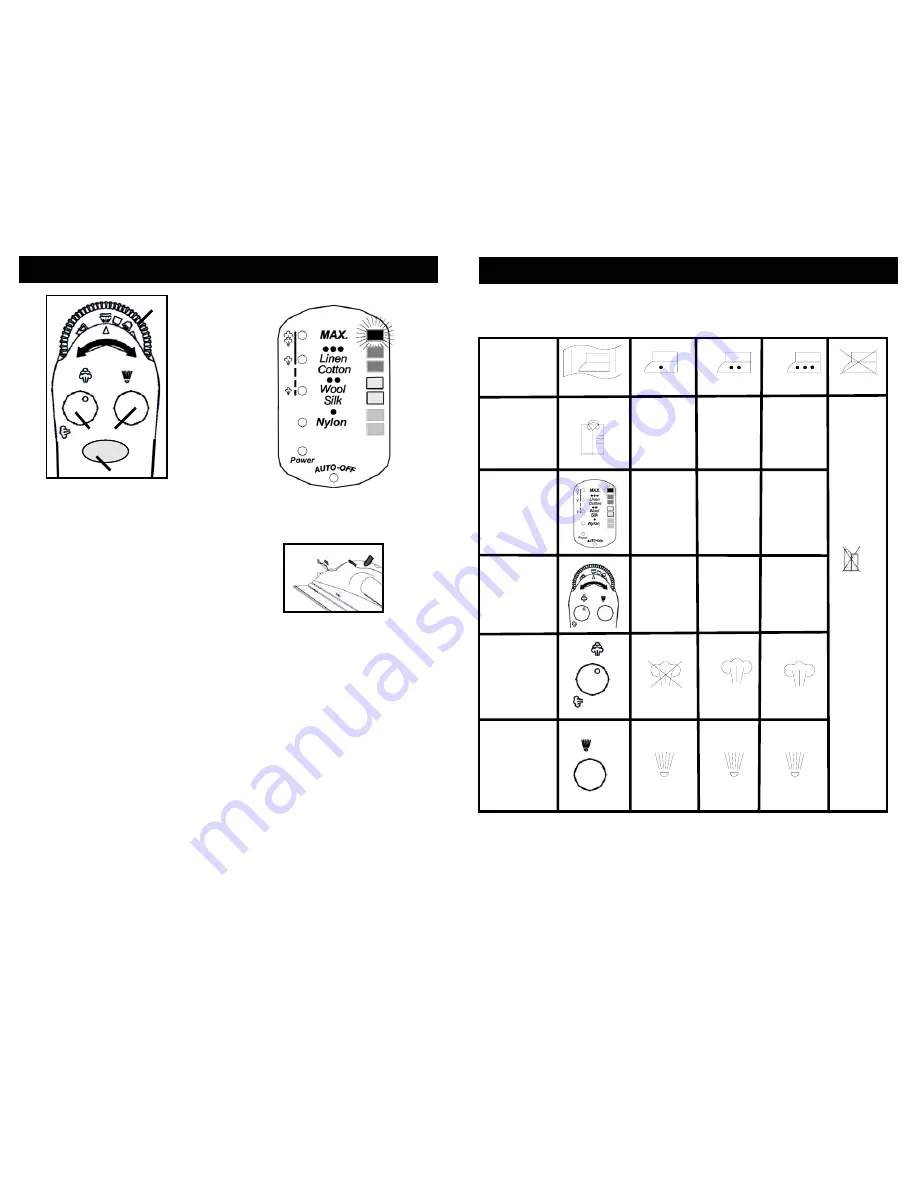
FEATURES OF SHARK ELECTRONIC IRON

TEMPERATURAS RECOMENDADAS PARA PLANCHAR  

LED Display Panel

NOTA:

Siempre referirse a la etiqueta de la prenda con sus instrucciones para 

planchar.  Antes de comenzar a planchar telas delicadas, es mejor probar la 
temperatura de la plancha en una costura o doblez interior.  

1 2

3

4

INSTRUCCIONES
EN  LA 
ETIQUETA

TELA

PANEL DE 
LUCES 
INDICADORAS

DESCARGAS 
DE VAPOR

ROCÍO

T

e

n

g

a

 e

n c

u

e

nt

a

 q

u

el 

sím

b

olo


  s

ig

nif

ic

¡E

S

T

A

 P

R

E

N

D

A

 N

O

 D

E

B

E

 P

L

A

N

C

H

A

R

S

E

!

ALGODÓN

LINO

FIBRAS 

SINTÉTICAS 

p. ej.: acrílico, 

nylon, poliéster

SEDA

LANA

MÍN

• • • •  •

MÁX

0

VAPOR
MÁXIMO

VAPOR 
MÍNIMO

REGULADOR 
DE VAPOR

1.

BURST OF STEAM/X-TENDED 
STEAM BURST

TM

BUTTON

Turn the button all the way to the left 
for quick bursts of steam to aid in 
removing stubborn wrinkles from 
fabrics such as denim, cotton or 
linen. 
Turn the button all the way to right to 
get prolonged bursts of steam. The 
iron in the X-Tended steam position 
can be used vertically as well as 
horizontally.

6.

LED DISPLAY PANEL

Displays the fabric setting 
(left) and the temperature 
indicators (right).

7.

WATER FILLING INLET

The cover prevents dust and 
foreign matter from entering 
the water tank. It also stops 
any water from spilling during 
ironing.

2.

ATOMIZER SPRAY 
BUTTON

Pressing this button provides a 
defined jet of spray which gently 
moistens fabric.

8.

BUILT-IN ANTI-CALCIUM 
FILTER

Prevents calcium build-up 
and prolongs the life of the 
iron.

3.

VARIABLE STEAM 
CONTROL

Minimum to maximum steaming for 
different materials. Self cleaning 
feature flushes internal sole plate 
with water.

9.

STAINLESS STEEL 
SOLEPLATE

Provides maximum glide-
ability and heat retention.

4.

ELECTRONIC 
TEMPERATURE CONTROL

Select the fabric setting and 
temperature indicator by 
pressing on this button.

10.

PIVOT CORD

For left or right handed use. 
Pivots up and down; 
prevents dragging along the 
fabric. The flexible cord 
protector protects the cord 
from fraying.

5.

Anti-Drip Function

Cuts off water when the 
iron temperature is too 
low.

3

20

Summary of Contents for GI490

Page 1: ...Iron Plancha Electrónica de 1700 Wats OWNER S MANUAL MANUAL DEL PROPIETARIO Model Modelo GI490 120V 60 Hz 1700 Watts For information or assistance Para Información o Asistencia EURO PRO Corporation 178 West Service Rd Champlain NY 12919 1 866 98SHARK 1 866 987 4275 www sharkvac com ...

Page 2: ... En EE UU EURO PRO Corporation 178 West Service Rd Champlain NY 12919 En Canadá EURO PRO Corporation 4400 Bois Franc St Laurent QC H4S 1A7 Si EURO PRO Corporation le encontrase algún defecto de material o de fabricación lo reparará o reemplazará sin cargo El cliente debe incluir el documento que pruebe la fecha de compra y un cheque por 9 95 para cubrir el costo de manipuleo reembalaje y flete de ...

Page 3: ... de planchar varias veces Mueva el regulador de vapor de la posición 0 a la posición MAX varias veces La plancha podría no estar lo suficientemente caliente Gradue el termostato a MAX Siempre permita que la plancha se caliente lo suficiente antes de activar el regulador de vapor Uso excesivo del botón para chorros de vapor Espacie más el uso de éste botón La plancha puede estar con demasiada agua ...

Page 4: ...the X Tended steam position can be used vertically as well as horizontally 6 LED DISPLAY PANEL Displays the fabric setting left and the temperature indicators right 7 WATER FILLING INLET The cover prevents dust and foreign matter from entering the water tank It also stops any water from spilling during ironing 2 ATOMIZER SPRAY BUTTON Pressing this button provides a defined jet of spray which gentl...

Page 5: ...ción del almidón 6 Si la plancha no se hubiese usado por varias semanas sosténgala horizontalmente y permita que despida vapor por 2 minutos antes de planchar FABRIC TEMPERATURE INDICATORS Press on the Electronic Temperature Control to select the desired fabric setting The red lights at the left of the LED Display Panel will light up At the same time the temperature indicator lights on the right s...

Page 6: ...peratura MAX Espere a que la plancha se caliente hasta la temperatura seleccionada y que la luz deje de destellar 5 Mueva el dial regulador de vapor totalmente a la derecha hasta la posición Auto Limpieza Self Cleaning y sostenga la plancha horizontalmente sobre un lavadero Fig 8 6 Ahora comenzará a salir agua hirviente y vapor por los orificios en la suela de la plancha evacuando así las impureza...

Page 7: ...s Presione el botón atomizador para disparar un chorro de agua a la tela que se esté planchando en seco o al vapor Fig 5 Grad de Temp Fig 5 Fig 6 INSTRUCCIONES PARA OPERAR CONT OPERATING INSTRUCTIONS CONT SELECTING IRON TEMPERATURES Always read garment labels and follow the manufacturer s ironing instructions Refer to the Ironing Chart on page 9 for temperature recommendations Use low settings for...

Page 8: ...ar arrugas rebeldes en telas de denim mezclilla de algodón o lino Éste dispositivo puede usarse al planchar en seco o al vapor según se desee 1 Cerciórese que la plancha esté con agua por lo menos hasta la mitad 2 Gradúe la plancha para el tipo de tela y temperatura correspondiente Coloque la plancha verticalmente sobre su talón en una superficie estable protegida y déjela calentar por Aprox 2 min...

Page 9: ...de agua que contiene No sobrellene la plancha Al terminar de llenarla cierre la tapa 2 Enchufe la plancha a un tomacorriente polarizado de 120 VCA 3 Presione el botón de control electrónico de temperatura para seleccionar la tela y la temperatura deseada Gire el dial regulador de vapor a la graduación deseada Para la temperatura de agua vea la Guía para Planchar INSTRUCCIONES PARA OPERAR OPERATING...

Page 10: ...DE DIODOS INDICADORES Indica la selección de tela en la izquierda y de temperatura en la derecha 2 BOTÓN ATOMIZADOR DE AGUA Presionando éste botón se aplica un horro definido de agua que moja la tela levemente 7 TOMA DE AGUA La tapa evita que el polvo y cuerpos extraños entren al tanque de agua de la plancha y que el agua se derrame al planchar 3 REGULADOR DE VAPOR Regula el vapor entre mínimo y m...

Page 11: ...ufficient time to heat up before activating the variable steam control Overuse of steam burst Allow more time between each burst Iron may have been overfilled Turn iron off empty water and follow instructions for filling Steam performance may be low if iron requires seasoning To season use regular tap water for 1or 2 tanks until steam performance improves El olor es inocuo y no debe volverse a pro...

Page 12: ...es 2 Usar la plancha sólo para lo que esta diseñada 3 Para proteger contra el riesgo de choque eléctrico no sumergir la plancha en agua ni líquido alguno 4 Nunca jalar del cordón para desenchufar hacerlo agarrando del enchufe 5 No permitir que el cordón haga contacto con superficies calientes Dejar que la plancha se enfríe completamente antes de guardarla 6 Siempre desenchufar la plancha del tomac...

Reviews: