background image

10

FREEPHONE:

 0

800 862 0453

bottom of the bonnet to the 
frame (

Fig. 3

). Then attach the 

frame to the garment steamer 
as described above (

Fig. 4

).


 IMPORTANT:

 Use caution 

when changing the frames 
when the unit is hot. The 
frames are designed with a 
steam guard around the bottom 
to provide protection from heat 
when placing or removing the 
frames.


 The small steam bonnet frame 
must be attached at all times 
during usage.


 The frame should only be 
removed for washing by hand, 
if necessary (see page 13 for 
care instructions). 

Using Your Press & Refresh

Attaching the accessories:

3

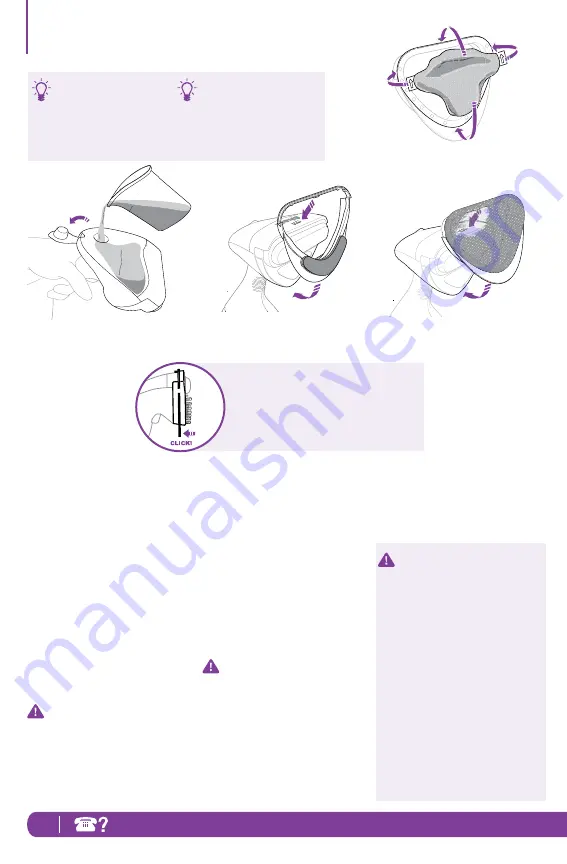
   Choose your desired frame. 

Using both hands, hold the 
frame on either side. Attach 
the top of the frame to the 
unit above the Wrinkle Eraser


into the notch. Next, secure 
the pointed end of the frame 
around the bottom of the unit 
and snap into place (

Fig. 2

). 

When using the upholstery/
delicate fabric frame: 


NOTE:

 Remember, DO NOT use 

the garment steamer without 
the small steam bonnet in place

4

   Attach the desired bonnet to 

the frame, then attach the 
frame to the unit. Pull either 
side of the bonnet over the top 
of the frame and secure the 

Filling and refilling the water 
reservoir:

1

   Never fill the garment steamer 

while it is plugged into an 
electrical outlet. 

2

   Open the water cap and hold 

the the garment steamer 
horizontally with the Wrinkle 
Eraser

 parallel to the floor. 

Using the filling flask provided 
fill the water tank to the Max 
Fill line. Be careful not to 
overfill. Push the cap back into 
place, making sure it closes 
firmly (

Fig. 1

). 


 NOTE:

 The water tank does not 

have to be completely full for 
the fabric steamer to generate 
steam. However, make sure 
that the water tank is at least 
half way full for optimal results.

Practice makes perfect! 
It takes time to master 
the garment steaming 
techniques.

For best results, tilt the 
steamer forward slightly 
and press the wrinkle 
eraser directly on the 
garment.

Fig. 1

Fig. 2

Fig. 4

Fig. 3

 The seam on the frame must line up 
with the seam on the unit for proper 
use and safety. The frame will snap into 
place, double check to make sure the 
seams are aligned.

Summary of Contents for Press & Refresh GS500UKL

Page 1: ...GS500UKL User s Guide garment care system ...

Page 2: ... the accessories become hot during use Exercise care when changing accessories and follow removal and changing instructions as outlined in the manual Do not change frames while the unit is turned on Turn the unit off wait for the Wrinkle Eraser to cool and then change frames 12 The garment steamer can be used in a vertical or horizontal motion NEVER hold the steam head down while at rest or tilt i...

Page 3: ...abric steamer Incorrect reassembly or repair can cause a risk of electrical shock or injury to persons when the fabric steamer is used g DO NOT handle plug or fabric steamer with wet hands or operate without shoes h DO NOT pull or carry by power cord use power cord as a handle close a door on the power cord or pull the power cord around sharp corners or edges i DO NOT allow power cord to touch hot...

Page 4: ...ropriate accessory The unit comes assembled with a small steam bonnet attached The bonnet must be attached at all times when the unit is being used 1 Attach the desired frame 2 Using both hands hold the frame on either side Attach the top of the frame to the unit above the Wrinkle Eraser into the notch Next secure the pointed end of the frame around the bottom of the unit and snap into place Fig 1...

Page 5: ...elpful Tips on using the Vertical Press Pad and VELCRO Clips 1 For the first time ever the vertical press pad eliminates the need for an ironing board It is designed to fit on any size door and can remain setup for your convenience The VELCRO clips are used to position stretch the garment for quick steaming with better results to complete the garment care system Fig 2 2 To make pressing easier the...

Page 6: ...HONE 0800 862 0453 TECHNICAL SPECIFICATIONS Voltage 220 240V 50Hz Power 1580 W Water Capacity 200 mL 6 5 fl oz This manual covers model number GS500UKL 11 Not to be disposed of with other household waste IP44 ...

Page 7: ...ts Getting Started 8 Assembly of the Vertical Press Pad 9 Using your Press Refresh 10 Care of your Press Refresh 13 Troubleshooting Guide 13 Thank you for purchasing the Shark Press Refresh Garment Care System ...

Page 8: ...of your garment care needs Save time and money with fewer trips to the dry cleaners and have your garments ready to wear when you want The combination of professional steam power and the exclusive heated Wrinkle Eraser makes it easier than ever to care for your garments The Press Refresh comes complete with accessories for all garment care needs The vertical press pad eliminates the hassle of an i...

Page 9: ... IMPORTANT Always make sure the garment steamer is UNPLUGGED from the electrical outlet when not in use Never fill the water reservoir when the unit is plugged in Assembly of the Vertical Press Pad 5 Attach the vertical press pad to any door With the door open loop the straps at the top of the vertical press pad around the corner of the door and repeat on the opposite side Gently tug on the pad to...

Page 10: ...steam bonnet in place 4 Attach the desired bonnet to the frame then attach the frame to the unit Pull either side of the bonnet over the top of the frame and secure the Filling and refilling the water reservoir 1 Never fill the garment steamer while it is plugged into an electrical outlet 2 Open the water cap and hold the the garment steamer horizontally with the Wrinkle Eraser parallel to the flo...

Page 11: ...ments in a vertical motion Begin at the top of the garment and move in a up and down direction pressing the Wrinkle Eraser directly onto the fabric 5 You can use the hooks on either side of the vertical press pad for a larger pressing area 6 When steaming lightweight garments the VELCRO clips can be used in place of a hanger to attach a garment directly to the pad Using the Press Refresh and verti...

Page 12: ...tion for heavy fabrics without leaving water marks Fabric Recommendations Heavy fabrics cotton wool canvas denim CAUTION Do not use the bristle brush on delicate fabrics When to use the different accessories Using Your Press Refresh cont 4 Upholstery Delicate Fabric Frame Upholstery Steam Bonnet shaggy material acts like multiple fingers to pick up dust and deodorize while steaming It provides a l...

Page 13: ...ttach the bonnet pull one corner of the bonnet over the steam nozzle then the other corner Secure the bottom of the bonnet to the nozzle using the bottom tab Descaling Procedure Your garment steamer must be descaled at an interval that will depend on the water quality and the frequency of use The garment steamer should be descaled at least once a year or every 100 hours of use If your water is con...

Page 14: ...er tank is at least half way full or fill to the max fill line The nozzle leaves water drops on the garment You are not using the steam bonnet The steam bonnet is too wet The frame has condensation The small steam bonnet must be in place at all times during usage The bonnet prevents water drops being left on the garment and to removes impurities from your water Let the unit cool for 30 minutes rem...

Page 15: ...15 Notes ...

Page 16: ...s PO Box 298 Mirfield WF14 9BA Freephone 0800 862 0453 Copyright 2012 Euro Pro Operating LLC VELCRO is a registered trademark of Velcro Industries B V Printed in China Illustrations may differ with actual product GS500UKL E 120308 2 Not to be disposed of with other household waste IP44 ...

Reviews: