background image

22

Dimension: 176 x 250mm

Printelligence Sdn. Bhd. (Malaysia)

ENGLISH

Specifications

Design and specifications are subject to change without notice.

Receiving System;
These receiving systems, encompassing all currently available technology, include those with
planned broadcast, videotape and laserdisc hardware and software.

Reception channels;
Some examples of the main receivable channels are shown above.

SHARP CORPORATION

MODEL

14D2-SS

20D2-SS

21D2-SS

Receiving System

World multi 18-system

TV Broadcasts

PAL-I

/VCR Playback

PAL-B/G
PAL-D/K
SECAM-B/G
SECAM-D/K • K1

VCR Playback

NTSC 4.43/5.5 MHz/60 Hz
NTSC 4.43/6.0 MHz/60 Hz
NTSC 4.43/6.5 MHz/60 Hz
NTSC 4.43/5.5 MHz/50 Hz
NTSC 4.43/6.0 MHz/50 Hz
NTSC 4.43/6.5 MHz/50 Hz
SECAM-I (6.0 MHz)

VCR Playback

SECAM-L (French SECAM)

(Using Video-in terminals)

PAL 60 Hz
NTSC 3.58 MHz

Laserdisc

PAL 5.5 MHz/60 Hz

Player Playback

PAL 6.0 MHz/60 Hz

(Using RF-in terminals)

PAL 6.5 MHz/60 Hz

Reception Channels

PAL-B/G

VHF

E2–E12 ch

SECAM-B/G

UHF

E21–E69 ch

PAL-D/K

VHF

C1–C12 ch, R1–R12 ch

SECAM-D/K • K1

UHF

C13–C57 ch, R21–R69 ch

PAL-I

VHF

B–J ch

UHF

21–69 ch (Hong Kong)

CATV

S1–S20 ch, S21–S41 ch (Hyper)

Receiving Frequency

48.25 MHz – 863.25 MHz

Channel Tuning

100-channel Electronic Tuner with Full Auto Tuning System

Picture Tube

14-Inch Tinted

20-Inch Tinted

21-Inch Tinted

Terminals

Audio/Video input 

×

 2 (Front 

×

 1, Rear 

×

 1)

Audio/Video output 

×

 1 (Rear), Headphone jack 

×

 1 (Front)

Sound Output

2.5 W (RMS) 

×

 2

Power Source

Rated AC 110–240V, 50/60 Hz

Power Consumption

62 W

72 W

79 W

Dimensions

446 (W) 

×

 333 (H) 

×

 362 (D) mm

594 (W) 

×

 465 (H) 

×

 478 (D) mm

594 (W) 

×

 465 (H) 

×

 473 (D) mm

Weight

9.2 Kg (Approx.)

18 Kg (Approx.)

21 Kg (Approx.)

21D2-SS[21-22]EN

30/10/04, 9:48 AM

22

Summary of Contents for 14D2-SS

Page 1: ...ISEUR COULEUR COLOUR TELEVISION 14D2 SS 20D2 SS 21D2 SS TINS B721WJZZ 05P01 MSP Please read this operation manual carefully before using the colour television Veuillez lire attentivement ce mode d emploi avant d utiliser ce téléviseur couleur TINS B721WJZZ 05P01 MSP 14D2 SS 20D2 SS 21D2 SS NT 30 10 04 9 42 AM 1 ...

Page 2: ...t on an unstable cart stand or table The television equipment may fall causing serious injury to a child or an adult and serious damage to the equipment Use only with a cart or stand recommended by the manufacturer or sold with the television equipment Page Safety Precautions 1 Accessories 3 Antenna Connection 3 Headphone Jack 3 Location of Controls 4 Basic Operation 6 OSD On Screen Display Langua...

Page 3: ...do not subject the AC power cord to damage by bending or twisting it or by placing heavy items on top of it and do not place the AC power cord under the TV set If the AC power cord becomes damaged unplug it from the wall outlet immediately and call your dealer for service Never remove the back of the cabinet as there is high voltage inside the TV set Unplug the power cord from the wall outlet imme...

Page 4: ...of the TV set 75 ohm coaxial cable round cable 300 ohm twin lead feeder Rod antenna dipole with ribbon feeder 300 75 impedance converter Only for 14D2 SS Rod Antenna Connection AV IN OUT AUDIO VIDEO Rod Antenna Antenna mounting socket Antenna jack 14D2 SS Feeder Impedance Converter 1 Insert the rod antenna s base post into the antenna mounting socket until it clicks into position 2 Connect the fee...

Page 5: ...H or DOWN CH button Used to select the CHANNEL These buttons are also used to control the OSD LANGUAGE Q SOUND MUTE u button Press Mutes sound Press again Restores sound to previous level W PICTURE button For adjusting the PICTURE E CALL button Displays the channel and timer settings on the screen Ë Installing dry batteries in the remote control unit When using the TV set for the first time instal...

Page 6: ...N Infrared sensor window HEADPHONE jack VOLUME UP or DOWN button These are also used to make adjustment in PRESET mode CHANNEL UP CH or DOWN CH button Location of Controls continued TV Front This operation manual is for 14D2 SS 20D2 SS and 21D2 SS The illustration of 21D2 SS is used in this operation manual ...

Page 7: ... safety precaution turn off the main power by pressing the POWER switch on the TV set and unplug the cord from the outlet Press the POWER switch on the TV set to turn the TV set ON TV ON mode POWER indicator lights up brightly TV Standby mode POWER indicator lights up dimly Press the STANDBY ON ø button on the remote control or any of the CHANNEL UP CH or DOWN CH button on the TV set The POWER ind...

Page 8: ...o 100 positions Channel 0 to 99 One digit and two digit methods of selection can be used Follow the procedure shown below to select channels 0 1 4 7 2 5 8 3 6 9 CH CH To select a one digit channel e g Channel 5 1 Press the 5 button 2 If 5 is indicated and the picture does not change press the button to switch over to the 1 digit select mode and press the 5 button again To select a two digit channe...

Page 9: ... 0 NORMAL TIMER FUNCTION SYSTEM PICTURE 1 4 7 2 5 8 3 6 9 CH CH ENGLISH FRANCAIS BAHASA MELAYU Full Auto Channel Preset AUTO Automatically tunes in and presets receivable TV stations Press the PICTURE PRESET 1 button on the TV set for more than 2 seconds to turn on Full Auto Channel Preset Mode Press the VOLUME UP or DOWN button on the TV set All the TV stations in your area that can be received b...

Page 10: ...rs Press the PICTURE PRESET 1 button again to display the MANUAL mode screen Press the CHANNEL UP CH or DOWN CH button to choose the channel position to be set The illustration on the right shows that channel 5 has been selected to be set Press the VOLUME UP or DOWN button on the TV set to locate the channel you want to preset to the position Search is initiated and when a TV signal is received du...

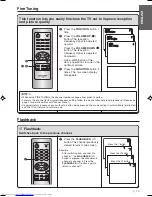
Page 11: ...signal is adjusted upward Press the VOLUME DOWN button The reception frequency signal is adjusted downward Use a combination of the above operations to tune in the optimum picture Press the FUNCTION button 5 times The on screen display disappears TV VIDEO TV 0 NORMAL TIMER FUNCTION SYSTEM PICTURE 1 4 7 2 5 8 3 6 9 CH CH z Flashback Switches back to the previous channel Press the FLASHBACK z button...

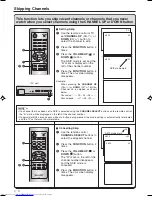
Page 12: ... or DOWN button The SKIP mode is set and the mark is displayed on the left of the channel number Press the FUNCTION button 4 times The on screen display disappears Example When pressing the CHANNEL UP CH or DOWN CH button Channel 25 is skipped as shown below Channel up 23 24 26 Channel down 27 26 24 TV VIDEO 0 NORMAL TIMER FUNCTION SYSTEM PICTURE 1 4 7 2 5 8 3 6 9 CH CH SKIP mode mark SKIP SKIP 25...

Page 13: ...displayed for PAL or SECAM When the NORMAL button is pressed while a PICTURE selection is displayed on the screen only the selected mode on the screen is reset to the standard factory setting position When the NORMAL button is pressed during NORMAL MODE all PICTURE selections are reset to the standard factory setting positions H PICTURE menu screen The following table lists the adjustment items sh...

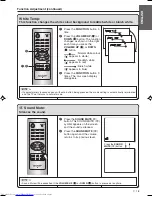
Page 14: ...set is 12 hours and 50 minutes In this state the Timer starts to count down When you have finished setting the time press the TIMER button 3 times The on screen display disappears TV VIDEO TV 0 NORMAL TIMER FUNCTION SYSTEM PICTURE 1 4 7 2 5 8 3 6 9 CH CH H Action of the Reminder 5 minutes before the preset length of time has passed the remaining time is displayed on the screen for 10 seconds When ...

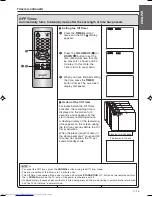
Page 15: ...nd the OFF display appears Press the VOLUME UP or DOWN button to set the time Maximum time that can be preset is 12 hours and 50 minutes In this state the Timer starts to count down When you have finished setting the time press the TIMER button 2 times The on screen display disappears TV VIDEO TV 0 NORMAL TIMER FUNCTION SYSTEM PICTURE 1 4 7 2 5 8 3 6 9 CH CH H Action of the Off Timer 5 minutes bef...

Page 16: ...andby mode If approximately 6 seconds pass without a button being pressed the mode setting is automatically terminated and the TV set returns to normal mode H Setting the On Timer Press the TIMER button 3 times and the ON display appears Press the VOLUME UP or DOWN button to set the time Maximum time that can be preset is 12 hours and 50 minutes In this state the Timer starts to count down When yo...

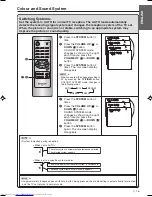
Page 17: ...button COLOUR SYSTEM mode changes in the following order TV VIDEO TV 0 NORMAL TIMER FUNCTION SYSTEM PICTURE 1 4 7 2 5 8 3 6 9 CH CH AUTO PAL N358 N443 SECAM Press the SYSTEM button 2 times Press the VOLUME UP or DOWN button SOUND SYSTEM mode changes as shown on the right each time you press the VOLUME UP or DOWN button Press the SYSTEM button again The on screen display disappears System indicatio...

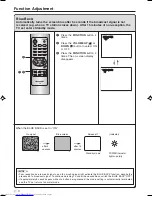
Page 18: ... TV under these conditions switch the BLUE BACK OFF If approximately 6 seconds pass without a button being pressed the mode setting is automatically terminated and the TV set returns to normal mode Press the FUNCTION button 4 times Press the VOLUME UP or DOWN button to select ON or OFF Press the FUNCTION button 2 times The on screen display disappears TV VIDEO TV 0 NORMAL TIMER FUNCTION SYSTEM PIC...

Page 19: ...n Normal white colour appears in white Reddish white appears in red Bluish white appears in blue Press the FUNCTION button 3 times The on screen display disappears TV VIDEO TV 0 NORMAL TIMER FUNCTION SYSTEM PICTURE 1 4 7 2 5 8 3 6 9 CH CH u Sound Mute Silences the sound Sound Mute will be cancelled if the VOLUME UP or DOWN button is pressed at anytime Press the SOUND MUTE u button This SOUND MUTE ...

Page 20: ... AV input programs Each time you press the TV VIDEO button the input switches over between AV and TV program TV VIDEO TV 0 NORMAL TIMER FUNCTION SYSTEM PICTURE 1 4 7 2 5 8 3 6 9 CH CH 25 AV PAL B G Press the CALL button again The channel number colour and sound system are display on the screen Press the CALL button once again The channel number display disappears and the screen returns to normal s...

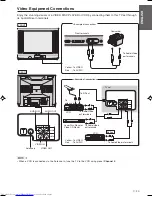
Page 21: ... 0 Example of connection Example of connection AV IN OUT AUDIO VIDEO AV IN OUT AUDIO VIDEO AV IN OUT AUDIO VIDEO Front terminals Camcorder To Audio Video out terminals To RF out TV set To antenna in To Audio Video out terminals To Audio Video out terminals To Audio Video in terminals Laser Disc Player or VCR VCR Editing Video CD Player AUDIO IN AUDIO OUT VIDEO IN VIDEO OUT Antenna in FRONT REAR Ye...

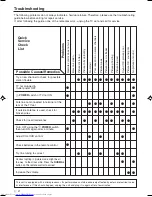
Page 22: ...ouble TV not plugged in Outlet power OFF POWER switch of TV not ON Antenna not connected to terminal at the rear of the TV set If outside antenna is used check for broken wires Check for local interference Turn OFF using the POWER switch then turn ON again after a minute Adjust COLOUR control Check batteries in the remote control Try fine tuning to correct Contrast setting in picture mode might be...

Page 23: ...CR Playback SECAM L French SECAM Using Video in terminals PAL 60 Hz NTSC 3 58 MHz Laserdisc PAL 5 5 MHz 60 Hz Player Playback PAL 6 0 MHz 60 Hz Using RF in terminals PAL 6 5 MHz 60 Hz Reception Channels PAL B G VHF E2 E12 ch SECAM B G UHF E21 E69 ch PAL D K VHF C1 C12 ch R1 R12 ch SECAM D K K1 UHF C13 C57 ch R21 R69 ch PAL I VHF B J ch UHF 21 69 ch Hong Kong CATV S1 S20 ch S21 S41 ch Hyper Receivi...

Reviews: