background image

E 2

D i m e n s i o n :   1 7 6   x   2 5 0   m m

F L E   ( M )   S d n .   B h d

Dear SHARP Customer

Thank you for buying SHARP's Colour
Television. We hope you will have many
years of enjoyment from this television
set. To ensure proper operation, please
read this manual carefully, and keep it in
a safe place for future reference.

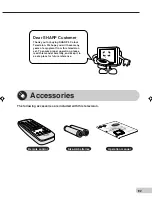
Remote control

Size-AA batteries

Operation manual

The following accessories are included with this television.

Accessories

MPX

SUR

ROU

ND

21H-FG5RU

TINS

-B32

8WJ

ZZ

04P

06-M

SF

21H-FG5RU[01-06]EN

14/4/04, 10:59 am

2

Summary of Contents for 21H-FG5RU

Page 1: ...MODEL OPERATION MANUAL C O L O U R T E L E V I S I O N MODEL 21H FG5RU Please read this operation manual carefully before using the colour television TINS B328WJZZ 04P06 MSF ...

Page 2: ...lay language selection 13 Auto channel tuning 14 Manual channel tuning 15 Channel setting 16 Picture adjustment 17 Sound adjustment 18 Blue screen 19 Text 20 Favourite channels 21 Surround sound 21 Off timer 22 On timer 23 Reminder on screen timer 24 Broadcast features NICAM broadcasts 25 A2 stereo system broadcasts 26 Teletext broadcasts 27 Connections Connecting to a DVD player 28 Watching DVD P...

Page 3: ...joyment from this television set To ensure proper operation please read this manual carefully and keep it in a safe place for future reference Remote control Size AA batteries Operation manual The following accessories are included with this television Accessories MPX SURROUND 21H FG5RU TINS B328WJZZ 04P06 MSF ...

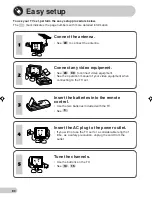
Page 4: ...ee 29 30 to connect video equipment See the operation manual of your video equipment when connecting to the TV set Insert the batteries into the remote control Use the two batteries included with the TV See 6 Insert the AC plug to the power outlet If you will not use the TV set for a considerable length of time as a safety precaution unplug the cord from the outlet Tune the channels Use the button...

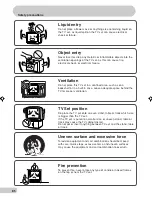
Page 5: ...dult and serious damage to the set Sharp recommends securing the TV set to a stable surface or wall to prevent the set from falling due to sudden shocks or impact Water To prevent fire or electrical shock do not place the TV set near a bathroom swimming pool or other area where it may become wet Moisture To prevent electrical shock do not use the TV set in an excessively damp place Power cord prot...

Page 6: ...eave adequate space behind the TV for proper ventilation TV Set position Do place the TV set onto an even stand table or track which size is bigger than the TV set If the TV set is put onto a smaller size or uneven stand table or track may cause the TV cabinet distort Do not put or insert anything between TV set and the stand table or track Uneven surface and excessive force Television equipment a...

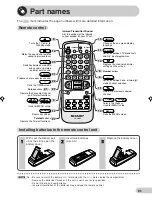
Page 7: ...window at the infrared sensor window on your TV set Calls the TIMER screen Mutes the sound and restores sound to previous level Adjusts the volume Used for MENU setup Resets all settings Teletext buttons Operate the Teletext functions Operate the Favourite Channel and Teletext functions Colour buttons Displays the channel and timer settings on the screen Number buttons Switches between one or two ...

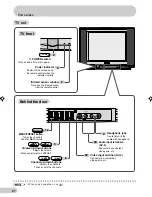
Page 8: ...Channel up down buttons Selects the channels Tunes or sets the channels CH CH Headphone jack Use to listen to the audio with headphone 9 Audio input terminals AV 2 Connects to a camcorder video game etc 30 Video input terminal AV 2 Connects to a camcorder video game etc 30 MENU PRESET button Tunes the channels Used for MENU setup 12 MENU PRESET Volume up down buttons Adjusts the volume Makes adjus...

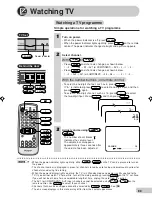
Page 9: ...d then press 5 again To select a two digit channel such as 15 press to select the two digit input Press 1 and then press 5 15 1 SECAM D K When the power indicator lights up dimly either CH CH on the TV can be pressed to turn on the power The channel number is displayed in green for channels tuned by auto tuning and displayed in yellow for channels tuned using fine tuning When the power indicator l...

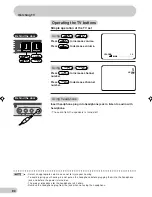
Page 10: ...the headphone plug from the jack when not using the headphone Operating the TV buttons Simple operation of the TV set Using Press to increase volume Press to decrease volume CH CH VOLUME 10 5 SECAM D K Using CH CH Press CH to increase channel number Press CH to decrease channel number Using headphone Insert headphone plug into headphone jack to listen to audio with headphone The audio from the spe...

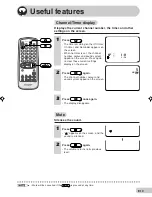
Page 11: ...n the screen When no timer is set the channel number colour and sound system appear on the screen Press again to clear these current settings display on the screen Useful features LANGUAGE TV VIDEO SURROUND CH CH NORMAL TV TEXT 1 2 3 4 5 6 7 8 0 9 MENU B A C D MPX 1 Press appears on the screen and the sound is silenced 2 Press again The volume returns to its previous level 3 Press once again The d...

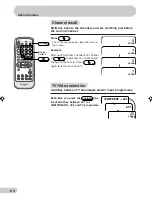
Page 12: ... 2 3 4 5 6 7 8 0 9 MENU B A C D MPX TV VIDEO Number buttons Channel recall Switches back to the channel you were watching just before the current channel 25 SECAM D K AV2 AV1 COMPONENT or Press The channel previously viewed returns to the screen Example After switching from channel 5 to channel 7 is pressed the channel will change to channel 5 Press again to return to channel 7 5 SECAM 7 SECAM 5 S...

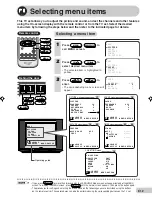
Page 13: ...creen To display the MENU screen press MENU PRESET until the normal screen appears then press the button again The procedures for setting and selecting the menu items on the following pages are described using the buttons on the remote control These procedures can also be performed using the corresponding buttons on the TV set PULL OPEN Operating guide MENU PICTURE SOUND FEATURE TIMER CH SETTING M...

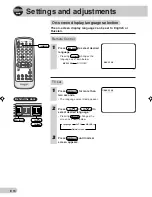
Page 14: ...ressing MENU PRESET changes the screen as shown below 1 Press MENU PRESET for more than two seconds The language select mode appear Language MANUAL Normal screen AUTO CH CH MENU PRESET Behind the door TV set LANGUAGE TV VIDEO SURROUND CH CH NORMAL TV TEXT 1 2 3 4 5 6 7 8 0 9 MENU B A C D MPX LANGUAGE 1 Press LANGUAGE to select desired language Pressing LANGUAGE changes the language as shown below ...

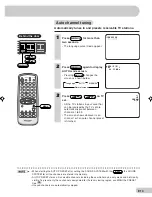
Page 15: ... preset only those channels designated for the local viewing region use MANUAL PRESET See 15 Unused channels are automatically skipped 1 SECAM D K 2 Press MENU PRESET again to display AUTO mode screen Pressing MENU PRESET changes the screen as shown below MENU PRESET 3 Press on TV set All the TV stations in your area that can be received by the TV set are automatically preset between channels 1 to...

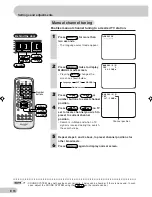
Page 16: ...V set to locate channel you wish to preset to current channel position Search is initiated and when a TV signal is received during the search the search stops 5 Repeat steps 3 and 4 above to preset channel positions for other broadcasts 6 Press MENU PRESET again to display normal screen Channel position LANGAUGE TV VIDEO SURROUND CH CH NORMAL TV TEXT 1 2 3 4 5 6 7 8 0 9 MENU B A C D MPX MENU Numbe...

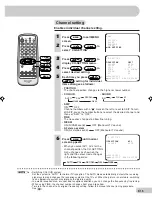
Page 17: ...es to allow fine tuning NICAM ON NICAM sound OFF Monaural TV sound A2 stereo system ON A2 stereo sound OFF Monaural TV sound Switching COLOUR system Set the system to AUTO for normal TV reception The AUTO mode automatically detects the receiving signal system and changes the reception system of the TV set When the picture is not stable switching to an appropriate system may improve the picture qua...

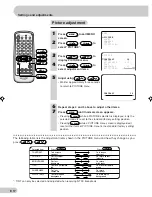
Page 18: ...CH CH NORMAL TV TEXT 1 2 3 4 5 6 7 8 0 9 MENU B A C D MPX CH CH MENU NORMAL 3 Press to display PICTURE menu 4 Press CH CH to select adjustment items CONTRAST 50 5 Adjust using Wait for approximately three seconds to return to PICTURE menu CONTRAST Selected item Press Press COLOUR BRIGHTNESS TINT SHARPNESS To decrease contrast For less colour intensity For less brightness To move tint toward red Fo...

Page 19: ...set all the items of SOUND menu to the standard factory setting position SURROUND ON ON TREBLE BASS Selected item To decrease treble To decrease bass To increase treble To increase bass Press Press BALANCE To shift balance toward left To shift balance toward right OFF LANGUAGE TV VIDEO SURROUND CH CH NORMAL TV TEXT 1 2 3 4 5 6 7 8 0 9 MENU B A C D MPX CH CH MENU NORMAL 3 Press to display SOUND men...

Page 20: ...ROUND CH CH NORMAL TV TEXT 1 2 3 4 5 6 7 8 0 9 MENU B A C D MPX CH CH MENU MENU PICTURE SOUND FEATURE TIMER CH SETTING MENU ENTER RETURN SELECT CH 1 Press MENU to call MENU screen 2 Press CH CH to select FEATURE 3 Press to display FEATURE menu 4 Press CH CH to select BLUE BACK 5 Press to select ON or OFF 6 Press MENU until normal screen appears FEATURE BLUE BACK OFF TEXT 3 MENU ADJUST RETURN SELEC...

Page 21: ...English 1 Indonesia English 1 Malaysia English 1 Malta English 1 New Zealand English 1 Singapore English 1 South Africa English 1 UK English 1 Thailand English Thai 1 Austria German 1 Germany German 1 Holland German 1 Denmark Swedish 1 Finland Swedish 1 Norway Swedish 1 Sweden Swedish 1 Italy Italian 1 France French 1 Belgium French German 1 Switzerland French German Italian 1 Iceland Spanish 1 Po...

Page 22: ...her favourite channel repeat steps 1 and 2 above To change a preset favourite channel repeat steps 1 and 2 above Turns to white 12 Settings and adjustments LANGUAGE TV VIDEO MPX SURROUND CH CH NORMAL TV TEXT 1 2 3 4 5 6 7 8 0 9 MENU B A C D SURROUND Surround sound Produces a virtual surround sound from the TV s speakers Each time you press SURROUND the mode changes between ON ON and OFF OFF Produc...

Page 23: ... length of time expires in the example after two hours and 25 minutes the remaining time appears on the screen for several seconds A flashing display of the remaining time appears during the last few seconds When the preset length of time has passed the TV set enters the Standby mode 1 Press to display TIMER screen 2 Press CH CH to select OFF To cancel the timer setting press NORMAL when is displa...

Page 24: ... screen 2 Press CH CH to select ON 3 Press to set time for TV to turn on Maximum time that can be preset is 12 hours and 50 minutes As soon as the time is entered the timer starts to count down TV Set Power indicator Flashing To cancel the timer setting press NORMAL when is displayed on the left of ON so as to set the timer to The timer can be set in ten minute intervals The On Timer is cancelled ...

Page 25: ...te intervals To cancel the timer setting press NORMAL when is displayed on the left of so as to set the timer to TIMER OFF ON 1 50 POSITION VOLUME MENU ADJUST RETURN SELECT CH 3 Press to set time Maximum time that can be preset is 12 hours and 50 minutes The right example shows that the Reminder will be activated after one hour 50 minutes 4 Press until normal screen appears Five minutes before the...

Page 26: ... Hong Kong NICAM B G National and regional broadcast system used in Singapore Malaysia and New Zealand NICAM D K National and regional broadcast system used in Russia and China 6 Press MENU twice to display normal screen When set to OFF the TV sound is output in monaural MENU ADJUST RETURN SELECT CH CH SETTING POSITION COLOUR SOUND SKIP FINE NICAM A2 CH27 AUTO D K OFF OFF ON 168 25MHz LANGUAGE TV ...

Page 27: ...ch time you press MPX the mode switches between MAIN or SUB Stereo Each time you press MPX the mode switches between STEREO and MONO If the sound quality is poor due to a weak signal or other problems during A2 stereo broadcast reception set A2 to OFF to change the TV sound to monaural 6 Press MENU twice to display normal screen When set to OFF the TV sound is output in monaural When A2 is set to ...

Page 28: ...he Teletext image presently on the screen Press a second time to enlarge the bottom half of the Teletext image presently on the screen Press a third time to restore the regular Teletext image Press a fourth time to return to the start of the sequence Top Bottom Full button Press to display the initial page of a Teletext broadcast Press again to simultaneously display the TV picture and Teletext in...

Page 29: ...ng to a DVD player The DVD input terminals COMPONENT IN on the rear of the TV can be used to input high quality images from a DVD player COMPONENT R ı AUDIO ı L VIDEO AV 1 IN OUT MONO Y PB CB PR CR DVD input terminals COMPONENT R ı AUDIO ı L VIDEO AV 1 IN OUT MONO Y PB CB PR CR DVD player To colour difference component video out terminals Green To Y Blue To PB CB Red To PR CR Red To AUDIO R White ...

Page 30: ...ng to an antenna via a VCR You can also connect the TV set to the tuner on a VCR using the connection shown below When using the RF terminal connection set the TV to channel zero to make initial adjustments for the VCR Turn off the power on the TV set and the VCR being connected before making the above connections Be sure the cord plugs are fully inserted in the connection terminals See the operat...

Page 31: ... Player VCR Yellow To VIDEO White To AUDIO L Red To AUDIO R Example use of rear terminals Turn off the power on the TV set and the VCR being connected before making the above connections Be sure the cord plugs are fully inserted in the connection terminals For playback of monaural audio connect the external source to the audio input left terminal on the front or rear of the TV set MONO to hear the...

Page 32: ...ol Try fine tuning to correct Contrast setting in picture mode might be all the way to the minus side Press the NORMAL button on the remote control to correct Increase the volume Problems Remote control does not work Bars on screen Picture distorted Picture rolls vertically No colour Poor reception on some channels Picture weak Picture lines or streaks Picture ghosting Picture blurred Sound OK pic...

Page 33: ...nch SECAM Using Video in terminals Laserdisc Player Playback PAL 5 5 MHz 60 Hz Using RF in terminals PAL 6 0 MHz 60 Hz PAL 6 5 MHz 60 Hz NTSC 3 58 4 5 MHz 50 Hz Stereo Broadcast NICAM I B G D K A2 stereo B G Reception Channels PAL B G VHF E2 E12 ch SECAM B G UHF E21 E69 ch PAL D K VHF C1 C12 ch R1 R12 ch SECAM D K K1 UHF C13 C57 ch R21 R69 ch PAL I VHF B J ch UHF 21 69 ch Hong Kong NTSC VHF 2 13 c...

Page 34: ...SHARP CORPORATION ...
Reviews: