background image

ENGLISH

RUSSKIJ

FRANÇAIS

C O L O U R   T E L E V I S I O N
TÉLÉVISEUR COULEUR

Ц В Е Т Н О Й  Т Е Л Е В И З О Р

OPERATION MANUAL

ИНСТРУКЦИЯ ПО ЭКСПЛУАТАЦИИ

M O D E   D ’ E M P L O I

29K-F200F

Пожалуйста, перед началом 
эксплуатации цветного телевизора 
внимательно ознакомьтесь с настоящей 
инструкцией по эксплуатации.

Please read this operation manual
carefully before using the colour 
television.

Veuillez lire attentivement ce 
mode d’emploi avant d’utiliser ce 
téléviseur couleur.

TINS-C115WJZZ
05P12-MSM

29K-F200F

TINS-C115WJZZ
05P12-MSM

Summary of Contents for 29K-F200F

Page 1: ...K F200F Пожалуйста перед началом эксплуатации цветного телевизора внимательно ознакомьтесь с настоящей инструкцией по эксплуатации Please read this operation manual carefully before using the colour television Veuillez lire attentivement ce mode d emploi avant d utiliser ce téléviseur couleur TINS C115WJZZ 05P12 MSM 29K F200F TINS C115WJZZ 05P12 MSM ...

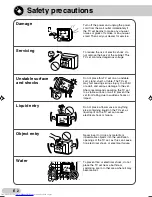
Page 2: ...off the power and unplug the power cord from the wall outlet immediately if the TV set begins to make any unusual noises or gives off smoke or an unusual smell Then call your dealer for service Servicing To reduce the risk of electric shock do not remove the back of the cabinet This TV set contains dangerous voltage Unstable surface and shocks Liquid entry Never insert or drop any metallic or infl...

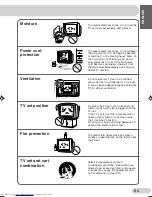
Page 3: ...n a bookshelf or in a built in case Leave adequate space behind the TV for proper ventilation TV set position Do place the TV set onto an even stand table or rack which size is bigger than the TV set If the TV set is put onto a smaller size or uneven stand table or rack may cause the TV cabinet to distort Do not put or insert anything between TV set and the stand table or rack Fire prevention To p...

Page 4: ...P on off and PIP size selection 16 Move 16 Input channel selection of inset screen 17 Swap Freeze 17 Channel scan function Channel scan 19 Freeze function Freeze 20 Twin screen function Twin screen 18 Swap 18 Settings and adjustments On screen display language selection 22 Auto channel tuning 23 Manual channel tuning 24 Channel setting 25 Picture adjustment 26 Sound adjustment 27 Surround sound 28...

Page 5: ... will have many years of enjoyment from this television set To ensure proper operation please read this manual carefully and keep it in a safe place for future reference Remote control Size AA batteries Operation manual The following accessories are included with this television Accessories ...

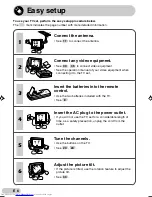
Page 6: ... of your video equipment when connecting it to the TV set Insert the batteries into the remote control Use the two batteries included with the TV See 8 Insert the AC plug to the power outlet If you will not use the TV set for a considerable length of time as a safety precaution unplug the cord from the outlet Tune the channels Use the buttons on the TV See 23 24 2 3 4 5 Adjust the picture tilt If ...

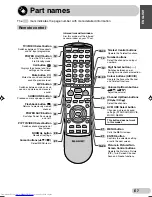
Page 7: ...uces a more spacious sound POWER SAVE button Switches Power Save mode on or off PIP TV VIDEO Select button Switches channel selection of inset screen NORMAL button Resets all settings Number buttons Select the channels and input numbers Digit Select button Switches between one or two digit mode channel selection Colour buttons A B C D Operate the Favourite Channel and Teletext functions AV MODE Se...

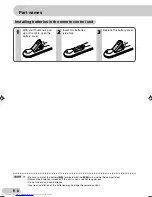
Page 8: ...e batteries if weak or if the unit is not in use for long periods Do not mix old and new batteries Incorrect installation of the batteries may damage the remote control With your thumbnail pull up at the slit to open the battery cover Insert two batteries size AA Replace the battery cover Installing batteries in the remote control unit 1 2 3 ...

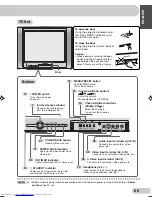
Page 9: ... Lights up red when Power Save mode is on POWER SAVE sensor Room brightness sensor Audio input terminals AV 3 IN Connects to a camcorder video game etc MENU PRESET button Used for MENU setup Tunes the channels 13 S Video input terminal SAV3 Connects to a camcorder video game etc Bottom 12 7 31 45 45 45 13 31 35 12 13 13 21 Volume Up Down buttons Adjust the volume Make adjustments in PRESET Channel...

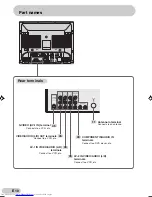
Page 10: ...onnect to a DVD player etc AV 2 IN VIDEO AUDIO L R terminals Connect to a VCR etc AV 1 IN VIDEO AUDIO L R terminals Connect to a VCR etc VIDEO AUDIO L R OUT terminals Connect to a VCR etc S VIDEO AV 1 IN terminal Connects to a VCR etc 11 Antenna In terminal Connects to an antenna ...

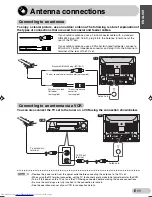
Page 11: ...ing the RF terminal connection set the TV to channel zero to make initial adjustments for the VCR Turn off the power on the TV set and the VCR being connected before making the above connections Be sure the cord plugs are fully inserted in the connection terminals See the operation manual of your VCR for connection details Connecting to an antenna To enjoy a clearer picture use an outdoor antenna ...

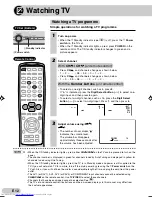
Page 12: ...o digit input Press 1 and then press 5 When the Standby indicator lights up red either CH CH on the TV can be pressed to turn on the power The channel number is displayed in green for channels tuned by Auto Tuning and displayed in yellow for channels tuned using Fine Tuning When the Standby indicator lights up red the TV is in Standby mode and power is still supplied to the TV If you will not watc...

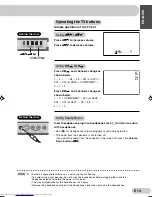
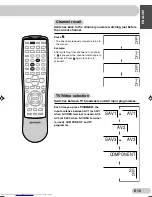
Page 13: ... Using Press to increase volume Press to decrease volume Using CH CH Press CH and channels change as shown below 1 2 98 99 AV1 or SAV1 AV2 AV3 or SAV3 COMPONENT 0 1 2 Press CH and channels change as shown below 1 0 COMPONENT AV3 or SAV3 AV2 AV1 or SAV1 99 98 2 1 0 Using headphones Insert headphones plug into headphones jack to listen to audio with headphones See 32 for headphones volume adjustment...

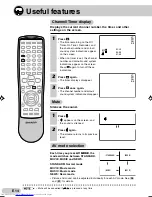
Page 14: ...ons Useful features 1 Press appears on the screen and the sound is silenced 2 Press again The volume returns to its previous level 3 Press once again The channel number and colour sound system indications disappear Each time you press AV MODE the mode switches between STANDARD MOVIE MUSIC and NEWS STANDARD Normal mode MOVIE Movie mode MUSIC Music mode NEWS News mode Picture and sound can be adjust...

Page 15: ...inal is used COMPONENT and TV programme Channel recall Switches back to the channel you were watching just before the current channel Press The channel previously viewed returns to the screen Example After switching from channel 5 to channel 7 is pressed the channel will change to channel 5 Press again to return to channel 7 PAL PAL PAL PAL 5 7 5 7 B G B G B G B G COMPONENT 25 AV S 1 AV1 AV2 or AV...

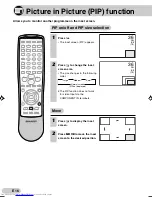
Page 16: ... video input via the COMPONENT IN terminals 1 Press The inset screen PIP appears Picture in Picture PIP function 1 Press to display the inset screen 2 Press MOVE to move the inset screen to the desired position Move Large Small Normal screen PIP not displayed Medium B G 10 PAL 36 B G 10 PAL 36 Allows you to monitor another programme on the inset screen ...

Page 17: ...nges over with the main screen 2 Press FREEZE The inset screen displays a still picture If SWAP is pressed during Freeze mode the Freeze function is cancelled and the inset screen changes over with the main screen Swap Freeze AV1 AV3 TV AV2 36 B G PAL 5 B G PAL 5 36 AV1 B G PAL 5 When the colour system is different between the main screen and the inset screen the aspect ratio of the inset screen m...

Page 18: ...d external input The Twin screen function does not work for video input via the COMPONENT IN terminals 1 When the two images are displayed press SWAP The main screen changes over with the sub screen 2 Press SWAP again to return the images to their original positions 36 0 1 Main screen Sub screen 10 6 3 Main screen Sub screen 36 0 1 36 Main screen Sub screen Sound can be heard via TV speakers Sound...

Page 19: ...ub screens in numeric order If there are more than 9 preset channels the 10th channel and after will be displayed on a new screen Channel scan For fast and easy channel selection this function displays each tuned channel in numeric order Channel scan function 1 1 0 4 7 2 5 8 3 6 9 Normal screen Ex Channel 10 Channel scan screen 3 Ex Channel 3 2 Press CH SCAN again to return to the normal screen Sk...

Page 20: ...ge while the left half displays a moving image Freeze Use to temporarily freeze a video image such as when you want to copy down important information from the screen or freeze an image from a sports programme Freeze function The Freeze function cannot be used with the Channel Scan function 36 36 Moving image Still image ...

Page 21: ... remote control These procedures can also be performed using the corresponding buttons on the TV set Selecting menu items MENU PRESET MENU P I CTURE SOUND FEATURE T IMER CH SETT ING MENU P I CTURE SOUND FEATURE T IMER CH SETT ING MED STANDARD TREBLE SOUND 0 BASS 0 SUPER BASS IUM SURROUND OFF LEVEL BALANCE 0 SELECT F IX ENTER MENU RETURN Operation guide MENU button ENTER button Cursor Up Down butto...

Page 22: ...ntil normal screen appears 2 Press CH CH to select desired language Pressing MENU PRESET changes the screen as shown below 1 Press and hold down MENU PRESET for more than two seconds The Language Select screen appears Language MANUAL Normal screen AUTO TV set I SH A I S Й A MELAYU ENGL FRANÇ BAHAS И РУССК MENU PRESET I SH A I S Й A MELAYU ENGL FRANÇ BAHAS И РУССК Behind the door ...

Page 23: ...arly visible To preset only those channels designated for the local viewing region use Manual Preset See 24 Unused channels are automatically skipped 2 Press MENU PRESET again to display AUTO mode screen Pressing MENU PRESET changes the screen as shown below 3 Press on TV set All the TV stations in your area that can be received by the TV set are automatically preset between channels 1 to 99 The s...

Page 24: ...position 4 Press on TV set to locate channel you wish to preset to current channel position Search is initiated and when a TV signal is received during the search the search stops 5 Repeat steps 3 and 4 above to preset channel positions for other broadcasts MENU PRESET I SH A I S Й A MELAYU ENGL FRANÇ BAHAS И РУССК L B G 1 25MHz VHF MANUA 48 L B G 5 50MHz Channel position VHF MANUA 107 6 Press MEN...

Page 25: ...witching to an appropriate system may improve the picture quality In a weak reception area or under bad reception conditions you can change the frequency by Fine Tuning When using Fine Tuning FINE the channel number changes from green to yellow To return the channel to its original frequency setting follow the manual channel tuning procedure See 24 6 Press MENU until normal screen appears When you...

Page 26: ...ing deteriorated video tapes or when receiving broadcasts with relatively weak signals In these cases set PICTURE NR to LOW MID or HIGH to reduce the noise However when receiving good images without noise you can get better image quality by turning OFF this feature MENU P I CTURE SOUND FEATURE T IMER CH SETT ING STANDARD CONTRAS P I CTURE T 50 COLOUR 0 BRIGHTNESS 0 T INT SHARPNESS 0 P I CTURE NR L...

Page 27: ...djustment items shown in the SOUND menu and how they change as you press 5 Adjust using LEVEL can only be selected and adjusted when SURROUND is set to ON SURROUND TREBLE BASS Selected item The surround effect is ON To decrease treble To decrease bass The surround effect is OFF LEVEL To decrease surround effect level To increase surround effect level To increase treble To increase bass SUPER BASS ...

Page 28: ...the TV s speakers Favourite channels The colour buttons A B C and D can be used to select up to four user registered channels 1 Press CH CH to select your favourite channel E g Channel 12 2 Press A for example until channel number display turns white The display will disappear after three seconds and the selected channel is then preset 3 To watch favourite channel press A The preset favourite chan...

Page 29: ...ver BLUE BACK Blue screen 1 Press MENU to call MENU screen 2 Press to select FEATURE 3 Press ENTER to display FEATURE menu 4 Press to select BLUE BACK 5 Press to select ON or OFF 6 Press MENU until normal screen appears MENU P I CTURE SOUND FEATURE T IMER CH SETT ING CH SELECT ENTER MENU RETURN VOLUME 2 SELECT SUB ROTAT ION 0 I P MODE AUTO BLUE BA FEATURE CK ON AUTO SELECT SAVE OFF 0 ON after 5 se...

Page 30: ... return to a TV channel 1 Press MENU to call MENU screen 2 Press to select FEATURE 3 Press ENTER to display FEATURE menu 4 Press to select AUTO SELECT 5 Press to select ON or OFF 6 Press MENU until normal screen appears To use the Auto Select function confirm the following The TV set is turned on The Standby indicator lights up green The video equipment such as a video game system or camcorder is ...

Page 31: ...s MENU to call MENU screen 2 Press to select FEATURE TV Set Bottom 1 Press POWER SAVE to display the SAVE mode screen 2 Each time you press POWER SAVE the mode toggles between ON and OFF When SAVE is set to ON the POWER SAVE indicator on the TV set lights up red When SAVE is set to OFF the POWER SAVE indicator on the TV set turns off 3 Press to turn off the SAVE mode screen Using MENU screen Using...

Page 32: ...nu 4 Press to select SELECT 5 Press to select MAIN or SUB When MAIN is selected you can listen to Normal screen audio during Normal Screen mode Main screen audio during PIP mode Left screen audio during Twin Screen mode When SUB is selected you can listen to Normal screen audio during Normal Screen mode Inset screen audio during PIP mode Right screen audio during Twin Screen mode 6 Press MENU unti...

Page 33: ... call MENU screen 2 Press to select FEATURE 3 Press ENTER to display FEATURE menu 4 Press to select IP MODE 5 Press to select I P or AUTO I 100 120 Hz Interlaced signal output P Progressive signal output AUTO 100 Hz Interlaced signal output when 50i signal is input Progressive signal output when 60i signal is input 6 Press MENU until normal screen appears MENU P I CTURE SOUND FEATURE T IMER CH SET...

Page 34: ... of the remaining time appears during the last few seconds When the preset length of time has passed the TV set enters the Standby mode 1 Press MENU to call MENU screen 2 Press to select TIMER To cancel the Off Timer setting press NORMAL when OFF is selected on TIMER menu The time is reset to The timer can be set in ten minute intervals The Off Timer is cancelled if the power is turned off or set ...

Page 35: ...increases from zero to the preset volume 1 Press MENU to call MENU screen 2 Press to select TIMER To cancel the On Timer setting press NORMAL when ON is selected on TIMER menu The time is reset to The timer can be set in ten minute intervals The On Timer is cancelled if the power is turned off using the Power switch on the TV set If the TV set is turned on by the On Timer then the TV set will be a...

Page 36: ...time that can be preset is 12 hours and 50 minutes The right example shows that the Reminder will be activated after 1 hour and 50 minutes 6 Press MENU until normal screen appears Five minutes before the preset length of time expires in the example after one hour and 45 minutes and each minute thereafter the remaining time appears on the screen for several seconds When the preset length of time ha...

Page 37: ...een M1 main sound M2 sub sound and MONO Monaural Each time you press MPX the mode switches between NICAM MONO and MONO The setting can be selected individually for each channel position NICAM I National and regional broadcast system used in the UK and Hong Kong NICAM B G National and regional broadcast system used in the Singapore and New Zealand Broadcast features NICAM STEREO 49 MONO 49 M2 49 M1...

Page 38: ... and SUB Bilingual The setting can be selected individually for each channel position A2 stereo B G National and regional broadcast system used in Malaysia Thailand and Australia A2 stereo system broadcasts Enables selection of reception mode when receiving an A2 stereo signal B G STEREO 49 49 MONO MAIN 49 SUB 49 Broadcast features ...

Page 39: ...tions Depending on the TV programme the Teletext pages are transmitted using different systems Your SHARP TV is adjusted to receive two Teletext systems namely FLOF and LIST which are automatically identified by the receiver You can easily identify them by the manner in which they appear on the screen FLOF and LIST Entering and leaving Teletext mode Page selection Fast page selection Select an app...

Page 40: ...me you press the button the upper lower half of the Teletext page is magnified and displayed on the screen Hold Press to hold a Teletext page or sub page on the screen Press again to cancel the Hold mode Reveal Press to reveal hidden information such as the answer to a quiz Press again to hide the information Teletext mode Teletext screen Mixed mode The Teletext broadcast is superimposed onto the ...

Page 41: ...ly stored in the memory See 42 for more information on Teletext page memory list Press again to switch from LIST mode to FLOF system Index Press to return to the index page Reset Press to return to the index page and exit Teletext mode Clock In TV mode When a TV signal with Teletext data is received press to display the real time information on the top right area of the screen In Teletext mode Whe...

Page 42: ...ports Movie Weather LIST Teletext P 300 100 200 300 400 LIST Teletext P 315 100 200 315 400 If you want to store the page press Broadcast features 1 Select the programme channel number into which you want to store Teletext page numbers 2 Press to select the Teletext mode FLOF 3 Press LIST to change from FLOF system to LIST mode 4 Press the Colour button A B C or D corresponding to the coloured bra...

Page 43: ...olour button A B C or D selects the following pages A Current page number minus 1 B Current page number plus 1 LIST Teletext P 100 100 200 315 400 LIST Teletext P 315 100 200 315 400 FLOF Teletext P 100 News Sports Movie Weather News Sports Movie Weather 1 Select an appropriate programme channel 2 Press to select the Teletext mode 3 Press LIST to change from FLOF system to LIST mode 4 To recall a ...

Page 44: ...terminals by the plugs and not the cables themselves Connecting to a DVD player The DVD input terminals COMPONENT IN on the rear of the TV can be used to input high quality images from a DVD player Watching DVD playback 1 Press TV VIDEO to select COMPONENT DVD input screen Connecting the video terminals DVD input terminals DVD player Y Y or Y Y PB CB PB CB or B Y Pb PR CR PR CR or R Y Pr COMPONENT...

Page 45: ...uipment may differ from those shown in the above diagram See the operation manual of your video equipment for connection details The above recording and editing connections are intended solely for personal use and not for the illegal copying of audio visual material protected by copyright laws Connection to both the S VIDEO and VIDEO terminals on the front of this TV will cause picture distortion ...

Page 46: ...using the Power switch then turn ON again after a minute Adjust COLOUR control Check batteries in the remote control Try fine tuning to correct CONTRAST or BRIGHTNESS setting in picture mode might be all the way to the minus side Increase the volume Problems Remote control does not work Bars on screen Picture distorted Picture rolls vertically No colour Poor reception on some channels Picture weak...

Page 47: ... S VIDEO SECAM Special VCR and VDP Video in 50 60 Hz playback S Video in 50 60 Hz DVD playback COMPONENT IN Progressive signal 50 60 Hz Interlaced signal 50 60 Hz Stereo broadcast A2 stereo B G NICAM I B G D K Reception Channels PAL B G VHF E2 E12 ch SECAM B G UHF E21 E69 ch PAL D K VHF C1 C12 ch R1 R12 ch SECAM D K K1 UHF C13 C57 ch R21 R69 ch PAL I VHF B J ch UHF 21 69 ch Hong Kong NTSC VHF 2 13...

Reviews: