background image

11

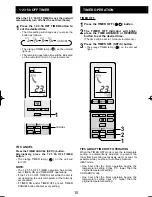
TIMER ON 

1

  Press the TIMER ON ( 

 ) button.

2

 The TIMER ON indicator will blink; 

press the TIME ADVANCE or REVERSE 
button to set the desired time. 


(The time can be set in 10-minute increments.)

3

  Press the TIMER SET (SET/C) button.

•  The orange TIMER lamp ( 

 ) on the unit will 

light.

4

  Select the operation condition.

NOTE:

•  The unit will turn on prior to the set time to allow 

the room to reach the desired temperature by the 
programmed time. (Awaking function)

COMBINED USE OF ON AND OFF TIMERS

You can use the ON and OFF timers in 
combination.

Example:

To stop operation at 11:00 p.m. and resume 
operation to bring the room temperature to the 
desired level by 7:00 a.m.

1

  Set the TIMER OFF to 11:00 p.m. during 

operation.

2

  Set the TIMER ON to 7:00 a.m.


The arrow (   or   ) between the TIMER ON 
indicator and the TIMER OFF indicator shows 
which timer will activate fi rst.

NOTE:

• You cannot programme the ON-TIMER and 

OFF-TIMER to operate the unit at different 
temperatures or other settings.

•  Either timer can be programmed to activate prior 

to the other.

CANCEL

1

3

2

TO CANCEL TIMER MODE

Press the TIMER CANCEL (SET/C) button.

•  The orange TIMER lamp ( 

 ) on the unit will turn 

off.

•  The current clock time will be displayed on the 

remote control.

NOTE:

• If any TIMER ON, TIMER OFF and ONE-HOUR 

OFF TIMER are set, the TIMER CANCEL button 
cancels all settings.

TO CHANGE TIME SETTING

Cancel the TIMER setting fi rst, then set it again

Before setting the timer, make sure the clock is properly set with the current time.

AY ZP48LZ_eng_cov.indd 11

09.10.30 2:17:08 PM

Summary of Contents for AE-Z48LZ

Page 1: ...AIR TO AIR HEAT PUMP OPERATION MANUAL Plasmacluster is a trademark of SHARP Corporation INDOOR UNIT OUTDOOR UNIT AY ZP48LZ AE Z48LZ ...

Page 2: ......

Page 3: ...ERATION 10 PLASMACLUSTER OPERATION 12 SELF CLEAN OPERATION 12 VACANCY OPERATION 13 ADDITIONAL NOTES ON OPERATION 13 MAINTENANCE 14 BEFORE CALLING FOR SERVICE 15 SPECIFICATIONS 15 IMPORTANT SAFETY INSTRUCTIONS WARNINGS FOR INSTALLATION REMOVAL REPAIR For your safety ensure that your new heat pump is installed by a licensed heat pump contractor in accordance with the AUSTRALIAN NEW ZEALAND WIRING RU...

Page 4: ...ical airflow Louvre 8 Horizontal airflow Louvre 9 Outlet Air 0 PLASMACLUSTER Lamp blue q OPERATION Lamp red w TIMER Lamp orange e FULL POWER Lamp green OUTDOOR UNIT rInlet Air tRefrigerant Pipe and Cable yDrainage Hose uOutlet Air NOTE Actual units might vary slightly from those shown above 1 2 3 4 5 6 7 8 9 0 q w e r t y u ...

Page 5: ...MER ON Button p TIMER SET CANCEL Button a TIME ADVANCE Button s TIME REVERSE Button d CLOCK Button f DISPLAY Button g RESET Button h TIMER OFF Button REMOTE CONTROL DISPLAY MODE Symbols FAN SPEED Symbols PLASMACLUSTER Symbol AIR FLOW Symbol COOL DRY AIRFLOW Symbol HEAT COANDA AIRFLOW Symbol HEAT ENERGY SAVE Symbol BATTERY Symbol TRANSMITTING Symbol SELF CLEAN Symbol Q COANDA AIRFLOW Symbol COOL DR...

Page 6: ... battery life is approximately one year in normal use Replace the batteries when the remote control displays When you replace the batteries always change both batteries and make sure they are the same type If the remote control does not operate properly after replacing the batteries press the RESET button If you will not be using the unit for a long time remove the batteries from the remote contro...

Page 7: ...n necessary temperature point will result in increased power consumption BLOCK DIRECT SUNLIGHT AND PREVENT DRAFTS Blocking direct sunlight during cooling operation will reduce power consumption Close the windows and doors during cooling and heating operations SET PROPER AIR FLOW DIRECTION TO OBTAIN THE BEST AIR CIRCULATION KEEP THE FILTER CLEAN TO ENSURE THE MOST EFFICIENT OPERATION USE THE TIMER ...

Page 8: ...f 18 C to 32 C DRY MODE The temperature can be changed up to 2 C above or below the temperature automatically determined by the unit 3 To change the fan speed press the FAN button AUTO SOFT LOW HIGH In the DRY mode the fan speed is preset to AUTO and cannot be changed 4 To turn off the unit press the STOP button The red OPERATION lamp on the unit will turn off BASIC OPERATION Example 1 C higher Ex...

Page 9: ... the SWING range in order to prevent condensation from dripping CAUTION Never attempt to adjust the louvres manually Manual adjustment of the louvres can cause the unit to malfunction When the vertical airflow louvre is positioned at the lowest position in the COOL or DRY mode for an extended period of time condensation may re sult VERTICAL AIR FLOW DIRECTION 1 Press the SWING button The vertical ...

Page 10: ...set obliquely upward to deliver cool air to the ceiling in order to avoid direct airflow In heat mode the vertical airflow louvre is set downward to deliver warm air down to the floor 1 During operation press the COANDA AIRFLOW button HEAT mode The remote control will display COOL DRY mode The remote control will display TO CANCEL Press the COANDA AIRFLOW button again NOTE If you want the COANDA A...

Page 11: ... set the temperature or fan speed during the FULL POWER operation To turn off the FULL POWER lamp press the DISPLAY button The ENERGY SAVING operation and the FULL POWER operation can not be used together FULL POWER OPERATION ENERGY SAVING OPERATION The temperature set point is automatically controlled to save energy 1 During operation press the ENERGY SAVE button The remote control will display T...

Page 12: ...rate at the formerly set condition If TIMER ON and or TIMER OFF are set TIMER CANCEL button cancels every setting TIMER OPERATION TIMER OFF 1 Press the TIMER OFF button 2 The TIMER OFF indicator will blink press the TIME ADVANCE or REVERSE button to set the desired time The time can be set in 10 minute increments 3 Press the TIMER SET SET C button The orange TIMER lamp on the unit will light TIPS ...

Page 13: ...evel by 7 00 a m 1 Set the TIMER OFF to 11 00 p m during operation 2 Set the TIMER ON to 7 00 a m The arrow or between the TIMER ON indicator and the TIMER OFF indicator shows which timer will activate first NOTE You cannot programme the ON TIMER and OFF TIMER to operate the unit at different temperatures or other settings Either timer can be programmed to activate prior to the other CANCEL 1 3 2 ...

Page 14: ...button when the unit is not operating The mode symbol of the remote control will go off and the fan speed cannot be set to AUTO SELF CLEAN OPERATION SELF CLEAN operation using Plasmacluster ions helps to reduce the growth mold fungus and dry inside of the unit It is recommended to utilize the operation at seasonal change over 1 Press the SELF CLEAN button when the unit is not operating The remote ...

Page 15: ...n the same settings which were active before the power failure except for timer settings If the timers were set before a power failure they will need to be re set after power recovery PREHEATING FUNCTION In the HEAT operation the indoor fan may not start for two to five minutes after the unit is turned on to prevent cold air from blowing out of the unit DE ICING FUNCTION When ice forms on the heat...

Page 16: ...al disposal laws and regulations AIR PURIFYING filter materials Filter Polypropylene Frame Polyester MAINTENANCE Be sure to stop the operation and turn off the circuit breaker before performing any mainte nance CLEANING THE FILTERS The air filters should be cleaned every two weeks 1 Turn off the unit 2 Remove the filters 1 Lift the open panel 2 Push the air filters up slightly to unlock them 3 Pul...

Page 17: ...ROM THE PLASMACLUSTER AIR OUTLET This is the smell of ozone generated from the Plasmacluster Ion generator The ozone concentration is very small posing no adverse effect on your health The ozone discharged into the air rapidly decomposes and its density in the room will not increase Check the following points before calling for service IF THE UNIT FAILS TO OPERATE Check if the circuit breaker has ...

Page 18: ...16 ...

Page 19: ...17 ...

Page 20: ...18 Printed in Thailand TINSEA629JBRZ 09K TH 1 ...

Reviews: