22
Useful Features (Continued)
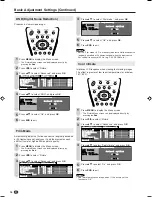
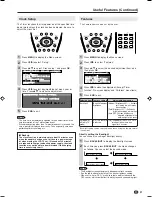
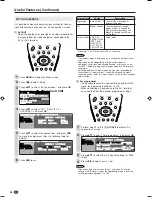
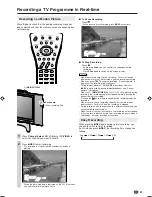
Timer Functions
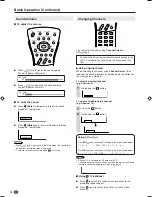
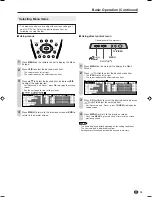
Press
MENU
to display the Menu screen.
• The Timer function Menu screen can be displayed directly by
pressing the
Yellow
.
Press
\
/
|
to select “Features”.
Press
'
/
"
to select “Timer functions”, and press
OK
.
M e n u [ F e a t u r e s T i m e r f u n c t i o n s ]
B a c k l i g h t
T i m e r f u n c t i o n s
A u t o p o w e r o f f
O n - s c r e e n d i s p l a y
C h i l d l o c k
F e a t u r e s
Press
'
/
"
to select the desired item, and press
OK
.
(See the table below.)
: SELECT O K : ENTER M : BACK E : EXIT
M e n u [ F e a t u r e s T i m e r f u n c t i o n s ]
M e n u [ F e a t u r e s T i m e r f u n c t i o n s ]
S l e e p t i m e r
A l a r m
A d j u s t s e t t i n g
W a k e - u p t i m e r
T i m e S e t
H H : M M O f f
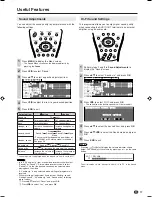
Press
\
/
|
to make the adjustment. Input the desired
time with
Channel Select
or
'
/
"
.
Press
END
to exit.
*
Be sure to adjust the clock with “Clock setup” in “Setup” before setting
“Sleep timer”, “Alarm” or “Wake-up timer”.
NOTE
• The time is automatically set/corrected via the Teletext broadcast
when available.
•
Timer programming settings are cancelled when the duration
of the power outage exceeds the backup time. (See page 21.)
1
2
4
5
6
1
2
3
4
5
1
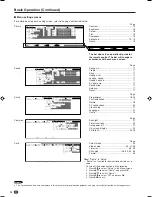
Adjustment item
Sleep timer*
Alarm*
Wake-up timer*
Description
The LCD TV set automatically turns
off at the specified time everyday.
The alarm sound turns on at the
specified time everyday.
The LCD TV set automatically
turns on at the specified time, with
the specified channel, and with the
specified sound volume every day.
Input value/Choice
HH:MM
Off
On
HH:MM
Vol.
Off
On
HH:MM
Channel
Vol.
Off
On
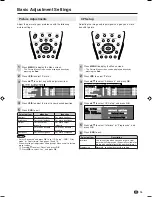
Adjustment item
Position
Sound info
Time
Card
Alarm time
Sleep time
Wake-up time
Description
To select the position of the On-
screen display.
To select whether or not sound
info is to be displayed, when a
channel has been selected.
To select information to be
displayed on the On-screen
display.
Choice
bottom
top
no
yes
no
yes
no
yes
no
yes
no
yes
no
yes
3
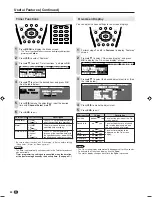
On-screen Display
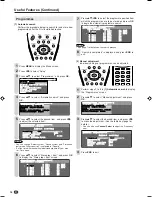
You can adjust various settings for on-screen displays.
Perform steps
1
and
2
in
Features
to display “Features”
screen.
Press
'
/
"
to select “On-screen display”, and press
OK
to display the “On-screen display” screen.
M e n u [ F e a t u r e s O n - s c r e e n d i s p l a y ]
B a c k l i g h t
T i m e r f u n c t i o n s
A u t o p o w e r o f f
O n - s c r e e n d i s p l a y
C h i l d l o c k
F e a t u r e s
Press
'
/
"
to select the desired adjustment item. (See
the table below.)
M e n u
M e n u [ F e a t u r e s O n - s c r e e n d i s p l a y ]
A d j u s t s e t t i n g
P o s i t i o n b o t t o m
S o u n d i n f o y e s
T i m e n o
C a r d y e s
A l a r m t i m e n o
S l e e p t i m e n o
W a k e - u p t i m e n o
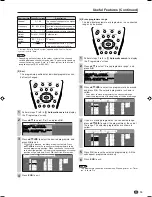
Press
\
/
|
to make the adjustment.
Press
END
to exit.
NOTE
• The On-screen display automatically disappears after 30 seconds.
• To activate the On-screen display, use the
Cyan
.
• The status display changes each time the
Cyan
is pressed.
LC-20B5E_E_P17-22.p65
04.3.7, 10:24 AM
22
Summary of Contents for AQUOS LC-15B5E
Page 66: ...64 ...

