background image


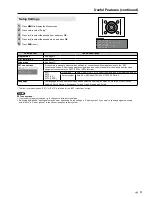
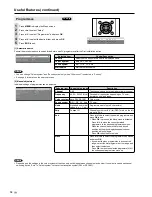
Setup Settings

  Press 

MENU

 to display the Menu screen.

2

  Press ◀/▶ to select “Setup”.

3

  Press ▲/▼ to select the desired item, and press 

OK

.

4

  Press ▲/▼ to select the desired mode, and press 

OK

.

5

  Press 

END

 to exit.

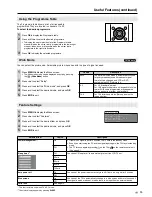
Selected item

Choice/Description

Programmes

See page 12.

First installation

See page 8.

Wide mode

See page 13.

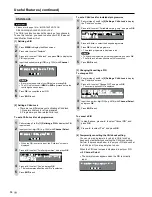
EXT connections 

It is possible to manually adjust various settings for connections with external devices on the “EXT 

connections” screen. Select the appropriate signal type and colour standard for the signals from the video 

equipment connected to the EXT1, EXT2 or EXT3 terminal.
EXT1 

EXT2

EXT3 (Y/C) 

EXT3 (CVBS)

Signal type*

1

Auto, CVBS, RGB, Y/C: To select the signal type of external equipment.

Colour system Auto, PAL, SECAM, NTSC4.43, NTSC3.58, PAL60

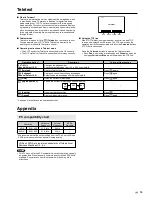
Language

The language for the on-screen display can be selected from English, Spanish, German, French, Italian, 

Swedish, Dutch, Russian, Portuguese, Turkish, Greek, Finnish, and Polish.

*

This item is visible only when “EXT1” or “EXT2” is selected for the “EXT connections” setting.

NOTE

EXT connections:

If no (colour) image is displayed, try to change to a different signal type.

Switching between AV input signals may be slow, depending on the settings in “Colour system”. If you want to speed up signal switching, 

select “Auto” in “Colour system” to the current reception colour system.

Useful Features (continued)

Programmes 

First  installation

Wide  mode

EXT  connections

Language

Setup

EXT1

EXT2

EXT3  ( Y/C )

EXT3  ( CVBS )

Summary of Contents for aquos LC-20S5E-BK

Page 1: ...RISTAUX LIQUIDES LCD TELEVISORE A COLORI LCD TELEVISIÓN EN COLOR LCD LCD KLEURENTELEVISIE LC 20S5E BK LC 20S5E WH OPERATION MANUAL BEDIENUNGSANLEITUNG MODE D EMPLOI MANUALE DI ISTRUZIONI MANUAL DE MANEJO GEBRUIKSAANWIJZING ENGLISH DEUTSCH FRANÇAIS NEDERLANDS ITALIANO ESPAÑOL ...

Page 2: ... serious electric shock may occur To fit an appropriate plug to the mains lead follow the instructions below IMPORTANT The wires in the mains lead are coloured in accordance with the following code Blue Neutral Brown Live As the colours of the wires in the mains lead of this product may not correspond with the coloured markings identifying the terminals in your plug proceed as follows The wire whi...

Page 3: ...djustments 9 Sound Adjustments 9 Picture Mode Settings 9 Sound Mode Settings 10 NICAM and A2 Stereo Broadcast Selection 10 Setup Settings 11 Programmes 12 Using the Programme Table 13 Wide Mode 13 Feature Settings 13 Child Lock 14 Teletext 15 Appendix 15 PC compatibility chart 15 RS 232C port specifications 16 Troubleshooting 17 Specifications 18 End of Life Disposal 19 Dimensional Drawings The di...

Page 4: ...n can cause overheating and or shorten the life of the product Do not place the product on a bed sofa rug or other similar surface since they can block ventilation openings This product is not designed for built in installation do not place the product in an enclosed place such as a bookcase or rack unless proper ventilation is provided or the manufacturer s instructions are followed The LCD panel...

Page 5: ...An example of strapping the LCD TV set onto the wall is shown below The string and hook are commercially available 2 75 ohm coaxial cable round cable To antenna terminal AC cord Product shape may vary from country to country Removing the terminal cover Pull down the hooks to open the cover Round lock for Kensington Security Standard slot Using the Kensington Lock This LCD TV set has a Kensington S...

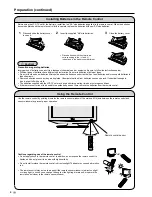
Page 6: ... TV set may have a shorter operating time due to storage conditions If the remote control is not to be used for an extended period of time remove the batteries from the remote control 1 Press and slide the battery cover to open it 2 Insert two supplied AA size batteries Place batteries with their terminals corresponding to the and indications in the battery compartment 3 Close the battery cover 30...

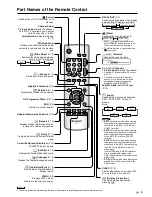
Page 7: ...d O n When is pressed in the Mute mode the sound turns on and the volume indicator is displayed The Mute function is cancelled when is pressed Volume Changes the sound volume Volume 10 P Channel TV input mode Selects the channel Channel 0 is reserved for RF output of VCR Channels not set with Automatic search or via Setup are set to be skipped and therefore cannot be displayed using P Teletext mod...

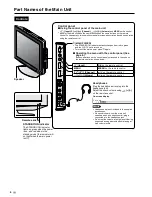
Page 8: ...sound volume using on the remote control On screen display Volume 10 NOTE Headphones are not included in the supplied accessories No sound is heard from the main unit speakers when a headphone mini plug is connected into the headphone jack Do not set the volume at a high level Hearing experts advise against extended listening at high volume levels Controls Speaker MAIN POWER The STANDBY ON indicat...

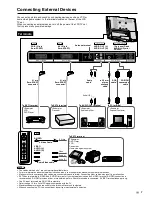
Page 9: ...EO provides a finer more detailed picture If both terminals are connected S VIDEO terminal takes a priority The PC input terminals are DDC1 2B compatible Refer to page 15 for a list of PC signals compatible with the TV Macintosh adaptor may be required for use for some Macintosh computers When connecting to a PC the correct input signal type is automatically detected S Video Audio Video cable S Vi...

Page 10: ... can be used to adjust the various settings of your LCD TV set For details on setting each menu item refer to the page number indicated below NOTE The illustrations and on screen displays in this manual are for explanation purposes and may vary slightly from the actual appearance Programmes or First installation cannot be set when the EXT1 EXT2 EXT3 or PC mode is selected as an input mode Settings...

Page 11: ...ble For stronger treble Bass For weaker bass For stronger bass Balance Decrease audio from the right speaker Decrease audio from the left speaker NOTE For the picture and sound adjustments When resetting all adjustment items to factory preset values perform the following procedure Press to select Reset and press OK Press to select Yes and press OK Picture Mode Settings You can make various picture...

Page 12: ...om movie to the advertisements The Automatic Volume Control Auto vol solves this problem and equalises the volume levels For the Clear voice setting This function emphasises speech voice against the background noise for more intelligibility It is not recommended for music sources NICAM and A2 Stereo Broadcast Selection This enables the selection of the reception mode when receiving a NICAM I NICAM...

Page 13: ...ignal type 1 Auto CVBS RGB Y C To select the signal type of external equipment Colour system Auto PAL SECAM NTSC4 43 NTSC3 58 PAL60 Language The language for the on screen display can be selected from English Spanish German French Italian Swedish Dutch Russian Portuguese Turkish Greek Finnish and Polish 1 This item is visible only when EXT1 or EXT2 is selected for the EXT connections setting NOTE ...

Page 14: ...ption Channel 0 99 The channel changes to the higher or lower channel Frequency 44 25 863 25 MHz Receivable frequencies depending on TV norm installation site and range Colour system Auto PAL SECAM Colour norm Sound system B G I D K L L Auto TV norm Name Alphabets numerical values e g t 7 etc Programme name up to 5 characters Skip On Off Channel numbers with a RED mark on the left are set to Skip ...

Page 15: ...ower management 1 On If there is no signal input for 8 minutes the TV enters the standby mode Even if you start using the PC and the signal inputs again the TV stays in standby mode The TV turns on again by pressing on the TV or on the remote control unit See page 8 Off Sleep timer 2 Off You can set Sleep timer to automatically turn off the LCD TV set 30 min 60 min 90 min 120 min Auto power off On...

Page 16: ...ective until No is selected 5 Press END to exit To set a Child Lock for individual programmes 1 Perform steps 1 and 2 in 2 Setting a Child Lock to display the Child lock screen 2 Press to select For individual prog only and press OK F o r a l l p r o g r a m m e s F o r i n d i v i d u a l p r o g o n l y C h a n g e P I N C a n c e l P I N 3 Press to select the desired programme 4 Press OK to loc...

Page 17: ...text screen Press Red to display the previous page and Green to display the next page Yellow and Blue are as indicated on the TOP line TELETEXT Red Green Yellow Blue 100 Operation button Description To turn off the function P Channel Select 0 9 Changes the page number Directly select any page from 100 to 899 by using 0 9 Teletext Displays Teletext screen Press again Subpage Channel Select 0 9 Disp...

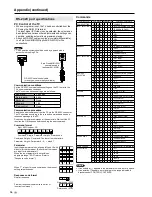
Page 18: ...ts and settings can be made enabling automatic programmed playing Attach an RS 232C cable cross type commercially available to a 9 pin D sub MINI DIN optional AN A1RS for the connections NOTE This operation system should be used by a person who is accustomed to using PCs Appendix continued 0 0 5 5 1 0 0 3 0 0 0 0 9 0 O K Return code 0DH E R R Return code 0DH CONTROL ITEM COMMAND PARAMETER CONTROL ...

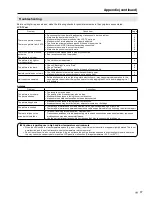
Page 19: ...ing checks for possible remedies to the symptoms encountered LCD TV set Antenna Problem Check item The picture is not sharp The picture shakes The reception may be weak The quality of the broadcast may also be bad Make sure the antenna is facing the correct direction Make sure the outside antenna has not been disconnected The picture has ghosts Make sure the antenna is facing the correct direction...

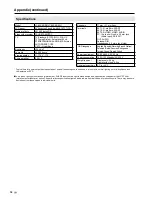
Page 20: ... AUDIO PC 15 pin mini D sub ø 3 5 mm jack Audio input RS 232C OUT AUDIO Antenna DIN Headphones 3 5 mm ø jack side OSD language English Spanish German French Italian Swedish Dutch Russian Portuguese Turkish Greek Finnish Polish Power requirement AC 220 240 V 50 60 Hz Power consumption 74 W 1 W Standby AC 230 V Weight approx Display only 5 4 kg Display with stand 6 2 kg Operating temperature 0 C to ...

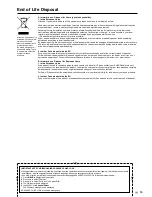
Page 21: ...new product Further collection facilities are listed on the homepage of www swico ch or www sens ch B Information on Disposal for Business Users 1 In the European Union If the product is used for business purposes and you want to discard it Please contact your SHARP dealer who will inform you about the take back of the product You might be charged for the costs arising from take back and recycling...

Page 22: ...20 ...

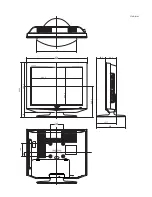
Page 23: ...Unit mm 478 403 3 300 8 434 5 399 5 35 246 5 68 3 89 4 157 7 225 100 100 32 317 7 ...

Page 24: ... in Thailand J31A0301D 07P03 TH NO SHARP ELECTRONICS Europe GmbH Sonnistraße 3 D 20097 Hamburg Deutschland Printed on environmentally friendly paper Auf ökologischem Papier gedruckt Imprimé sur papier écologique Stampato su carta ecologica Impreso en papel ecológico Afgedrukt op ecologisch papier J31A0301D SH07 03 N ...

Reviews: