DISASSEMBLY INSTRUCTIONS
B1-2
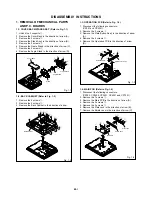
Fig. 1-5
1-5: POWER PCB (Refer to Fig. 1-5)
1.
2.
3.
4.
Disconnect the following connectors:
(CP6700, CP6701, CP6702, CP6703 and CP6705).
Remove the 5 screws
1
.
Remove the Power PCB in the direction of arrow (A).
Remove the Holder PCB in the direction of arrow (B).
1-6: LCD COVER/LCD PANEL (Refer to Fig. 1-6)
1.
2.
3.
4.
Remove the 2 screws
1
.
Remove the Angle Frame in the direction of arrow (A).
Remove the LCD Cover in the direction of arrow (B).
Remove the LCD Panel in the direction of arrow (C).
Fig. 1-6
1
Power PCB
(B)
(A)
1
1
1
1
Holder PCB
Front Cabinet
Angle Frame
1
(A)
(B)
(C)
LCD Panel
LCD Cover
1

