background image

Summary of Contents for AQUOS LC-40D68UT

Page 1: ...s Make sure the following accessories are provk_ed with the product emote control unit x 1 AA size battery x 2 AC cord x 1 Page 8 Page 9 Page 8 _ Operation manual x 3 languages Connection guide x 1 Always use the AC cord supplied with the TV Cable clamp 1 Stand unit x 1 Page 8 Page 7 J The illustrations above are for explanation purposes and may vary slightly from the actual accessories ...

Page 2: ...ure accompanying the product CAUTION TO PREVENT ELECTRIC SHOCK MATCH WIDE BLADE OF PLUG TO WIDE SLOT FULLY INSERT WARNING FCC Regulations state that any unauthorized changes or modifications to this equipment not expressly approved by the manufacturer could void the user s authority to operate this equipment CAUTION This product satisfies FCC regulations when shielded cables and connectors are use...

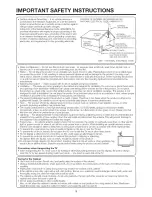
Page 3: ... CATV system installer This reminder is provided to call the CATV system instalier s attention to Article 820 40 of the National Electrical Code that provides guidelines for proper grounding and in particular specifies that the cable ground shall be connected to the grounding system of the building as close to the point of cable entry as practical This product utilizes tin lead solder and fluoresc...

Page 4: ...he apparatus has been damaged in any way such as power supply cord or plug is damaged liquid has been spilled or objects have fallen into the apparatus the apparatus has been exposed to rain or moisture does not operate normally or has been dropped Additional Safety Information 15 Power Sources This product should be operated only from the type of power source indicated on the marking label If you...

Page 5: ...product with 2 073 600 pixels giving you fine picture details Occasionally a few non ective pixels may appear on the screen as a fixed point of blue green or red Please note that this does not affect the performance of your product Lightning For added protection for this television equipment during a lightning storm or when it is left unattended and unused for long periods of time unplug it from t...

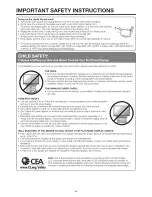
Page 6: ...all Follow the manutacturer s recommendations for the safe installation and use of your flat panel display o Carefully read and understand all enclosed instructions for proper use ot this product o Don t allow children to climb on or play with furniture and television sets o Don t place flat panel displays on furniture that can easily be used as steps such as a chest of drawers o Remember that chi...

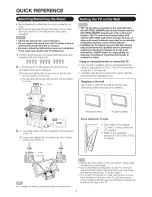
Page 7: ...gTAG2 wall mount bracket The use of other wall mount brackets may resuJt in an unetaMe installation and may cause serious injuries Installing the TV requires special skill that should only be performed by qualified service personnel Customers should not attempt to do the work themselves SHARP bears no responsibility for improper mounting or mounting that results in accident or injury Using an opti...

Page 8: ..._ B The POWER indicator on the front of the television lights GREEN I 0 0 o I POWERindicator 5 Insert the batteries into the remote control unit See page 9 Speakers cannot be detached from the V TV angle cannot be adjusted Cautions regarding the remote control unit e Do not expose the remote control unit to shock In addition do not expose the remote control unit to liquids and do not place in an a...

Page 9: ... ter mina_ 75 ohm _1 Cable without a CATV Cable W leaddn 2 m_ m converter _ 2_ VHF UHF antenna 3 Combination VHF UHF antenna _ 4 Separate VHF UHF antenna If the remote control fails to operate TV functions replace the batteries in the remote control unit I Open the battery cover 2 Insert two AA size batteries 3 Close the battery cover supplied with the product o Place the batteries with their term...

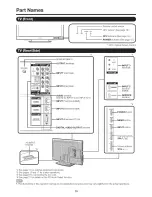
Page 10: ...TAL AUDIO OUTPUT terminal 1 INPUT 3 terminals INPUT 5 terminal HDMI _ ERVICE terminal 2 _ POWER button MENU I _ MENU button _ NPUT button AC INPUT terminal _ l _ _ i Channel buttons l I CHA V _II VOL 1 See page 11 for external equipment connection 2 See pages 12 and 17 for button operations 3 See page 8 for connecting the AC cord 4 See page 21 for details on the PC Audio Select function o The illu...

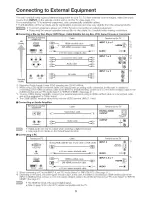
Page 11: ...tereo minijack cable to the AUDIO terminal and set PC Audio Select to INPUT6 HDMI See page 21 3 To enjoy 1080p display capability connect your external equipment using an HDMI certified cable or a component cable and set the equipment to f 080p output 4 The COMPONENT terminals take priority over the VIDEO terminal INPUT 1 only Connecting an Audio Amplifier Terminal on external Cable Terminal on th...

Page 12: ...a setting Make sure what kind of connection is made with your TV when selecting Air or Cable 3 Press A Y to select Air or able and then press ENTER CH Search Channel search Channel auto search makes the TV look for all channels viewable in the set area 4 S_0After Air Cable has been set CH Search is highlighted Press ENTER TV Location Select Home or Store for the location where you plan to install ...

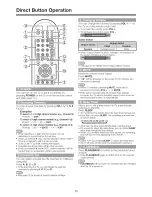
Page 13: ...tails of favorite channel settings o When Output Select is set to Variable the indicator on the screen changes as shown below I _18 1 o See page 24 for details on the Output Select function 11 _ Mutes the current sound output Press MUTE o c _ wi be displayed on the screen for 30 minutes and the sound is silenced o Within 30 minutes of pressing MUTE mute can be canceled by pressing VOL or M UTE o M...

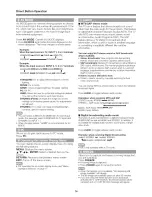
Page 14: ...ture is called Multi channel Television Sound MTS The TV with MTS can receive mono sound stereo sound and Secondary Audio Programs SAP The SAP feature allows a TV station to broadcast other information which could be audio in another language or something corrlpletely different like weather information You can enjoy Hi Fi stereo sound or SAP broadcasts where available Stereo broadcasts View progra...

Page 15: ...entified by its own number The CC1 and CC2 services display subtitles of TV programs superimposed over the program s picture In the Closed Caption system the T1 TEXT1 or T2 TEXT2 services display text that is unrelated to the program being viewed e g weather or news These services are also superimposed over the program currently being viewed intormation o Regardless ot whether or not an analog bro...

Page 16: ...ot 1080i p only Detects the resolution ot the signal and displays an image with the same number ot pixels on the screen Full Screen 720p only You can select Full Screen only when receiving a 720p signal S Stretch Smart stretch Suitabb tot stretching 4 3 programs to fill the screen Zoom Suitable for viewing wide screen 2 35 1 aspect ratio programs in full screen o When using Dot by Dot or Full Scre...

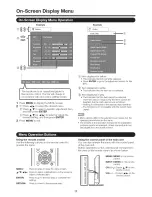
Page 17: ... selected input teminal The function is not compatible with the current input signal o Menu options differ in the selected input modes but the operating procedures are the same o The screens in the operation manual are for explanation purposes some are enlarged others cropped and may vary slightly from the actual screens Using the remote control Use the following buttons on the remote control to o...

Page 18: ... the image brighter A lower value makes the image darker o For resetting all adjustment items to the factory preset values press _ T to select Reset and then press ENTER For a better white balance use color temperature correction High White with bluish tone Mid High Middle Mid Low Low White with reddish tone Automatically adjusts the image contrast according to the scene On Automatically adjusts t...

Page 19: ...C is set to Off while Power Saving is set to Standard or Advanced the Power Saving leaf icon appears to the left of Backlght in the Picture menu screen When set to Enable the power will automatically shut down if there is no signal for 15 minutes o When it is 5 minutes before the power shuts down the remaining time will start to keep appearing every minute o Disable is the factory preset value o W...

Page 20: ...set the input terminal displayed when using the INPUT SOURCE menu or channel display Press A T 41 I_ to select the new name for the input mode o You cannot change labels if the INPUT SOURCE is TV For adjusting a picture s horizontal and vertical position H Poe Centers the image by moving it to the left or right V Pee Centers the image by moving it up or down o For resetting adjustments to the fact...

Page 21: ...ertified cable set PC Audio Select to INPUT4 PC To watch an HDMI or PCqN equipment image select INPUTS INPUT6 or INPUT7 from INPUT SOURCE menu using INPUT on the remote control unit or on the TV Enable To use View Mode based on signal recognition including an HDMI signal Disable No function You can output digital audio to an AV amplifier or similar device whose DIGITAL AUDIO INPUT terminal is conn...

Page 22: ...n out inappropriate television shows from their children o Movie ratings are used tor original movies rated by the Motion Picture Association of America MPM as watched on cable TV and not edited for television The V CHIP can also be set to block MPM rated movies o The setting automatically enters Block for any ratings below your selection o If Status is not set to On the configuration settings wil...

Page 23: ...ve dialog TVY TV Y7 X TVG TV PG X X X X TV14 X X X X TV MA X X X The content rating can be set but this rating is not normally broadcast by TV stations X Content rating can be set Press A _ to adjust the item to your desired position Block indicates the item is blocked Press MENU to exit E Exempt Includes news sports docamentades and other intormation programming talk shows music videos and variet...

Page 24: ... power o Peflorming any ot the three above will activate the WCHIP BLOCK When listening to music from a music program you can turn the screen off and enjoy audio only On Audio is output without screen image Off Both screen images and audio are output o The screen image will return to normal when a button except those tot audio adjustment such as VOL MUTE AUDIO is pressed If the irrlage does not co...

Page 25: ... display the MENU screen and then press VOL to select Option 2 Press ON X V to select Operation Lock Out and then press INPUT 3 Press ON X V to select Off and then press INPUT z Press MENU to exit o To unlock the buttons on the TV press MENU on the remote control and then select Off in Operation Lock Out The current version of the TV software is displayed This function allows software updates by i...

Page 26: ...e TV software with the update file select Yes and then press ENTER Example o If the USB memory device is not properly instalbd or the correct update file cannot be found on the USB memory device an error message is displayed o Check the file on the USB memory device and then reinsert the USB memory device correctly DO not remove the USB memory device or unplug the AC cord while the software is bei...

Page 27: ...ernal equipment is the volume too low or muted o When external equipment is connected via an HDMI cable you may need to configure the audio to be output through the HDMI cable o When audio is not output from external equipment connected to the INPUT 4 or INPUT 6 terminal check the PC Audio Select setting _ Page 21 o Even when external equipment is connected using an HDMbcertifbd cable an audio cab...

Page 28: ...figured to output HD images via cabb satellite o The cabb satellJte broadcast may not support a signal resolution ot 1080p o This is not a malflJnction This happens when the cabinet slightly expands and contracts according to change in temperature This does not affect the TV s pertormance The example of an error message Possible Solution displayed on a screen o Failed to receive broadcast o Check ...

Page 29: ...UT5 HDMI in with HDCP SERVICE Sottware update OSD language English French Spanish Power Requirement AC 120 V 60 Hz Power Consumption 170 W 0 4 W Standby with AC 120 V TV stand 33 1 Ibs 15 0 kg Weight TV only 28 7 Ibs 13 0 kg Dimension 2 TV stand 38 7 s 26 9 64x 12 s sinch ON x H x D TV only 38 7 s x 24 _ _ x 4 _ 4inch Operating temperature I 32 Fto 104 F 0 Cto 40 C Emergency alert messages via Cab...

Page 30: ... 60 Hz 72 Hz 75 Hz 60 Hz 70 Hz 75 Hz 60 Hz 60 Hz 60 Hz 60 Hz VESA Standard O O O O O O O O O O O O O O CLEARING THE SECRET NUMBER If you forget the secret number clear the secret number using the following procedure 1 Select an item from the list below to display the secret number input screen For operating the on screen display menu see page 17 EZ Setup CH Setup Parental CTRL or Reset on the Setu...

Page 31: ...e constitute complete fulf lff_ent of a E_ab EEties and responsibEEEties of Sharp to the purchaser with respect to the Product and sbell constitute full satisfaction of all claims whether based on contract negligence strict liability or otherwise Sharp does not warrant nor shall Sharp be E_abEe or in any way responsible for Products which have been subject to abuse including but not limited to imp...

Page 32: ...fail to operate during the warranty period warranty service may be obtained upon delivery of the Sharp product together with proof of purchase and a copy of this LIMITED WARRANTY statement to an Authorized Sharp Service Centre or an Authorized Sharp Servicing Dealer in home warranty service may be provided at Sharp s discretion on any Sharp television with the screen size of 27 or larger and on an...

Reviews: