background image

MODEL

LC-40LB700X

LCD COLOUR TELEVISION

OPERATION MANUAL

Cover_LC-40LB700X.indd   1

Cover_LC-40LB700X.indd   1

8/7/2009   12:34:06 PM

8/7/2009   12:34:06 PM

Summary of Contents for Aquos LC-40LB700X

Page 1: ...MODEL LC 40LB700X LCD COLOUR TELEVISION OPERATION MANUAL Cover_LC 40LB700X indd 1 Cover_LC 40LB700X indd 1 8 7 2009 12 34 06 PM 8 7 2009 12 34 06 PM ...

Page 2: ...Cover_LC 40LB700X indd 2 Cover_LC 40LB700X indd 2 8 7 2009 12 34 08 PM 8 7 2009 12 34 08 PM ...

Page 3: ...minal 16 Inserting the batteries 17 Using the remote control unit 17 Cautions regarding the remote control unit 17 Turning the TV on off 18 Turning on the power 18 Turning off the power 18 About Menu operations 19 What is Menu 19 Basic Menu operations 19 About the Guide Display 19 Blue illumination Emblem 19 Menu items TV INPUT 4 6 20 Menu items HDMI RGB 21 Watching TV Setting channels automatical...

Page 4: ...41 Digital audio output 41 Using Digital Audio Output 42 Programme Guide 42 Info 42 ATV Analogue DTV RADIO buttons 43 EPG 44 EPG display settings 44 Time zone 44 Selecting a programme using EPG 45 Basic Operation 45 Selecting a programme 45 Timer setting using EPG 47 Cancelling the timer setting 47 Settings when using external devices Settings when using HDMI output devices 48 Selecting the input ...

Page 5: ...uring Playback 63 DISC MENU Control 63 DISC MENU Operation Procedure 64 DISC MENU Which Can Be Set 64 Blu ray disc Setup Audio Video Settings 65 Playback Setting 65 Communication Setup 66 The operation procedure for inputting characters manually 68 Version 70 USB Memory Management 70 Software Update 70 AQUOS LINK Controlling HDMI devices using AQUOS LINK 72 AQUOS LINK connection 73 Connecting an A...

Page 6: ... 90 Specifications 91 Optional accessory 91 Dimensional drawings 92 Mounting the TV on the wall 93 Removing the stand 93 Handling and precautions with the wall mounted TV 93 Protection against overturning 94 CLEARING THE PASSWORD 95 Information on the software license for this product 96 CAUTION USE OF CONTROLS OR ADJUSTMENTS OR PERFORMANCE OF PROCEDURES OTHER THAN THOSE SPECIFIED HEREIN MAY RESULT...

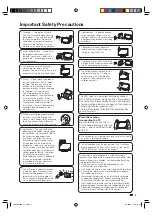
Page 7: ... be injured by broken glass Heat sources Keep the product away from heat sources such as radiators heaters stoves and other heat generating products including amplifiers To prevent fire never place any type of candle or naked flames on the top or near the TV set To prevent fire or shock hazard do not place the AC power cord under the TV set or other heavy items Do not place heavy objects on this produ...

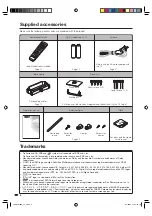
Page 8: ...s or registered trademarks of HDMI Licensing LLC Manufactured under license under U S Patent s 5 451 942 5 956 674 5 974 380 5 978 762 6 487 535 other U S and worldwide patents issued pending DTS and DTS 2 0 Digital Out are registered trademarks and the DTS logos and Symbol are trademarks of DTS Inc 1996 2007 DTS Inc All Rights Reserved is a trademark BD LIVE logo is a trademark of Blu ray Disc As...

Page 9: ... falling over Soft cushion Screw driver not supplied Long screw Screw driver not supplied Short screw 1 Confirm the 8 screws supplied with the TV Short screws g 4 used in step 3 Long screws g 4 used in step 2 2 Attach the supporting post for the stand unit onto the base as shown below 3 1 Insert the stand into the openings on the bottom of the TV 2 Insert and tighten the 4 short screws into the 4 h...

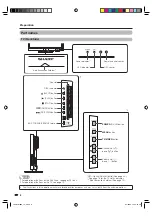
Page 10: ... SKIP FWD button SKIP REV button BD STORAGE SERVICE terminal NOTE 1 For operation of buttons on the Disc Drive see pages 56 to 63 2 For operation of buttons on the TV see page 19 OPC Optical Picture Control See page 36 See page 18 for the TV status indicator Blue illumination Emblem See page 19 The illustrations in this operation manual are for explanation purposes and may vary slightly from the a...

Page 11: ...e page 11 for connecting the AC cord Usually do not connect anything to this terminal as it is reserved only for service personnel The INPUT 1 and INPUT 7 terminals can both use the same audio input terminal However the proper item must be selected in the PC audio select menu See page 78 Regarding the headphone jack Use headphones with a stereo mini plug Ǿ3 5 mm Be sure to unplug headphones from t...

Page 12: ...NPUT2 INPUT3 INPUT4 INPUT5 INPUT6 INPUT7 PC See pages 14 48 and 50 15 OPC To switch the Optical Picture Control on and off See page 36 16 RADIO Press to access RADIO mode See page 43 17 DISPLAY Displays the channel or input information When a Blu ray disc is loaded the disc information during playback is displayed DTV mode Displays the time information included in the DTV broadcast ATV mode Displa...

Page 13: ... outdoor antenna The following is a brief explanation of the types of connections that are used for coaxial cable 2 Connecting external devices See pages 14 and 15 for connecting external equipment such as a VCR and DVD player 3 Connecting the AC cord Place the TV close to the AC outlet and keep the power plug within reach Disconnect the AC cord from the AC outlet if the TV will not be used for a ...

Page 14: ...a cable connected Is the AC cord plugged in 1 Press POWER on the TV The initial auto installation wizard appears 2 Setting the on screen display language English Display language settings 3 Press a b to select the desired language and then press ENTER Press c d to select HOME or STORE and then press ENTER HOME STORE Select the location of TV The picture will be optimized for that location HOME STA...

Page 15: ...re obtained NOTE The values of Signal Strength and Quality indicate when to check the appropriate alignment of the antenna 13 Preparation Initial auto installation continued 5 The TV searches for sorts and stores all the receivable TV stations according to their settings and the connected antenna To abort the initial auto installation in progress press RETURN NOTE HOME mode Settings are optimised ...

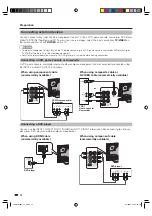
Page 16: ...le or camcorder A VCR game console camcorder and some other audiovisual equipment can be conveniently connected using the INPUT 5 or INPUT 4 INPUT 6 terminals When using component cable commercially available When using composite cable or S VIDEO cable commercially available R AUDIO L Y PB CB PR CR S VIDEO R L AUDIO VIDEO Connecting a DVD player You can use the INPUT 1 INPUT 2 INPUT 3 HDMI or INPU...

Page 17: ...Cable etc and other audiovisual equipment When using HDMI cable commercially available When using component cable commercially available R AUDIO L Y PB CB PR CR Connecting a PC You can use the INPUT 7 PC terminal when connecting to a PC STB Set Top Box PC STB Set Top Box LC 40LB700X_en_b indd 15 LC 40LB700X_en_b indd 15 8 7 2009 12 35 48 PM 8 7 2009 12 35 48 PM ...

Page 18: ...After connecting Perform the communication setting Pages 66 67 Load a BD LIVE compatible disc and play back the contents Pages 57 and 59 To ETHERNET terminal To ETHERNET terminal ETHERNET cable commercially available CAUTION When using a broadband internet connection a contract with an internet service provider is required For more details contact your nearest internet service provider Refer to th...

Page 19: ...ith this product may have a shorter life expectancy due to storage conditions If you will not be using the remote control unit for an extended period of time remove the batteries from it Batteries battery pack or batteries installed shall not be exposed to excessive heat such as sunshine fire or the like Using the remote control unit Use the remote control unit by pointing it towards the remote sen...

Page 20: ...creen disappears The POWER indicator on the TV changes from green to red Press POWER on the TV The POWER indicator on the TV turns off When the TV is turned off by POWER on the TV you cannot turn on the power by pressing POWER on the remote control POWER indicator Light off Power off Lighted Red The TV is in standby mode Lighted Green The TV is on NOTE If you are not going to use this TV for a lon...

Page 21: ...n accordance with each menu setting screen About Menu operations What is Menu You need to bring up the On Screen Display to perform settings for the TV The On Screen Display for the settings is called Menu The Menu enables various settings and adjustments See pages 20 and 21 The Menu can be operated with the remote control unit Basic Menu operations 1 Press MENU and the MENU screen displays Contra...

Page 22: ...Position Page 38 WSS Page 33 4 3 mode Page 33 Quick start Page 33 Language Page 23 Text language Page 83 Blue illumination Page 19 Identification Page 90 Reset Page 90 NOTE Some menu items may not be displayed depending on the selected input source Menu items TV INPUT 4 6 List of menu items to help you with operations Option Blu ray disc Setup Page 65 71 AQUOS LINK setup Page 73 Input select Page 4...

Page 23: ...on off Page 33 NOTE Some menu items may not be displayed depending on the selected input source Menu items HDMI RGB List of menu items to help you with operations Setup Input skip Page 50 Auto sync Page 79 Input label Page 50 Position Page 38 Fine sync Page 79 HDMI auto view Page 48 Quick start Page 33 Language Page 23 Blue illumination Page 19 Reset Page 90 Option Blu ray disc Setup Page 65 71 AQ...

Page 24: ...tification Reset Normal 4 3 mode Off Quick start English West Europe Language Text language On On WSS Antenna setup DIGITAL 4 If you have already set the password enter it here See page 30 for setting a password 5 Press c d to select Yes and then press ENTER 6 Press a b to select the desired language listed on the screen and then press ENTER Press c d to select Digital Search or Analogue Search an...

Page 25: ...age directly which is 3 digit page number from 100 to 899 by pressing buttons 0 to 9 Adjusting the volume L I Changing the volume You can change the volume on the TV or on the remote control unit To increase the volume press VOLk To decrease the volume press VOLl 20 NOTE TV INPUT1 INPUT2 INPUT3 INPUT4 INPUT5 INPUT6 and INPUT7 PC modes can store volume adjustment values separately Menu language set...

Page 26: ... press the colour button to change service settings Name DTV 993 SIT 3 DTV 994 SIT 2 DTV 995 SIT 1 DTV 996 Monosco 576 2 DTV 997 Monosco 576 1 DTV 998 Color Bar 576i DTV 999 HD Monosco Lock R CH skip G EPG skip Y Sort B 1 Press a b to select the desired service 2 Press the colour button on the remote control corresponding with the item you want to reconfigure The mark indicates the operation is set...

Page 27: ... 179 25 MHz Next Store Cancel 3 Press a b to select item and press ENTER Next Search the next channel Store Memorise the current display channel Cancel Return to the previous screen The search result will not be stored Fine tuning 1 Press a b c d to select the channel you want to edit and then press ENTER The selected channel information displays 2 Press a b to select Fine and then press ENTER 3 P...

Page 28: ...annel name of less than 5 characters select END Skipping channels Channels with Skip set to On are passed over when using CHr s even if selected while watching the image from the TV 1 Press a b c d to select the channel you want to edit and then press ENTER The selected channel information will be displayed 2 Press a b to select Skip and then press ENTER Skip menu displays Skip menu Fine Search Ch...

Page 29: ...t channel to replace Erasing programmes The individual programme can be erased 1 Press MENU and the MENU screen displays 2 Press c d to select Setup 3 Press a b to select Programme setup and then press ENTER If you have already set the password enter it here See page 30 for setting a password The Analogue setting screen displays and then press ENTER 4 Press a b to select Erase programme and then p...

Page 30: ...thin 30 minutes after pressing e press one of the buttons below to cancel the mute VOLl VOLk e Mute will be cancelled after 30 minutes However the TV will not suddenly output loud sound as the volume level will be set to 0 automatically Increase the volume level by pressing VOLk 2 Press e again within 30 minutes to cancel the mute Before 30 minutes the volume level returns to the previous setting ...

Page 31: ...stereo signal Each time you press MPX the mode switches between STEREO and MONO Stereo mode B G STEREO 01 BBC1 B G MONO PAL PAL 01 ATV ATV BBC1 When receiving a bilingual signal Each time you press MPX the mode switches among CH A CH B and CH AB Bilingual mode B G CH A 01 BBC1 B G CH B PAL NICAM PAL 01 ATV ATV BBC1 B G CH AB PAL 01 ATV BBC1 When receiving a monaural signal When you press MPX MONO ...

Page 32: ...w a locked channel Lock setting in Programme setup Manual adjust is set to On you must enter a password See page 26 When you select a locked channel a password prompt message pops up Press RETURN to display the password input window Clearing the password Allows you to clear your password 1 Repeat steps 1 to 3 in Setting a password 2 Enter the password 3 Press a b to select Clear password and then ...

Page 33: ...e and airtime by tuning a channel 1 Press MENU and the MENU screen displays 2 Press c d to select Option 3 Press a b to select Programme title display and then press ENTER 4 Press c d to select Yes and then press ENTER NOTE The Programme title display function is only available for the DTV mode Key lock This function allows you to lock the buttons on the TV or remote control in order to prohibit c...

Page 34: ... does not work when Energy save is set to Standard or Advanced Energy save This function enables you to automatically reduce the backlight brightness in order to decrease the power consumption and increase the backlight life span 1 Press MENU and the MENU screen displays 2 Press c d to select ECO ECO menu displays 3 Press a b to select Energy save and then press ENTER 4 Press a b to select Standar...

Page 35: ...2 Press c d to select Setup 3 Press a b to select Quick start and then press ENTER 4 Press c d to select On or Off and then press ENTER Selected item Description On The TV quickly starts up from standby 19 W or more of power consumption is required during standby Off Power consumption is less than 1 W Picture size settings Selecting the Wide Screen Signalling WSS picture size automatically WSS all...

Page 36: ...nal 2 Press WIDE or a b while the WIDE MODE menu displays on the screen As you toggle down the options each mode is immediately reflected on the TV Auto Selection If you set WSS and 4 3 Mode in the Setup menu on page 33 the optimum WIDE mode is automatically chosen for every broadcast containing the WSS information WSS menu To enable Auto Selection set WSS in the Setup menu to On See page 33 4 3 M...

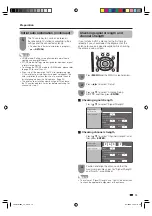
Page 37: ...C AV MODE DYNAMIC Fixed AV MODE USER AV MODE AUTO Selected item Description STANDARD For a highly defined image in a normally bright room MOVIE For a movie GAME Lowers image brightness for easier viewing PC For PC Available only when inputting an HDMI or RGB signal USER Allows the user to customise settings as desired You can set the mode for each input source AUTO The TV automatically sets the app...

Page 38: ... adjusted according to the lighting condition in the room OPC setting See this page Backlight The screen dims The screen brightens Contrast For less contrast For more contrast Brightness For less brightness For more brightness Colour For less colour intensity For more colour intensity Tint Skin tones become purplish Skin tones become greenish Sharpness For less sharpness For more sharpness Advance...

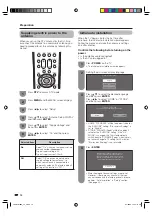
Page 39: ...ewing images in monochrome Advanced picture settings The advanced settings enable you to set the picture adjustment in more detail There are twelve options you can choose from 1 Press MENU and the MENU screen displays 2 Press c d to select Picture 3 Press a b to select Advanced and then press ENTER 4 Press a b to select the desired menu and then press ENTER C M S saturation C M S hue Colour temp C...

Page 40: ...djustment V pos V pos adjustment Return to factory pre settings 0 0 Display position adjustment Selected item Description H pos Centres the image by moving it to the left or right V pos Centres the image by moving it up or down 5 Press c d to adjust the item to your desired position NOTE For resetting all adjustment items to the factory preset values press a b to select Reset and then press ENTER ...

Page 41: ...ct On or On half hourly and then press ENTER Selected item Description On Display the clock time On half hourly Display the clock time in 30 minutes increments Off Hide the clock time H Time format You can select the time format either 24HR or AM PM for the clock time 1 Press MENU and the MENU screen displays 2 Press c d to select Option 3 Press a b to select Time display and then press ENTER 4 Pr...

Page 42: ...he Audio setting Selected item Description On TruSurround HD creates a high quality surround sound experience when watching DVD movies and TV programmes broadcast in surround sound Off Outputs the normal sound H Bass enhancer This function allows you to enjoy bass enhanced sound 1 Repeat steps 1 to 2 in Audio adjustment 2 Press a b to select Bass enhancer and then press ENTER 3 Press c d to select...

Page 43: ... Press MENU and the MENU screen displays 2 Press c d to select Option 3 Press a b to select Digital audio output and then press ENTER MENU Option DigitaI audio output Option Setting display colour Channel selecting effect AQUOS LINK setup PC audio select Output volume select Auto volume Clear voice Digital audio output Audio only Programme title display Time display Colour system Key lock INPUT7 R...

Page 44: ...ENTER the TV jumps to the channel CH LIST DTV TV Mon 19 6 9 29 002 003 004 009 010 011 012 ABC TV Sydney 002 ABC TV Sydney 9 23 9 29 Global Grover SBS FTV Guide NINE DIGITAL Global Grover Global Grover TEN DIGITAL TEN Guide TEN HD 020 ABC HDTV ABC Asia Pacific News 021 ABC 2 Global Grover 022 ABC TV 030 SBS HD 031 SBS 2 Info While watching DTV you can check the extended programme information on th...

Page 45: ... time When the TV powers on for the first time after purchase perform the auto installation ATV Analogue TV You can run the auto installation to set channels automatically 1 To watch the analogue TV select Auto Installation from Setup menu See page 22 2 After setting the channels you can select a channel using CH r s or 0 9 on the remote control unit See page 23 DTV When the TV accesses to DTV mode...

Page 46: ...cting EPG setup to YES will result in higher power consumption Selecting EPG setup to NO will save power consumption NOTE Approximately 19W for 15 30 minutes depending on number of channels tuned after power off from remote control EPG data will not update if the TV is turned off from the mains power switch H Display range setup The Display range setup allows you to select three types of time span...

Page 47: ...n the left of the services continue to press a b to display next or previous screen H Close the EPG screen Press EPG again 2 1 3 4 5 Programme Information Selecting a programme 3 Check programme information 1 Press a b c d to select the programme you want to check 2 Press R EPG DTV TV 002 9 23 9 29 ABC TV Sydney Trotro 9 10 11 12 13 14 TEN Digital ABC TV Sydney SBS FTV Guide TEN Digital TEN Guide ...

Page 48: ... by date time 1 Press Y 2 Press c d to select the desired time span and then press ENTER EPG DTV TV 9 10 11 12 13 14 TEN Digital ABC TV Sydney SBS FTV Guide TEN Digital TEN Guide TEN HD ABC HDTV ABC 2 002 007 010 012 030 061 062 340 351 SBS 2 SBS NEWS 996 997 SBS NEWS D44 998 999 Pla Ba ABC Arr Naked Scien Catal Parliament Qu The The Pla Ba Arr Naked Scien Catal Parliament Qu The The Stat T W Se P...

Page 49: ...me 1 Press c d to select Watch and then press ENTER 2 Press c d to select Yes and then press ENTER The selected TV programme is marked with an icon Cancelling the timer setting 1 Press EPG 2 Press a b c d to select the programme on timer setup and then press ENTER 3 Press c d to select Cancel and then press ENTER H Cancelling using B button on the remote control 1 Press EPG 2 Press B to display th...

Page 50: ...r INPUT3 using TV VIDEO on the remote control unit or on the TV 2 Press MENU and the MENU screen displays 3 Press c d to select Setup 4 Press a b to select HDMI auto view and then press ENTER The HDMI auto view can be selected only when INPUT1 INPUT2 or INPUT3 is selected MENU Setup HDMI auto view Setup Option Input skip Input label Position HDMI auto view Reset On On Quick start English Language ...

Page 51: ... no colour image displays try changing the other signal type Check the operation manual of the external equipment for the signal type When the signal type is set to Auto the input terminal where a cable is connected is automatically selected When the signal type is set to Auto and multiple video signal cables are connected the signal type is selected in the following prioritised order INPUT 4 COMP...

Page 52: ...ry preset value is AUTO If AUTO is selected colour system for each channel is automatically set If an image does not display clearly select another colour system e g PAL NTSC 4 43 Colour system is selectable only when inputting an S VIDEO or composite signal Labelling input sources You can assign each input source a label as you prefer 1 Press TV VIDEO to select the desired input source 2 Press ME...

Page 53: ...r and then press ENTER 4 Press a b to select the desired colour and then press ENTER BLUE GRAY RED GREEN Colour setting including Menu and EPG Channel selecting effect This function shows a screen effect when choosing or changing channels 1 Press MENU and the MENU screen displays 2 Press c d to select Option 3 Press a b to select Channel selecting effect and then press ENTER 4 Press c d to select ...

Page 54: ...cm 5 BD RE DL BD R DL BDMV BDAV DVD VIDEO Region code4 ALL Video format Audio Video Movie 12 cm 5 8 cm 3 4 ALL DVD RW DVD R DVD R DL DVD RW DVD R Video VR format finalized disc only Audio Video Movie 12 cm 5 8 cm 3 Audio CD Audio CD CD DA Audio 12 cm 5 8 cm 3 CD RW CD R Audio CD CD DA Audio This TV has been designed on the premise of playing back Audio CDs that comply with CD Compact Disc standards...

Page 55: ...s cannot be played Discs with unusual shapes heart shaped or hexagonal discs etc cannot be used The use of such discs will cause malfunction H The following BD VIDEO discs cannot be played Discs not displaying B or ALL for the region code discs sold outside the authorized marketing area Discs produced illegally Discs recorded for commercial use The region code for this product is B H The following...

Page 56: ...with 16 bits and 96 kHz with 24 bits on DVD VIDEO discs and between 48 kHz with 16 bits and 192 kHz with 24 bits on BD VIDEO discs 2 Subtitle languages This indicates the kind of subtitles 3 Screen aspect ratio Movies are shot in a variety of screen modes 4 Camera angle Recorded onto some BD DVD discs are scenes which have been simultaneously shot from a number of different angles the same scene i...

Page 57: ...VD and CD discs are sensitive to dust fingerprints and especially scratches A scratched disc may not be able to be played back Handle discs with care and store them in a safe place Proper Disc Storage Place the disc in the center of the disc case and store the case and disc upright Avoid storing discs in locations subject to direct sunlight close to heating appliances or in locations of high humidi...

Page 58: ...een NOTE In the following cases the disc will be ejected automatically When a disc using an incompatible standard or format was inserted When the disc was inserted facing the wrong way Removing a Disc 1 Press on the TV or EJECT on the remote control unit r s k l L I The disc is ejected and protrudes partly from the slot 2 Carefully grasp the protruding disc and pull it out r s k l L I After a disc...

Page 59: ...e disc BD DVD Menus This section explains how to play back a BD DVD VIDEO disc with a top menu disc menu or pop up menu The titles listed in the top menu and a disc guide for options like subtitles and audio languages are given in the disc menu Start Playback by Selecting a Title from the Top Menu BD VIDEO DVD VIDEO 1 Press TOP MENU TITLE LIST The top menu screen is displayed 2 3 4 Latin Rock Clas...

Page 60: ...njoy a variety of functions via the internet in addition to the BONUSVIEW functions Virtual Package BD LIVE data is saved in Local Storage USB memory device connected to this TV To enjoy these functions connect a USB memory device 2GB or greater supporting USB 2 0 High Speed 480Mbit s to the BD STORAGE SERVICE terminal page 8 on the back of this TV If there is insufficient storage space the data wi...

Page 61: ...age data copied to the USB memory device Disc Playback Primary audio video Secondary audio video BD LIVE In this TV a variety of contents with interactive functions are available through BD LIVE compatible Blu ray discs by connecting to the internet You can enjoy the download of bonus features such as latest movie trailers to the USB memory device communication compatible BD J interactive games et...

Page 62: ...type of playback and then press ENTER Playback of the title will begin NOTE Finalize refers to a recorder processing a recorded disc so that it will play in other DVD players recorders as well as this TV Only finalized DVD discs will play back in this TV This TV does not have a function to finalize discs Audio CD Playback AUDIO CD Playback from the Beginning 1 Load an audio CD Playback may begin aut...

Page 63: ... Fast Forward Reverse functions when J or G is pressed during playback Example When J is pressed The search speed will change each time you press the button When playing back a DVD You cannot fast forward or fast reverse from one title and continue to another title except when playing audio CDs Skipping to the Next or the Start of the Current Chapter Track Skipping to the beginning of a chapter or...

Page 64: ...splayed 2 Press c d to select Off and then press ENTER NOTE Press U the Repeat Playback is cancelled and the next chapter is played back Press T once the Repeat Playback is cancelled and the TV returns to the start of current chapter track If you press T again within about 5 seconds the TV will skip to the beginning of the previous chapter track For Partial Repeat Playback set the start and end po...

Page 65: ...layed for DVD VIDEO The settings can be changed in Blu ray disc Setup Playback Setting Angle Mark Display See page 65 NOTE Settings for audio subtitles and angle can be changed also in DISC MENU control screen See this page The operations of subtitles angle and audio differ according to each disc You may need to refer to the operation manual of the disc The following operations will not work when ...

Page 66: ...ed title press 0 9 to enter the title number when this option is highlighted Chapter Number Direct Chapter Skip Shows the chapter number being played back You can skip to the start of the chapter To skip to the start of a selected chapter press 0 9 to enter the chapter number when this option is highlighted Playback Elapsed Time Direct Time Skip Shows the elapsed time from the beginning of the dis...

Page 67: ...e operations in accordance with the instructions in the BD disc manual To enjoy BD LIVE functions perform the broadband internet connection page 16 and communication settings pages 66 67 Audio Video Settings H Play Format Set the playback setting for content recorded in 24Hz Auto The content is played back in 24Hz Off The content is played back in 60Hz H Secondary Audio This toggles the clicking s...

Page 68: ...rent setting select Initialize then press ENTER 6 For setting the IP address press c d to select Yes or No then press ENTER Do you obtain the IP address automatically IP Address Yes No Next Netmask Gateway If selecting Yes The IP address is automatically obtained Go to the step 10 If selecting No The IP address netmask and gateway are manually entered using the screen for inputting characters See ...

Page 69: ...ion occurs in which the Ethernet connection fails etc change the setting and confirm if the Ethernet connection successfully works When the connection speed is set select Next then press ENTER 14 For testing the connection to the internet after confirming the settings press c d to select Test then press ENTER Test is available only when setting to obtain the IP address automatically Test cannot be s...

Page 70: ...e input screen either by selecting each of the characters in the Numeric mode or using the Number buttons on the remote control IP Address Netmask Gateway 123 1 Press ENTER at the boxes in which characters are to be entered and the input screen will appear Numeric 1 2 3 4 5 6 7 8 9 0 Edit 2 Press a b to select the desired input mode When inputting the address of the proxy server 1ABC Alphabet nume...

Page 71: ...i MK Macedonian ML Malayalam MN Mongolian MO Moldavian MR Marathi MS Malay MT Maltese MY Burmese NA Nauru NE Nepali NL Dutch NO Norwegian OC Occitan OM Afan Oromo OR Oriya PA Panjabi PL Polish PS Pashto Pushto PT Portuguese QU Quechua RM Rhaeto Romance RN Kirundi RO Romanian RU Russian RW Kinyarwanda SA Sanskrit SD Sindhi SG Sangho SH Serbo Croatian SI Singhalese SK Slovak SL Slovenian SM Samoan S...

Page 72: ...isc Drive of this TV Using a USB extension cable may prevent the Disc Drive from performing correctly Version When you select Version the system software version is displayed USB Memory Management The following instructions explain how to delete data such as the Virtual Package data copied to a USB memory device CAUTION Do not remove the USB memory device or unplug the AC cord while the erase is b...

Page 73: ...ly updated a screen is displayed indicating that the update process is completed If the update has failed check the file in the USB device and try Software Update again 9 Press POWER on the TV to turn off the TV 10 Remove the USB memory device Software Update continued 1 Insert the USB memory device with the update file into the BD STORAGE SERVICE terminal on the Disc Drive of this TV 2 Press MENU t...

Page 74: ...45 and 46 you can also call up the external player s Top menu or AQUOS BD Player s AQUOS Recorder s Title list provided that the devices support AQUOS LINK Multiple control of HDMI devices You can select which HDMI device to operate using the OPTION button NOTE When you use AQUOS LINK make sure to use a certified HDMI cable Point the remote control unit toward the TV not to the connected HDMI devic...

Page 75: ...ayer AQUOS Recorder via the AQUOS AUDIO speaker system Connecting an AQUOS BD Player AQUOS Recorder only Optical audio cable HDMI certified cable HDMI certified cable AQUOS BD Player AQUOS Recorder AQUOS AUDIO speaker system AQUOS BD Player AQUOS Recorder HDMI certified cable AQUOS LINK setup AQUOS LINK control Set to On to enable HDMI CEC functions 1 Press MENU and the MENU screen displays 2 Press c...

Page 76: ...INK control Selecting channel key This function allows you to select the channel of the connected HDMI device using the TV s remote control unit 1 Repeat steps 1 to 3 in AQUOS LINK control 2 Press a b to select Selecting channel key and then press ENTER Auto power on Selecting recorder Selecting channel key Using genre info INPUT1 On On On Off Off Off INPUT2 INPUT3 Setting channel select key for A...

Page 77: ...me you press ENTER Refer to the operation manual of the AQUOS AUDIO speaker system for details Calling up the menu of an external device connected with the TV via HDMI You can call up the menu of an HDMI CEC compatible external device player recorder decorder etc using the Setup Menu function 1 Open the remote control unit s flip cover and then press OPTION 2 Press a b to select Setup Menu and then...

Page 78: ...te control unit s flip cover and then press OPTION 2 Press a b to select Model select and then press ENTER The HDMI device changes every time you press ENTER Recording via the AQUOS Recorder EPG only for recorders You can call up the CEC compatible recorder s EPG and preset timer recordings using the TV s remote control unit 1 Open the remote control unit s flip cover and then press OPTION 2 Press a...

Page 79: ...o Signal name Pin No Signal name Pin No Signal name R GND Ground Not connected G GND Ground SDA B GND Ground HD Not connected 5V VD CSYNC GND Ground SCL NOTE Macintosh adaptor may be required for use for some Macintosh computers Pin No 5 is not used for inputting the signal DVI HDMI conversion cable commercially available Ǿ3 5 mm stereo minijack cable commercially available PC HDMI cable commercia...

Page 80: ... illustrated below a Screen size images Input Signal 1024g768 Normal Keeps the original aspect ratio in a full screen display Cinema For viewing wide screen programs The top and bottom of the image is slightly cropped Full An image fully fills the screen Dot by Dot Detects the resolution of the signal and displays an image with the same number of pixels on the screen Input Signal 1360g768 Normal Ke...

Page 81: ...nputting analogue signals Adjusting the PC image manually Ordinarily you can easily adjust the picture as necessary to change image position using Auto sync In some cases however manual adjustment is needed to optimise the image 1 Press MENU and the MENU screen displays 2 Press c d to select Setup 3 Press a b to select Fine sync and then press ENTER 4 Press a b to select the specific adjustment ite...

Page 82: ...m the PC via the RS 232C connector The TV operates according to the received command and sends a response message to the PC Do not send multiple commands at the same time Wait until the PC receives the OK response before sending the next command Command format C1 C2 C3 C4 P1 P2 P3 P4 Parameter Input the parameter values aligning left and fill with space s for the remainder Be sure that four values ...

Page 83: ...VESA 60Hz standard Any variations from this standard will result in picture distortions DDC is a registered trademark of Video Electronics Standards Association Power Management is a registered trademark of Sun Microsystems Inc VGA and XGA are registered trademarks of international Business Machines Corp RS 232C commands list Commands Commands not indicated here are not guaranteed to operate NOTE ...

Page 84: ...t signal No Teletext available is displayed The same message displays during other modes if no Teletext signal is available When viewing the Teletext information Press CHr to increase the page number Press CHs to decrease the page number Button functions Colour Red Green Yellow Blue You can select a group or block of pages displayed in the coloured brackets at the bottom of the screen by pressing ...

Page 85: ...t used to convert between languages Displaying Subpages You can display subpages as they are transmitted 1 Press m to display Teletext 2 Press 1 to display the subpage as shown below Subpage screen 3 Select the desired subpage by using CHr CHs Red or Green 0 9 directly selects the desired subpage 4 Press 1 to exit the subpage screen Time display You can display the time information included in the...

Page 86: ...g impaired Off H Selecting the Language 1 Press MENU and the MENU screen displays 2 Press c d to select Digital setup 3 Press a b to select Subtitle and then press ENTER 4 Press a b to select 1st language or 2nd language and then press ENTER 5 Press a b to select the desired language and then press ENTER H Displaying subtitles for the hearing impaired You can display subtitles for the hearing impa...

Page 87: ...ight The picture may look dark in a room that is too bright Check the colour system setting See pages 25 and 50 Check the HDMI auto view setting See page 48 Power is suddenly turned off The unit s internal temperature has increased Remove any objects blocking the vent or clean Check the ECO setting See page 32 Is the sleep timer set See page 32 No picture Is the connection to external equipment co...

Page 88: ...d sound the TV will switch to the original soundtrack which may result in a change in language Cannot play commercially available BD VIDEO or DVD VIDEO disc If the BD VIDEO or DVD VIDEO disc contains viewing restrictions according to age level Parental Control playback may be inhibited For BD VIDEO stop playback and disable Parental Control for the respective age level For DVD VIDEO enter the 4 di...

Page 89: ... Discs created on a computer may not play in this TV The disc is automatically ejected Make sure that region code on the disc matches that of this TV Make sure that the disc is playable Make sure that the disc is loaded properly The disc should be loaded with the playback side facing the back of the TV Take out the disc and clean it Disc cannot be ejected Turn power off the main power and then tur...

Page 90: ...e down this message will appear and the disc tray will automatically pop out Occurs if the loaded disc cannot be played because it is a non standard disc or scratched etc Remove the disc Cannot operate Occurs if an operation is incorrect This USB memory is not formatted properly Please format the memory in USB memory management Occurs if there is a formatting error Occurs if the USB memory is not ...

Page 91: ...may be incompatible Failed to record No record media available S16 Check the recording medium Failed to record Cannot record while playback S17 Stop playback and set up the recording again Failed to record Cannot record while recording other programme S18 During recording another recording is not possible Failed to record No record media available S19 Check the recording medium Writing to the medi...

Page 92: ...na To abort the initial auto installation in progress press RETURN NOTE When the TV is in STORE mode repeat steps 1 to 7 to change to HOME mode Download setup The TV automatically determines whether a new software version is available when the TV is in standby mode Selected item Description Yes Automatically searches for new software updates available when the TV is in standby mode No Does not sea...

Page 93: ...50Hz 720P 60Hz 1080I 50Hz 1080I 60Hz INPUT 7 PC input 15 pin mini D sub AUDIO in common use with INPUT1 3 5 mm jack MONITOR OUT VIDEO out AUDIO out RS 232C 9 pin D sub male connector DIGITAL AUDIO OUTPUT Optical Digital Audio output Disc Drive ETHERNET Network connector See page 9 BD STORAGE SERVICE USB 2 0 correspondence for Local storage Software Update OSD language English Simplified Chinese Ara...

Page 94: ...drawings Unit mm POWER MENU r s TV VIDEO CH k l VOL VIDEO L I I R AUDIO 309 99 138 420 420 964 665 53 612 378 300 170 300 887 8 500 3 LC 40LB700X_en_j indd 92 LC 40LB700X_en_j indd 92 8 7 2009 12 39 16 PM 8 7 2009 12 39 16 PM ...

Page 95: ...ult in an unstable installation and may cause serious injuries Installing the Liquid Crystal Television requires special skill that should only be performed by qualified service personnel Customers should not attempt to do the work themselves SHARP bears no responsibility for improper mounting or mounting that results in accident or injury Using an optional bracket to mount the TV You can ask a qua...

Page 96: ... Restraining band supplied Screw for band supplied Restraining band supplied Table Anchoring the TV to the wall or a pillar 1 Fix the product with the 2 clamps supplied using the screws supplied 2 Fix the TV to the wall using extrastrong ties commercially available Fixing the TV to the table 1 Lay the TV down on cushioning such as a blanket over a table 2 Attach the band supplied to the bottom of ...

Page 97: ...rd using the following procedure 1 Press MENU to display the MENU screen and then press c d to select Setup 2 Press a b to select Auto installation Programme setup Child lock Reset and the password input screen displays 3 Press and hold both CHr and VOLk on the TV simultaneously until the message appears on the screen L I 95 LC 40LB700X_en_j indd 95 LC 40LB700X_en_j indd 95 8 7 2009 12 39 17 PM 8 ...

Page 98: ...Public License hereafter GPL a GNU Lesser General Public License hereafter LGPL or other license agreement Obtaining source code Some of the open source software licensors require the distributor to provide the source code with the executable software components GPL and LGPL include similar requirements For information on obtaining the source code for the open source software and for obtaining the...

Page 99: ...LC 40LB700X_en_j indd 97 LC 40LB700X_en_j indd 97 8 7 2009 12 39 17 PM 8 7 2009 12 39 17 PM ...

Page 100: ...Printed in Malaysia TINS E306WJZZ 09P09 MA NP LC 40LB700X_en_j indd 98 LC 40LB700X_en_j indd 98 8 7 2009 12 39 17 PM 8 7 2009 12 39 17 PM ...

Reviews: