background image


9

Preparation

Simple operations for watching a TV programme

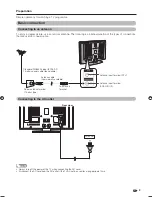
Basic connection

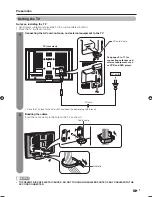
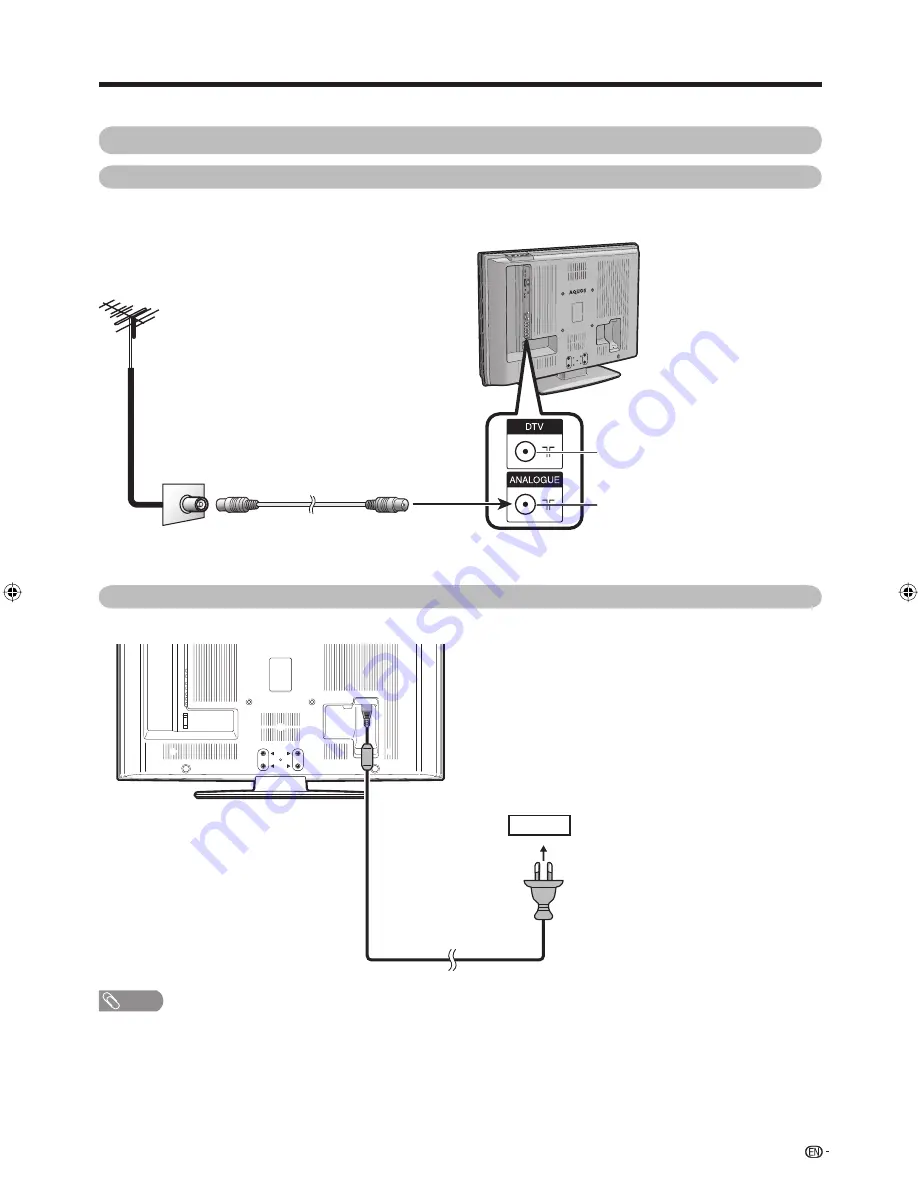
Connecting to an antenna

To enjoy a clearer picture, use an outdoor antenna. The following is a brief explanation of the types of connections 
that are used for coaxial cable.

Standard DIN45325 plug (IEC169-2)
75-ohm coaxial cable (round cable) 

Room antenna terminal 
(75-ohm type)

Antenna cable 
(commercially available)

To antenna 
terminal

Connecting to the AC outlet

Rear view

AC outlet

NOTE

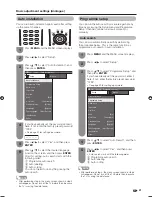
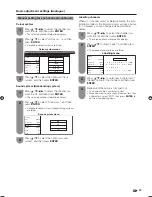
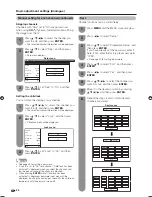
•  Always turn off the power of the TV when connecting the AC cord.
•  Disconnect the AC cord from the AC outlet if the TV will not be used for a long period of time.

Antenna input terminal 
(ANALOGUE)

Antenna input terminal (DTV)

42PD7X_en_a.indd   9

42PD7X_en_a.indd   9

2007/01/12   15:45:19

2007/01/12   15:45:19

Summary of Contents for AQUOS LC-42PD7X

Page 1: ...MODEL LC 42PD7X LCD COLOUR TELEVISION OPERATION MANUAL ...

Page 2: ......

Page 3: ... button operation for changing volume sound 17 Sleep timer 17 ANALOG DTV RADIO buttons 18 Basic adjustment settings 19 Menu operation buttons 19 On Screen Display 19 Menu items TV DTV INPUT1 2 20 Menu items HDMI DVI 20 Auto installation 21 Programme setup 21 Auto search 21 Manual setting for each channel 22 Search tuning 22 Fine tuning 22 Colour system 23 Sound system Broadcasting system 23 Labell...

Page 4: ...ync adjustment PC input mode only 41 Fine Sync adjustment PC input mode only 41 Input Label 42 Image position 42 Wide Screen Signalling WSS 43 Picture aspect ratio 43 Standby Mode 44 Reset 44 WIDE mode for TV AV input mode 45 WIDE mode for PC input mode 46 Audio Only 47 DNR Digital Noise Reduction 47 HDMI Setup 47 Language setting for on screen display 48 Identification 48 Colour system setting 48 ...

Page 5: ...gs This product is not designed for built in installation do not place the product in an enclosed place such as a bookcase or rack unless proper ventilation is provided or the manufacturer s instructions are followed The LCD panel used in this product is made of glass Therefore it can break when the product is struck forcefully or with a sharp object If the LCD panel is broken be careful not to be...

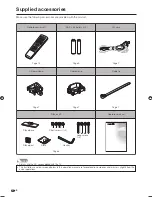
Page 6: ...le clamp Operation manual Stand unit Page 14 Page 5 Page 7 Page 7 Page 7 Page 6 Stand base Stand post Short screws g4 Long screws g4 NOTE Always use the AC cord supplied with the TV The illustrations and on screen displays in this operation manual are for explanation purposes and may vary slightly from the actual operations Hex key Cable tie Page 7 Cloth ...

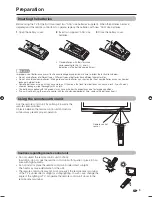
Page 7: ...ions in the battery compartment 2 Insert two supplied AAA size batteries 3 Close the battery cover 5 m Inserting the batteries Before using the TV for the first time insert two AAA size batteries supplied When the batteries become depleted and the remote control fails to operate replace the batteries with new AAA size batteries Using the remote control unit Use the remote control unit by pointing i...

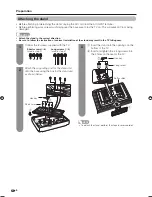
Page 8: ...se using the box for the stand unit as shown below Confirm the 8 screws supplied with the TV Attaching the stand Before attaching or detaching the stand unplug the AC cord from the AC INPUT terminal Before performing work spread cushioning over the base area to lay the TV on This will prevent it from being damaged CAUTION Attach the stand in the correct direction Be sure to follow the instructions ...

Page 9: ...let and keep the power plug within reach Setting the TV Notes on installing the TV Avoid direct sunlight and place the TV in a well ventilated location Place the TV in a level location Cable clamp CAUTION TO PREVENT RISK OF ELECTRIC SHOCK DO NOT TOUCH UN INSULATED PARTS OF ANY CABLES WITH THE AC CORD CONNECTED Bundling the cables Insert the cable clamp in the hole on the TV as shown 2 AC cord clam...

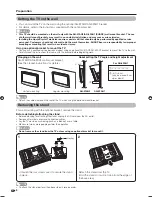
Page 10: ...on requires special skill that should only be performed by qualified service personnel Customers should not attempt to do the work themselves SHARP bears no responsibility for improper mounting or mounting that results in accident or injury Using an optional bracket to mount the TV You can ask a qualified service personnel about using an optional AN 37AG2 AN 52AG1 bracket to mount the TV to the wall...

Page 11: ...axial cable Standard DIN45325 plug IEC169 2 75 ohm coaxial cable round cable Room antenna terminal 75 ohm type Antenna cable commercially available To antenna terminal Connecting to the AC outlet Rear view AC outlet NOTE Always turn off the power of the TV when connecting the AC cord Disconnect the AC cord from the AC outlet if the TV will not be used for a long period of time Antenna input termin...

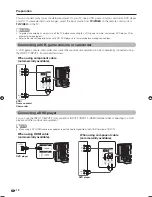
Page 12: ...nnecting a VCR game console or camcorder A VCR game console camcorder and some other audiovisual equipment can be conveniently connected using the INPUT 1 INPUT 2 component terminals VCR Game console Camcorder Connecting a DVD player You can use the INPUT 1 INPUT 2 component or INPUT 3 INPUT 4 HDMI terminal when connecting to a DVD player and other audiovisual equipment When using HDMI cable comme...

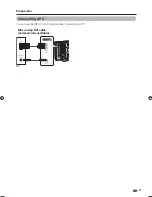
Page 13: ...11 Preparation Connecting a PC You can use the INPUT 5 DVI terminal when connecting to a PC When using DVI cable commercially available PC DVI I AUDIO L R ...

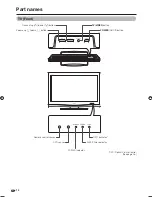
Page 14: ...ront Volume up e down f buttons Channel up r down s buttons OPC indicator POWER On Off button TV VIDEO button OPC Optical Picture Control See page 26 SLEEP timer indicator OPC sensor Remote control sensor POWER indicator ...

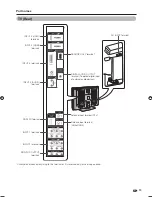
Page 15: ...NPUT 1 terminals Antenna input terminal ANALOGUE AC INPUT terminal SERVICE ONLY terminal Usually do not connect anything to this terminal as it is reserved only for service personnel INPUT 4 HDMI terminals INPUT 5 terminals DIGITAL AUDIO OUTPUT terminal To optical digital input of external audio devices Antenna input terminal DTV ...

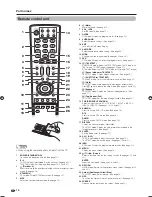
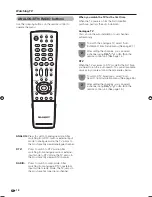
Page 16: ... 51 3 Hold TELETEXT mode Stop updating Teletext pages automatically Press 3 again to release the hold mode See pages 50 and 51 1 Subpage TELETEXT mode Display the Teletext subpage directly See page 51 v Top Bottom Full TELETEXT mode Set the area of magnification See page 50 15 TV VIDEO INPUT SOURCE Select an input source TV DTV INPUT 1 INPUT 2 INPUT 3 INPUT 4 INPUT 5 See pages 10 42 and 49 16 ANALO...

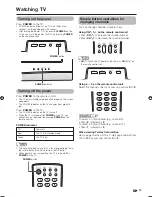
Page 17: ... TV is in standby mode Red POWER indicator The TV is on Green NOTE If you are not going to use this TV for a long period of time be sure to remove the AC cord from the AC outlet Minor power is consumed when the TV is turned off by POWER on the TV Simple button operations for changing channels You can change channels in several ways Using CHr s on the remote control unit Press CHr to increase the c...

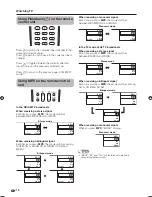
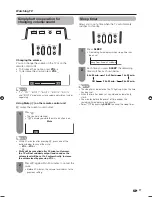
Page 18: ...etween NICAM STEREO and MONO When receiving a bilingual signal Each time you press MPX the mode switches among NICAM CH A NICAM CH B NICAM CH AB and MONO In the TV mode of A2 TV broadcasts When receiving a stereo signal Each time you press MPX the mode switches between STEREO and MONO When receiving a monaural signal When you press MPX MONO displays When receiving a bilingual signal Each time you ...

Page 19: ... remote control unit e mutes the current sound output Sleep timer Allows you to set a time when the TV automatically switches to standby Press e The sound is silenced M is displayed while the mute function is on Press e again within 30 minutes to cancel the mute Before 30 minutes the volume level returns to the previous setting 1 2 Sleep Timer Remain 2 hr 00 min NOTE The sleep timer indicator on t...

Page 20: ...ntly tuned radio channel When you watch the TV for the first time When the TV powers on for the first time after purchase perform the auto installation Analogue TV You can run the auto installation to set channels automatically To watch the analogue TV select Auto Installation from Setup menu See page 21 1 DTV When the TV accesses to DTV mode for the first time you need to run the auto search To scan...

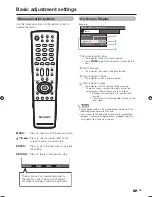
Page 21: ...t modes but the operating procedures are the same The screens in the operation manual are for explanation purposes some are enlarged others cropped and may vary slightly from the actual screens MENU Option Input Select Option Audio Only DNR Input Select Colour System VIDEO Auto 19 Basic adjustment settings Menu operation buttons Use the following buttons on the remote control to operate the menu E...

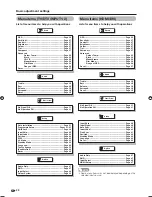
Page 22: ... Surround Page 30 Reset Page 30 Audio Treble Page 30 Bass Page 30 Balance Page 30 Surround Page 30 Reset Page 30 Setup Auto Installation Page 21 Programme Setup Pages 21 25 Child Lock Page 39 Input Skip Page 40 Input Label Page 42 Position Page 42 WSS Page 43 4 3 Mode Page 43 Standby Mode Page 44 Language Page 48 Text Language Page 52 Identification Page 48 Reset Page 44 Option Audio Only Page 47 D...

Page 23: ...password 1234 See page 39 for setting a password 1 2 3 MENU Setup Programme Setup Setup Option Child Lock Input Skip Auto Installation Programme Setup Position Identification Reset Panorama 4 3 Mode Mode1 Standby Mode English Language West Europe Text Language On WSS If you have already set the password enter it here If not enter the factory preset password 1234 See page 39 for setting a password ...

Page 24: ... and then press ENTER The selected channel information displays Press a b to select Search and then press ENTER 1 2 MENU Setup Programme Setup Fine Colour sys Sound sys Label Skip Lock 179 25 Search Auto B G Off SAT 1 Off 179 25 MHz Next Store Cancel Press a b to select item and press ENTER Next Search the next channel Store Memorise the current display channel Cancel Return to the previous screen...

Page 25: ...lays 1 Press a b to select Colour sys and then press ENTER Receivable colour systems are listed 2 Colour system menu Manual setting for each channel continued Press a b c d to select the channel you want to edit and then press ENTER The selected channel information displays 1 Press a b to select Label and then press ENTER The alphabet and numbers are listed 2 Press a b c d to select each character...

Page 26: ...elect the channel you want to edit and then press ENTER The selected channel information will be displayed 1 Press a b to select Skip and then press ENTER Skip menu displays 2 Skip menu Setting the child lock You can block the viewing of any channel Press a b c d to select the channel you want to edit and then press ENTER The selected channel information will be displayed 1 Press a b to set Lock t...

Page 27: ...be erased Press a b c d to select the channel you want to erase and then press ENTER A message screen pops up 6 Basic adjustment settings Analogue Press c d to select Yes and then press ENTER to erase the selected programme All the subsequent programmes move up 7 Repeat the steps 6 and 7 until all desired channels are erased 8 Erase programme menus 01 06 07 08 09 10 11 12 13 14 15 16 17 18 19 20 S...

Page 28: ...g light When the input source is TV DTV INPUT1 or 2 terminals Example AV MODE MOVIE AV MODE STANDARD AV MODE DYNAMIC AV MODE GAME AV MODE USER TV AV MODE DYNAMIC Fixed When the input source is INPUT3 4 or 5 terminals Example AV MODE MOVIE AV MODE STANDARD AV MODE DYNAMIC AV MODE GAME AV MODE PC AV MODE USER AV MODE DYNAMIC Fixed Press OPC to switch the OPC function on and off Using OPC on the menu...

Page 29: ...Digital Selected item Backlight Contrast Brightness Colour Tint Sharpness cbutton The screen dims For less contrast For less brightness For less colour intensity Skin tones become purplish For less sharpness dbutton The screen brightens For more contrast For more brightness For more colour intensity Skin tones become greenish For more sharpness Adjustment items MENU Picture Picture Audio Contrast ...

Page 30: ...settings Analogue Digital Selected item On Off Description For high detail in black portions No adjustment Press a b to select the desired level and then press ENTER 5 Press a b to select Colour Temp and then press ENTER 4 Selected item High Mid High Middle Mid Low Low Description White with bluish tone White with reddish tone 3D Y C Provides high quality images with minimal dot crawl and cross co...

Page 31: ...o select On and then press ENTER 5 Range of OPC The brightness level range of the OPC sensor s automatic adjustments can be set according to your preferences The adjustment range of the OPC sensor can be set to a maximum of 16 and a minimum of 16 Repeat steps 1 to 3 in Monochrome 1 Press a b to select Range of OPC and then press ENTER 2 Press a b to select Max or Min and then adjust the item to th...

Page 32: ...lance Surround Reset Off 0 0 15 L 15 0 15 15 R STANDARD Basic adjustment settings Analogue Digital NOTE For resetting all adjustment items to factory preset values press a b to select Reset press ENTER press c d to select Yes and then press ENTER Press a b to select a specific adjustment item 3 Selected item Treble Bass Balance cbutton For weaker treble For weaker bass Decrease audio from the right...

Page 33: ...ntrol menu displays 2 Press a b to select No Operation Off and then press ENTER 3 Press c d to select Enable and then press ENTER Five minutes before the power shuts down remaining time displays every minute 4 NOTE Disable is factory preset value Power Control Power Control setting allows you to save energy No Operation Off When set to Enable the power will automatically shut down if there is no o...

Page 34: ...37 Multilingual Page 37 Time Setup Page 37 I Plate Setup Page 38 Information Page 38 Quick Search Page 36 Audio Setup NOTE The illustrations and on screen displays in this manual are for explanation purposes and may vary slightly from the actual operations S W Update SERVICE ONLY Page 38 Selecting DTV mode Press DTV MENU to directly display DTV menu screen DTV MENU Press to open or close DTV menu ...

Page 35: ...under Next is displayed 12 0021 11 52 TTX Mpeg Jun 25 G INFO ABC Melbourne ABC2 NOW Montreux Jazz Festival 2003 11 04 12 03 NEXT The New Inventors 6 7 8 9 0 1 5 4 3 2 General INFO screen 1 Current channel number 2 Date and current local time 3 Teletext 4 Audio system Dolby D or MPEG 5 Parental rate 6 Station name 7 Service name 8 Current programme name 9 Time for the current programme 0 Next progr...

Page 36: ...channel is locked you must enter your password whenever you tune to the channel NOTE Press ENTER again to cancel FAV or Lock settings Parental Rate This function allows TV channels to be restricted It prevents children from watching violent or sexual scenes that may be considered inappropriate Press a b to select Parental Rate and then ENTER Repeat steps 1 to 3 in Favourite Lock 1 2 Press a b to s...

Page 37: ...ess made Manual Adjust You can set some channel items manually Press a b to select Manual Adjust and then press ENTER 2 Repeat steps 1 to 3 in Auto Search 1 Press 0 9 or c d to select a channel number Channel settings apply to channels 2 69 3 3 Channel No Frequency 778000KHz Signal Level Quality SNR 94 100 25dB Start Scan Press a b to select the desired menu item and make sure the correct frequenc...

Page 38: ...ER 5 Reset Data Use this function to clear the channel data Press a b to select Reset Data and then press ENTER 2 Repeat steps 1 to 3 in Quick Search 1 Press c d to select Yes and then press ENTER 3 Video Setup This function allows you to select an output format Audio Setup Time Setup I Plate Setup Video Setup Fix Auto Output Format Press a b to select Setup and then press ENTER 2 Press DTV MENU t...

Page 39: ...t format is normally in PCM Dolby Digital audio will be output when there is a Dolby Digital audio signal The output will be in PCM when there is no Dolby Digital audio signal Using Digital Audio Output It is possible to output audio through the DIGITAL AUDIO OUTPUT terminal PCM audio outputs from the terminal To optical digital input of external audio devices Optical fibre cable commercially avail...

Page 40: ...e display time and time format for the information plate Press c d to select your desired value and then press ENTER 6 Press a b to select I Plate Setup and then press ENTER 4 Press a b to select System Setup and then press ENTER 3 Press a b to select your desired item 5 Information You can check the current version of the hardware and software on the screen Press a b to select Information and the...

Page 41: ...4 digit number as in step 6 to confirm The new password was registered displays 7 Press a b to select Change password and then press ENTER 5 Change password Reset New Password Reconfirm Enter the 4 digit number as a password using 0 9 6 Resetting the password Allows you to reset your password NOTE As a precautionary measure make a note of your password and keep it in a familiar place If you lose or...

Page 42: ...t mode only Some input signals may have to be registered manually to display properly The pairs of input signals resolutions in the list below are not distinguishable when received In such case you have to set the correct signal manually After setting once it will display when the same signal resolution is input again 1024 x 768 1360 x 768 NOTE You can only select the Input Signal on the Setup men...

Page 43: ... cases however manual adjustment is needed to optimise the image Press a b to select the specific adjustment item 4 Reset H Pos 90 a b a b a b a b V Pos Clock Phase 39 90 20 Selected item H Pos V Pos Clock Phase Description Centres the image by moving it to the left or right Centres the image by moving it up or down Adjusts when the image flickers with vertical stripes Adjusts when characters have l...

Page 44: ... 3 Press a b to select Input Label and then press ENTER 4 Press a b c d to select each character of the new name for the input source and then press ENTER 5 Press MENU and the MENU screen displays 1 Press c d to select Setup 2 Press a b to select Position and then press ENTER 3 Press a b to select H Pos or V Pos 4 Press c d to adjust the item to your desired position 5 Reset H Pos a10 b10 V Pos a2...

Page 45: ...screen format When the broadcast signal contains no WSS information the function will not work even if enabled Picture aspect ratio The WSS signal has 4 3 auto switching that allows you to select between Panorama and Normal Press MENU and the MENU screen displays 1 Press c d to select Setup 2 Press a b to select 4 3 Mode and then press ENTER 3 Press c d to select Panorama or Normal and then press ...

Page 46: ... be restored to normal you can reset the settings to the factory preset values Press a b to select Reset and then press ENTER Return to factory pre settings displays on the screen 3 Press c d to select Yes and then press ENTER Now TV will restart automatically OK displays on the screen 4 Press MENU and the MENU screen displays 1 Press c d to select Setup 2 Press c d to select Yes and then press EN...

Page 47: ... The menu lists the wide mode options selectable for the type of video signal currently received 1 Press WIDE or a b while the WIDE MODE menu displays on the screen As you toggle down the options each mode is immediately reflected on the TV 2 WIDE MODE Normal Zoom 14 9 Panorama Full Cinema 16 9 Cinema 14 9 4 3 Mode set to Panorama 4 3 Mode set to Normal Auto Selection If you set WSS and 4 3 Mode in...

Page 48: ...enu 2 a Screen size images WIDE MODE Normal Cinema Full Dot by Dot Example Full Dot by Dot An image fully fills the screen Detects the resolution of the signal and displays an image with the same number of pixels on the screen Input Signal Full Dot by Dot An image fully fills the screen Detects the resolution of the signal and displays an image with the same number of pixels on the screen 1360g768 Y...

Page 49: ...MENU screen displays 2 Press c d to select Option 3 Press a b to select HDMI Setup and then press ENTER The HDMI Setup can be selected only when INPUT3 or INPUT4 is selected 4 MENU Option HDMI Setup Option Audio Only DNR HDMI Setup Off HDMI Setup HDMI High Definition Multimedia Interface terminal selection Press a b to select the desired item and then press ENTER 5 RGB YCbCr4 4 4 YCbCr4 2 2 Enable ...

Page 50: ...actory preset value is Auto If Auto is selected colour system for each channel is automatically set If an image does not display clearly select another colour system e g PAL NTSC 4 43 Identification You can check the current version of the software on the screen Language setting for on screen display You can also select a language from setup menu Select from among 3 languages English Chinese and Ar...

Page 51: ...on the remote control unit or on the TV 1 Press MENU and the MENU screen displays 1 Press c d to select Option 2 Press a b to select Input Select and then press ENTER 3 Selecting input signal type For setting the signal type of external equipment Press a b to select a signal type you want to set and then press ENTER 4 NOTE If no colour image displays try to change the other signal type Check the o...

Page 52: ... No Teletext available is displayed The same message displays during other modes if no Teletext signal is available TELETEXT TELETEXT Top Displays in the upper half of the screen Bottom Displays in the lower half of the screen Full Displays in full screen TELETEXT Red Green Yellow Blue When viewing the Teletext information Press CHr to increase the page number Press CHs to decrease the page number...

Page 53: ...ear on the display 3 4 Press DISPLAY again within the three second interval the channel display is on the screen Time information will display on the lower left of the screen for about three seconds Even when you change the TV channel you can display the time information with steps 2 to 3 above NOTE The time display cannot be stored once the power is turned off When you turn on the power perform s...

Page 54: ...R NOTE Teletext can display only when it is sent by a network Not used to convert between languages West Europe English French Scandinavian Czech German Spanish Italian East Europe Polish French Scandinavian Czech German Slovenian Croatian Italian Rumanian Greek Turkish English French Scandinavian Turkish German Spanish Italian Greek Cyrillic English Russian Estonian Czech German Spanish Ukrainian...

Page 55: ...king vent or clean Check the power control setting See page 31 Is sleep timer set See page 17 Is connection to other equipment correct See pages 10 and 11 Has input signal setup been done correctly after connection See pages 40 and 49 Is the correct input selected See page 49 Is picture adjustment correct See pages 27 to 29 Is the antenna connected properly See page 9 Is On selected in Audio Only ...

Page 56: ...bits None 1 bit None Baud rate Data length Parity bit Stop bit Flow control Communication procedure Send the control commands from the PC via the RS 232C connector The TV operates according to the received command and sends a response message to the PC Do not send multiple commands at the same time Wait until the PC receives the OK response before sending the next command Command format Parameter ...

Page 57: ...IMER 1 HOUR 30 MIN SLEEP TIMER 2 HOUR SLEEP TIMER 2 HOUR 30 MIN TEXT OFF TEXT ON TOGGLE DIRECT PAGE JUMP 100 899 WIDE MODE POSITION VOLUME SURROUND MUTE AUDIO CHANGE SLEEP TIMER TEXT O P P P P L H I I I I I I I I I I I U U U C C C C F F F F F F E E C L O O O O C S D D D D D D D D D D D T T T S S S H T T T T T T X X P M S S S S K E E E E E E E E E E E E E E E U U U A M M M M M M T T G 0 1 2 3 4 5 6...

Page 58: ...Receiving Channel VHF UHF CATV TV Tuning System Brightness Backlight life Rear ANTENNA IN 44 25 863 25 MHz S1 S41ch including Hyperband Auto Preset 99 ch 450 cd m2 60 000 hours at Backlight Standard position STEREO BILINGUAL NICAM B G I D K A2 stereo B G INPUT 5 Ø 3 5mm jack Audio input DVI DVI I input Terminals INPUT 1 INPUT 2 INPUT 3 INPUT 4 MONITOR OUTPUT RS 232C OSD language 75 q DIN type VIDE...

Page 59: ...200 540 1031 933 421 526 140 96 292 675 58 733 200 85 57 Unit mm Dimensional drawings ...

Page 60: ...d input screen displays Press MENU to display the MENU screen and then press c d to select Setup 3 Press and hold both CHr and VOLk on the TV simultaneously until the message appears on the screen The password resets to the factory preset 1234 The Password is NOTE As a precautionary measure make a note of your password above scissor it from this manual and keep it in a familiar place ...

Page 61: ...Memo ...

Page 62: ...Memo ...

Page 63: ......

Page 64: ...Printed in Malaysia TINS C983WJZZ 07P02 MA NG Printed on post consumer recycled paper ...

Reviews: