background image


7

Preparation

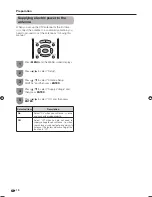
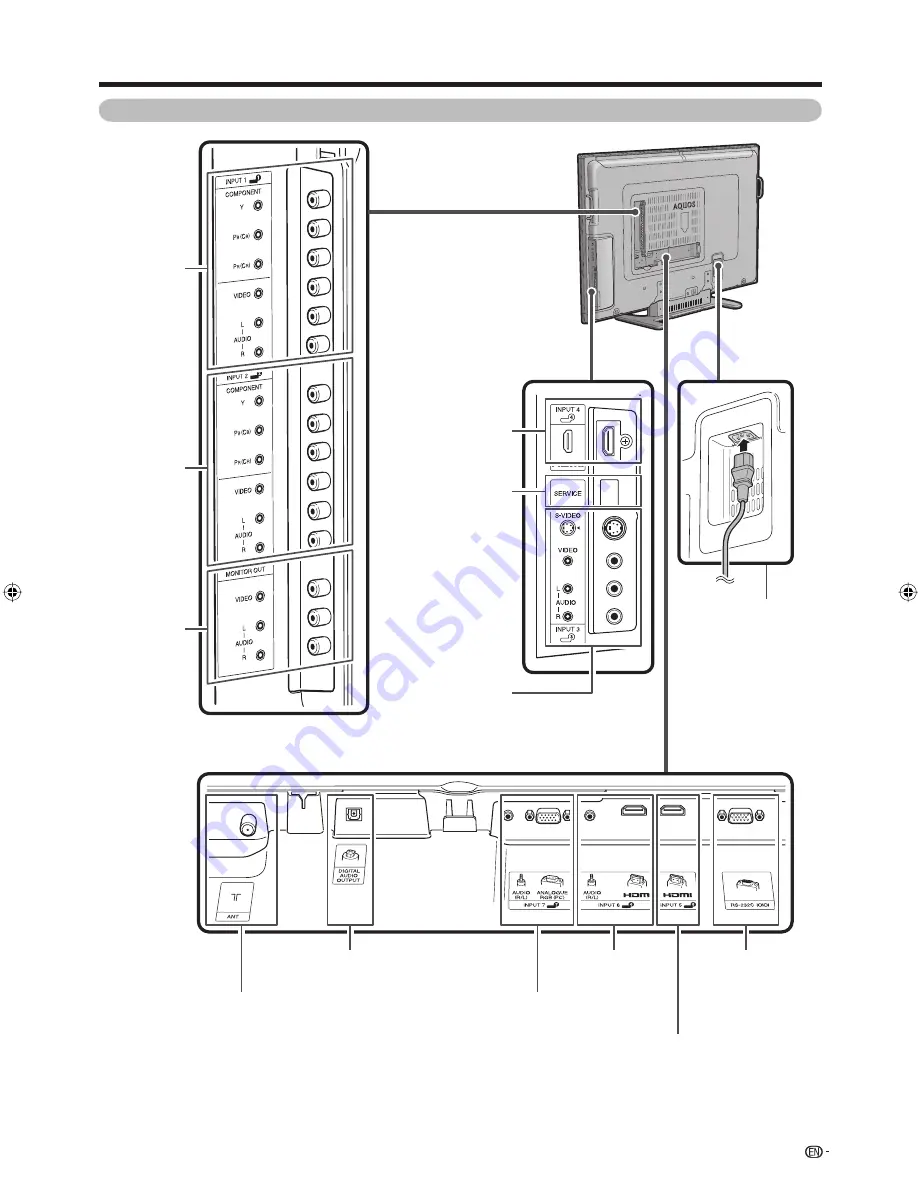
TV (Rear)

RS-232C terminal

INPUT 4 (HDMI) 

terminal

INPUT 7 (PC) terminals

INPUT 2 

terminals

INPUT 1 

terminals

Antenna input terminal

AC INPUT terminal

INPUT 5 (HDMI) terminal

INPUT 6 (HDMI) 
terminals

INPUT 3 terminals

MONITOR 

OUTPUT 
terminals

DIGITAL AUDIO OUTPUT terminal

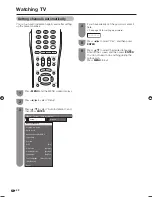
SERVICE ONLY 

terminal*

*  Usually do not connect 

anything to this terminal 
as it is reserved only 
for service personnel.

65RX1X_en_b.indd   7

65RX1X_en_b.indd   7

2008/06/20   13:57:34

2008/06/20   13:57:34

Summary of Contents for Aquos LC-65RX1X

Page 1: ...MODEL LC 65RX1X LCD COLOUR TELEVISION OPERATION MANUAL ...

Page 2: ......

Page 3: ...camcorder 12 Connecting a DVD player 12 Connecting a STB Satellite Cable etc 13 Connecting a PC 13 Using Digital Audio Output 13 Protecting against overturning 14 Inserting the batteries 15 Using the remote control unit 15 Cautions regarding the remote control unit 15 Turning the TV on off 16 Turning on the power 16 Turning off the power 16 About Menu operations 17 What is Menu 17 Basic Menu opera...

Page 4: ...r picture settings 36 DNR Digital Noise Reduction 36 Adjusting the image position 36 Game Play Time 36 Indicating time on the screen 37 Audio adjustment 38 Output Volume Select 38 Automatic Volume Adjustment 39 Clear Voice 39 Digital Audio Output 39 Programme Guide 40 INFO 40 Favourite channel setting 41 ATV Analogue DTV RADIO buttons 42 EPG 43 EPG display settings 43 Time Zone 43 Selecting a prog...

Page 5: ...ing a PC image on the screen 57 Selecting the picture size 57 Adjusting the PC image automatically 58 Adjusting the PC image manually 58 Input resolution settings 59 Selecting the input resolution 59 PC Control of the TV 60 PC compatibility chart 61 RS 232C commands list 61 Teletext function About Teletext 62 Teletext language setting 63 Displaying Subpages 63 Time display 63 DVB Subtitle Displayi...

Page 6: ...the product in an enclosed place such as a bookcase or rack unless proper ventilation is provided or the manufacturer s instructions are followed The LCD panel used in this product is made of glass Therefore it can break when the product is struck forcefully or with a sharp object If the LCD panel is broken be careful not to be injured by broken glass Heat sources Keep the product away from heat s...

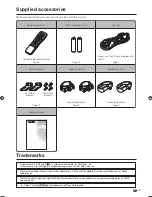
Page 7: ...ing cables Cable clamp g2 Page 9 For bundling cables Restraints brackets Screws for brackets TruSurround XT SRS and h symbol are trademarks of SRS Labs Inc TruSurround XT technology is incorporated under license from SRS Labs Inc HDMI the HDMI logo and High Definition Multimedia Interface are trademarks or registered trademarks of HDMI Licensing LLC Manufactured under license from Dolby Laboratorie...

Page 8: ...ual operations TV Front Side SLEEP timer indicator Regarding the headphone jack Use headphones with a stereo mini plug Ø 3 5 mm Be sure to unplug headphones from the jack when they are not in use The speakers do not output volume when headphones are plugged in The Audio menu cannot be operated when headphones are plugged in You can set the volume to different levels for each input source Volume di...

Page 9: ...nals INPUT 1 terminals Antenna input terminal AC INPUT terminal INPUT 5 HDMI terminal INPUT 6 HDMI terminals INPUT 3 terminals MONITOR OUTPUT terminals DIGITAL AUDIO OUTPUT terminal SERVICE ONLY terminal Usually do not connect anything to this terminal as it is reserved only for service personnel ...

Page 10: ... pages 62 1 Subpage Display the Teletext subpage directly See page 63 v Top Bottom Full TELETEXT mode Set the area of magnification See page 62 14 TV VIDEO INPUT SOURCE Select an input source TV INPUT 1 INPUT 2 INPUT 3 INPUT 4 INPUT 5 INPUT6 INPUT7 PC See pages 12 13 47 50 and 56 15 FAV DTV only Display the favourite channel setting See page 41 16 RADIO DTV only Press to access RADIO mode See page4...

Page 11: ... antenna terminal 75 ohm type Antenna cable commercially available To antenna terminal Connecting external devices See pages 12 and 13 for connecting external equipment such as a VCR and DVD player 2 3 Cable clamp Connecting the AC cord CAUTION Do not use a power cord other than the one supplied with the TV Be sure to use a power outlet of AC 110 240 V 50 60 Hz Using power supply other than the on...

Page 12: ... antenna is set up and connected independently Off Select Off when you do not need to supply voltage to your antenna i e when your antenna is connected to a community antenna The factory default setting of this function is Off Press MENU and the MENU screen displays 1 Press c d to select Setup 2 Press a b to select Antenna Setup DIGITAL and then press ENTER 3 Press a b to select Supply Voltage and...

Page 13: ...esired language and then press ENTER 3 Initial auto installation When the TV powers on for the first time after purchase the initial auto installation wizard appears Follow the menus and make the necessary settings one after another Confirm the following before turning on the power Is the antenna cable connected Is the AC cord plugged in English Digital Search Major Analogue Channel settings are pre...

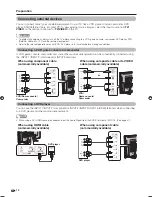
Page 14: ...a DVD player and other audiovisual equipment When using HDMI cable commercially available When using component cable commercially available NOTE When using a DVI HDMI conversion adaptor input the Audio Signal from the AUDIO terminal of INPUT 6 See page 47 L R AUDIO Y PB CB PR CR When using component cable commercially available L R AUDIO Y PB CB PR CR Connecting external devices You can connect ma...

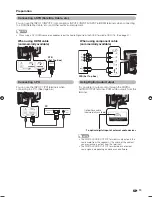
Page 15: ... CB PR CR STB Set Top Box STB Set Top Box Connecting a PC You can use the INPUT 7 PC terminals when connecting to a PC See page 56 ANALOGUE RGB AUDIO R L PC Using Digital Audio Output It is possible to output audio through the DIGITAL AUDIO OUTPUT terminal PCM audio outputs from the terminal To optical digital input of external audio devices Optical fibre cable commercially available NOTE The DIGIT...

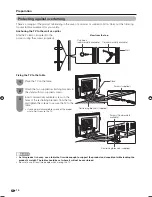
Page 16: ...e the TV on the table 1 2 CAUTION As this product is heavy use a table that is wide enough to support the product and capable of withstanding the product s weight The table should be set where it will not be overturned Be sure to use at least two people when moving the TV Tie commercially available View from the top Stand Restraining brackets supplied Screws supplied Screws Commercially available ...

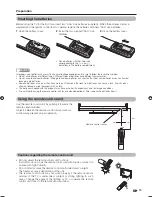
Page 17: ...tions in the battery compartment 2 Insert the two supplied AAA size batteries 3 Close the battery cover 5 m Use the remote control unit by pointing it towards the remote sensor window Objects between the remote control unit and sensor window may prevent proper operation Cautions regarding the remote control unit Do not subject the remote control unit to shock In addition do not soak the remote con...

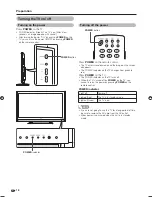
Page 18: ... this TV for a long period of time be sure to remove the AC cord from the AC outlet Minor power is consumed when the unit is in standby mode Turning the TV on off Press POWER on the remote control The TV enters standby mode and the image on the screen disappears The POWER indicator on the TV changes from green to red Press POWER on the TV The POWER indicator on the TV turns off When the TV is turn...

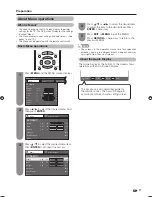
Page 19: ...it Press MENU and the MENU screen displays Press c d to select the desired menu and then press ENTER Press a b to select the desired menu item Press ENTER to proceed if necessary 1 2 3 Press EXIT or MENU to exit the MENU Press RETURN as necessary to return to the previous MENUs 5 Press a b or c d to select the desired item or adjust the item to the desired level Press ENTER if necessary 4 About th...

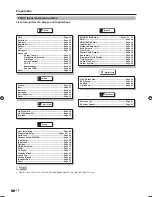
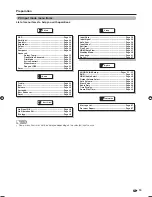
Page 20: ...e 50 Input Label Page 50 Position Page 36 HDMI Auto View Page 47 WSS Page 31 4 3 Mode Page 31 Standby Mode Page 30 Language Page 21 Text Language Page 63 Identification Page 67 Reset Page 67 Option AQUOS LINK Setup Pages 51 55 DNR Page 36 HDMI Audio Select Page 48 Input Select Page 49 Output Volume Select Page 38 Auto Volume Page 39 Clear Voice Page 39 Digital Audio Output Page 39 Audio Only Page 2...

Page 21: ...Reset Page 38 Setup Input Skip Page 50 Input Signal Page 59 Auto Sync Page 58 Input Label Page 50 Position Page 36 Fine Sync Page 58 HDMI Auto View Page 47 Standby Mode Page 30 Language Page 21 Reset Page 67 Option NOTE Some menu items may not be displayed depending on the selected input source AQUOS LINK Setup Pages 51 55 DNR Page 36 HDMI Audio Select Page 48 Output Volume Select Page 38 Auto Vol...

Page 22: ...then press ENTER You do not need to do anything during the auto search Press MENU to exit Press c d to select Yes and then press ENTER 5 Watching TV Setting channels automatically You can run auto installation again even after setting up the preset channels MENU Setup Auto Installation Setup Option Child Lock Auto Installation Programme Setup Antenna Setup DIGITAL Input Skip Position Identificatio...

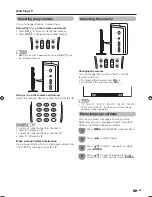
Page 23: ... the remote control unit To increase the volume press VOLk To decrease the volume press VOLl NOTE TV INPUT1 INPUT2 INPUT3 INPUT4 INPUT5 INPUT6 and INPUT7 PC modes can store volume adjustment values separately Menu language settings You can also select a language from setup menu Select from among 4 languages English Simplified Chinese Traditional Chinese and Arabic Press MENU and the MENU screen dis...

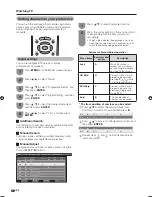
Page 24: ... 6 Press a b to select the desired menu item and then press ENTER 5 Press a b to select Digital Setting and then press ENTER 4 Buttons for Manual Adjust operation Menu items Remote control buttons Description Lock R When the service is locked you must enter your password whenever you tune to the service CH Skip G Services with a mark are passed over when pressing P r s in the TV remote control uni...

Page 25: ...vious screen The search result will not be stored 3 Fine tuning Press a b c d to select the channel you want to edit and then press ENTER The selected channel information displays 1 Press a b to select Fine and then press ENTER 2 Press c d to adjust the frequency and then press ENTER Adjust while checking the background picture as a reference 3 Fine Colour sys Sound sys Label Skip Lock 179 25 Sear...

Page 26: ...layed 1 Press a b to select Skip and then press ENTER Skip menu displays 2 Skip menu Manual setting for each channel continued Setting the child lock You can block the viewing of any channel Press a b c d to select the channel you want to edit and then press ENTER The selected channel information will be displayed 1 Press a b to set Lock to On and then press ENTER 3 Fine Search Colour sys Sound sy...

Page 27: ...ss a b to select Programme Setup and then press ENTER If you have already set the password enter it here See page 28 for setting a password 2 Press a b to select Erase Programme and then press ENTER 5 Press c d to select Yes and then press ENTER 6 Erasing programmes The individual programme can be erased Press a b c d to select the channel you want to erase and then press ENTER A message screen po...

Page 28: ...l returns to the previous setting Outputting only audio When listening to music from a music programme you can set the display off and enjoy audio only Press MENU and the MENU screen displays 1 Press c d to select Option 2 Press a b to select Audio Only and then press ENTER 3 Press c d to select On and then press ENTER 4 NOTE When you make operations that change the picture on the TV such as by ch...

Page 29: ...receiving a bilingual signal Each time you press MPX the mode switches among CH A CH B and CH AB Stereo mode B G STEREO 01 BBC1 B G MONO PAL NICAM PAL 01 ATV ATV BBC1 Bilingual mode B G CH A 01 BBC1 B G CH B PAL NICAM PAL NICAM 01 ATV ATV BBC1 B G MONO 01 BBC1 B G CH AB PAL PAL NICAM 01 ATV ATV BBC1 Monaural mode B G MONO 01 BBC1 B G MONO PAL NICAM PAL 01 ATV ATV BBC1 Stereo mode B G STEREO 01 BBC...

Page 30: ...press ENTER 3 If you have already set the password enter it here 4 Press a b to select Change password and then press ENTER 5 Change password Clear password Parental rating New Password Reconfirm Enter the 4 digit number as a password using 0 9 6 Clearing the password Allows you to clear your password NOTE As a precautionary measure make a note of your password and keep it in a familiar place If y...

Page 31: ...select Yes and then press ENTER 4 Selected item Description General and above G Content is not offensive to most viewers Parental Guidance and above PG Content is such that parents may not want their children to view the programme Mature and above M Mature Audience only This programme is specifically designed to be viewed by adults and therefore may be unsuitable for children under 15 Mature Adult...

Page 32: ...performed You can set the TV to automatically power off when no TV operation is performed for more than 3 hours NOTE Disable is the factory preset value When a TV programme finishes and the TV receives signal input this function may not operate Auto power off after the end of broadcast You can set the TV to automatically power off in about 15 minutes after the TV goes into a state of receiving no ...

Page 33: ...the broadcast signal contains no WSS information the function will not work even if enabled Selecting the Wide Screen Signalling WSS picture size manually The WSS signal has 4 3 auto switching that allows you to select between Panorama and Normal Press MENU and the MENU screen displays 1 Press c d to select Setup 2 Press a b to select 4 3 Mode and then press ENTER 3 Press c d to select Panorama or...

Page 34: ...cting the picture size manually Press WIDE The WIDE MODE menu displays The menu lists the wide mode options selectable for the type of video signal currently received 1 Press WIDE or a b while the WIDE MODE menu displays on the screen As you toggle down the options each mode is immediately reflected on the TV 2 WIDE MODE Normal Zoom 14 9 Panorama Full Cinema 16 9 Cinema 14 9 4 3 Mode set to Panora...

Page 35: ... MODE USER Selected item Description STANDARD For a highly defined image in a normally bright room MOVIE For a movie GAME Lowers image brightness for easier viewing PC For PC Available only when inputting an HDMI or RGB signal x v Colour Produce realistic colour on the TV screen unlike any other signal USER Allows the user to customise settings as desired You can set the mode for each input source ...

Page 36: ...creen Picture adjustment You can adjust the picture to your preference Follow the steps to adjust the picture Watching TV MENU Picture Picture Audio Contrast OPC DYNAMIC Off Brightness Colour Tint Sharpness Advanced Reset 30 0 0 0 0 Backlight 14 Manual picture settings Selected item cbutton dbutton OPC Sets whether or not the screen brightness is automatically adjusted according to the lighting co...

Page 37: ...ectable depending on the input signal type w Active Contrast Automatically adjusts the contrast of an image according to the scene if set to On w 3D Y C Provides high quality images with minimal dot crawl and cross colour noise Selected item Description Standard Normal adjustment Fast Set the optimum image quality for fast moving images Slow Set the optimum image quality for slow moving images Off...

Page 38: ...tory preset values press a b to select Reset and then press ENTER Adjustments are stored separately according to input source Images may not be displayed properly depending on the settings and or signals Selected item Description H Pos Centres the image by moving it to the left or right V Pos Centres the image by moving it up or down Game Play Time This function displays the elapsed game time so y...

Page 39: ... You can select the time format either 24HR or AM PM for the clock time Press MENU and the MENU screen displays 1 Press c d to select Option 2 Press a b to select Time Display and then press ENTER 3 Press a b to select Time Format and then press ENTER 4 Press c d to select the desired time format and then press ENTER 5 Selected item Description On Display the clock time On half hourly Display the ...

Page 40: ...and TV programmes broadcast in surround sound Off Outputs the normal sound Repeat steps 1 to 2 in Audio adjustment 1 Press a b to select Surround and then press ENTER 2 Press c d to select On 3 Press c d to select Option Press MENU and the MENU screen displays 1 2 Press c d to select Fixed or Variable and then press ENTER Press a b to select Output Volume Select and then press ENTER 3 4 Output Vol...

Page 41: ...en press ENTER Press a b to select Clear Voice and then press ENTER 3 4 Digital Audio Output This function allows you to select your favourite audio output system Press c d to select Option and then press ENTER Press MENU and the MENU screen displays 1 2 Press a b to select your desired output system and then press ENTER Press a b to select Digital Audio Output and then press ENTER 3 4 MENU Option...

Page 42: ...heck the current schedule of DTV events and view detailed information about current events Press GUIDE to display the programme guide list 1 Press a b to display your desired programme and then press ENTER When you press ENTER the TV jumps to the channel 2 INFO While watching DTV you can check the extended programme information on the screen using INFO on the remote control Age Optic REC OK Audio ...

Page 43: ...t to register as a favourite channel 1 4 Deleting a favourite channel Press FAV and the favourite channel screen displays Press a b to select 1 Data Clear and then press ENTER To delete all the favourite channels select All Data Clear and then skip to step 4 1 2 Press FAV 2 Press a b to select Register and then press ENTER 3 Press a b c d to select the position in the category and then press ENTER...

Page 44: ...hen you watch the TV for the first time When the TV powers on for the first time after purchase perform the auto installation ATV Analogue TV You can run the auto installation to set channels automatically To watch the analogue TV select Auto Installation from Setup menu See page 20 1 DTV Digital TV When the TV accesses to DTV mode for the first time you need to run the auto search To scan all availa...

Page 45: ... If EPG Setup is set to NO only EPG data for the current channel will be updated Selecting EPG Setup to YES will result in higher power consumption Selecting EPG Setup to NO will save power consumption NOTE Approximately 45W for 15 30 minutes depending on number of channels tuned after power off from remote control EPG data will not update if the TV is turned off from the mains power switch MENU D...

Page 46: ...062 340 351 996 999 994 995 998 997 Pla Ba ABC Arr Naked Scien Catal Parliament Qu The The Pla Ba Arr Naked Scien Catal Parliament Qu The The Stat T W Se Play S G ENTER Select Enter RETURN Back EPG Exit Programme Info Search By Genre Search By Date Timer List R G Y B Tue 19 6 9 28 Today Tue 20 Wed 21 Thu 22 Fri 23 Sat 24 Sun 25 Mon 26 2 1 3 4 5 Programme Information EPG DTV TV 002 9 23 9 29 ABC TV...

Page 47: ...ort Children s Music Arts Culture Current Affairs Education Information Comedy Information Drama Today AM Search By Genre Today PM Tue 20 AM Tue 20 PM ABC TV Sydney 002 Global Grover Mon 19 06 10 50 11 05 ABC HDTV 020 Global Grover Mon 19 06 10 50 11 10 ABC TV 022 Global Grover Mon 19 06 11 05 11 20 Next B EPG DTV TV 9 10 11 12 13 14 TEN Digital ABC TV Sydney SBS FTV Guide TEN Digital TEN Guide TE...

Page 48: ...ER 4 No Record Watch If you select No the TV returns to the EPG screen w Selecting Watch in the timer setup screen This setting allows you to switch to a programme at a set time 1 Press c d to select Watch and then press ENTER 2 Press c d to select Yes and then press ENTER The selected TV programme is marked with an icon w Selecting Record in the timer setup screen This setting allows you to recor...

Page 49: ...anguage Enable 1360m768 w HDMI High Definition Multimedia Interface Auto View Press c d to select the desired item and then press ENTER 5 Connecting an HDMI output device Settings when using external devices HDMI terminals can carry audio and visual signals to the TV with an HDMI certified cable When you want to output the audio and picture from an HDMI output device on the TV select INPUT4 INPUT5 o...

Page 50: ...ct Option 2 Press a b to select HDMI Audio Select and then press ENTER 3 MENU Option HDMI Audio Select Option AQUOS LINK Setup DNR HDMI Audio Select Output Volume Select Off Digital Fixed w HDMI Audio Select The HDMI Audio Select can be selected only when INPUT6 is selected 1 Press c d to select the desired setting and then press ENTER 4 Selectable items Description Digital Audio signal via the HD...

Page 51: ...t terminal where a cable is connected is automatically selected When the signal type is set to Auto and multiple video signal cables are connected the signal type is selected in the following prioritised order INPUT 1 INPUT 2 COMPONENTs VIDEO INPUT 3 S VIDEOs VIDEO Input source Selectable item INPUT 1 Auto COMPONENT VIDEO INPUT 2 Auto COMPONENT VIDEO INPUT 3 Auto S VIDEO VIDEO Press MENU and the M...

Page 52: ...U screen displays 1 Press c d to select Option 2 Press a b to select Colour System and then press ENTER 3 Press a b to select a compatible video signal system of your equipment and then press ENTER 4 Auto PAL SECAM NTSC 3 58 NTSC 4 43 PAL 60 You can change the colour system to one that is compatible with the image on the screen NOTE Factory preset value is Auto If Auto is selected colour system fo...

Page 53: ...perating Title list of external devices You can also call up the external player s Top menu or AQUOS BD Player s Title list provided that the devices support AQUOS LINK Multiple control of HDMI devices You can select which HDMI device to operate using OPTION Controlling the AQUOS LINK compatible audio system You can adjust the volume and select the sound mode of the AQUOS LINK compatible audio sys...

Page 54: ...lly available items AQUOS LINK Connecting an AQUOS BD Player via the AQUOS LINK compatible audio system Connecting an AQUOS BD Player only Optical Fibre cable commercially available HDMI certified cable HDMI certified cable HDMI certified cable AQUOS BD Player AQUOS LINK compatible audio system AQUOS BD Player AQUOS LINK Setup Press MENU and the MENU screen displays 1 Press c d to select Option 2 Pre...

Page 55: ... with the AQUOS LINK compatible audio system You can opt to listen to the TV sound only from the AQUOS LINK compatible audio system The sound from the TV speaker and headphone terminal is silenced and only the sound from the AQUOS LINK compatible audio system is audible You can use VOL k l and MUTE e AQUOS LINK Menu Recorder EPG Top Menu Title List Media change By AQUOS AUDIO SP By AQUOS SP Sound ...

Page 56: ...nd the AQUOS LINK menu screen displays 2 Press a b to select Top Menu Title List and then press ENTER 3 Playback of titles using AQUOS LINK This section explains how to play back a title in the AQUOS BD Player Select the title with a b c d and then press PLAY I to start playback 4 The linked recorder now powers on and the TV automatically selects the appropriate external input source The title lis...

Page 57: ... unit s flip cover press OPTION and the AQUOS LINK menu screen displays 1 Press a b to select Model select and then press ENTER The HDMI device changes every time you press ENTER 2 HDMI device selection If multiple HDMI devices are connected in a daisy chain you can specify which device to control here Open the remote control unit s flip cover press OPTION and the AQUOS LINK menu screen displays 1 P...

Page 58: ...B GND Ground HD Not connected 5V VD CSYNC GND Ground SCL Analogue Connection PC PC PC PC HDMI certified cable Commercially available DVI HDMI conversion cable Commercially available Ø 3 5 mm stereo minijack cable Commercially available INPUT 4 or 5 INPUT 6 INPUT 7 INPUT 7 Ø 3 5 mm stereo minijack cable Commercially available Ø 3 5 mm stereo minijack cable Commercially available RGB DVI conversion ...

Page 59: ... the screen Detects the resolution of the signal and displays an image with the same number of pixels on the screen Input Signal Full Dot by Dot An image fully fills the screen Detects the resolution of the signal and displays an image with the same number of pixels on the screen 1360g768 You can select the picture size as illustrated below NOTE Connect the PC before making adjustments Selectable s...

Page 60: ... Phase 39 90 20 Press c d to adjust the item to your desired position 5 NOTE For resetting all adjustment items to the factory preset values press a b to select Reset and then press ENTER Clock and Phase in the Fine Sync menu can be adjusted only when inputting analogue signals Images may not be displayed properly depending on the settings and or input signals Press MENU and the MENU screen displa...

Page 61: ...anually After setting once it will display when the same signal resolution is input again 1024 x 768 1360 x 768 NOTE You can only select the Input Signal on the Setup menu when receiving one of the 2 input signals listed above Press MENU and the MENU screen displays 1 Press c d to select Setup 2 1024 x 768 1360 x 768 Press a b to select Input Signal and then press ENTER 3 Press a b to select the d...

Page 62: ... the control commands from the PC via the RS 232C connector The TV operates according to the received command and sends a response message to the PC Do not send multiple commands at the same time Wait until the PC receives the OK response before sending the next command Command format Parameter Input the parameter values aligning left and fill with space s for the remainder Be sure that four values...

Page 63: ... I I I I I I I I I I I U U U C C C C F F F F F F E E C L O O O O C S D D D D D D D D D D D D T T T S S S H T T T T T T X X P M S S S S K E E E E E E E E E E E E E E E E U U U A M M M M M M T T G 0 1 2 3 4 5 6 7 8 9 1 1 0 1 2 0 1 2 _ 0 1 2 3 4 5 0 1 _ _ _ _ _ _ _ _ _ _ 0 1 _ _ _ _ _ _ _ _ _ _ _ _ _ _ _ _ _ _ _ _ _ _ _ _ _ _ _ _ _ _ _ _ _ _ _ _ _ _ _ _ _ _ _ _ _ _ _ _ _ _ _ _ _ _ _ _ _ _ _ _ _ _ _ _...

Page 64: ...lay the Teletext on the right screen and normal image on the left screen Each time you press m the screen switches as shown to the upper right If you select a programme with no Teletext signal No Teletext available is displayed The same message displays during other modes if no Teletext signal is available TELETEXT TELETEXT When viewing the Teletext information Press CHr to increase the page numbe...

Page 65: ... Language and then press ENTER Teletext language setting If Teletext information does not display correctly perform the procedure below Select from among 4 kinds of language tables West Europe East Europe Greek Turkish Cyrillic Each table is compatible with the Teletext languages listed below Press a b to select receivable teletext broadcasting language in your country NOTE Teletext can display on...

Page 66: ... ENTER 2 Press MENU and the MENU screen displays Press c d to select Digital Setup 4 Press a b to select Subtitle and then press ENTER Press a b to select For hearing impaired and then press ENTER 1 3 5 Press c d to select Yes and then press ENTER Subtitles for the hearing impaired have priority over the above subtitle setting 1st Language and 2nd Language EXAMPLE w Selecting the Language w Displa...

Page 67: ...w setting See page 47 The unit s internal temperature has increased Remove any objects blocking the vent or clean Check the power control setting See page 30 Is the sleep timer set See page 30 Is the connection to external equipment correct See pages 12 and 13 Has the input signal setup been performed correctly after connection See page 59 Is the correct input selected See page 50 Is the picture a...

Page 68: ...me S13 S14 Check the content broadcast or programme It may be incompatible Failed to record No record media available S16 Check the recording medium Failed to record Cannot record while playback S17 Stop playback and set up the recording again Failed to record Cannot record while recording other programme S18 During recording another recording is not possible Failed to record No record media avail...

Page 69: ...ress c d to select Setup 2 Press c d to select Yes and then press ENTER Now initialising displays on the screen and blinks After the reset has completed the power shuts off and then comes back on The screen will have returned to its original settings 6 Now initialising Reset Reciever Report If you have already set the password enter it here Return to factory pre settings displays on the screen 4 I...

Page 70: ...480P 576P 720P 50Hz 720P 60Hz 1080I 50Hz 1080I 60Hz 1080P 50Hz 1080P 60Hz 1080P 24Hz AUDIO in Ø 3 5 mm jack INPUT 7 PC input 15 pin mini D sub AUDIO in Ø 3 5 mm jack MONITOR OUT VIDEO out AUDIO out RS 232C 9 pin D sub male connector DIGITAL AUDIO OUTPUT Optical Digital Audio output Front Headphone OSD language English Simplified Chinese Traditional Chinese Arabic Power Requirement AC 110 240 V 50 ...

Page 71: ...drawings Unit mm Appendix 0 5 10 325 21 125 650 278 192 18 440 440 650 325 Cable opening Power code connection terminal On the wall bracket of AN 65AG1 there is a letter A indicating the centre point of the TV monitor When using wall mount bracket AN 65AG1 69 ...

Page 72: ...optional bracket to mount it Appendix NOTE To attach the stand perform the above steps in reverse order Mounting the TV on the wall 1 2 1 Detach the stand from the TV Hold the stand so it will not drop from the edge of the base area 2 Make sure to detach the TV with it tilted slightly backwards and supporting the knobs on the rear of the TV while holding the stand 3 Don t push hard on the speaker ...

Page 73: ... the AN 65AG1 SHARP wall mount bracket The use of other wall mount brackets may result in an unstable installation and may cause serious injuries Installing the Liquid Crystal Television requires special skill that should only be performed by qualified service personnel Customers should not attempt to do the work themselves SHARP bears no responsibility for improper mounting or mounting that result...

Page 74: ...e tape that will not leave permanent marks 1 Make diagonal lines from the four corners and mark their intersecting point Diagonally stretch string and mark the intersecting point in a way that no permanent marks will be left on the wall 2 1 Remove the screws from the stand 2 Attach the bracket to the LCD TV 3 When adjusting the bracket s angle adjust it before installing the TV on the wall The adj...

Page 75: ...he password input screen displays Press MENU to display the MENU screen and then press c d to select Setup 3 Press and hold both CHr and VOLk on the TV simultaneously until the message appears on the screen The Password is NOTE As a precautionary measure make a note of your password above remove it from this manual and keep it in a familiar place CLEARING THE PASSWORD ...

Page 76: ...clude software components covered by a GNU General Public License hereafter GPL a GNU Lesser General Public License hereafter LGPL or other license agreement Obtaining source code Some of the open source software licensors require the distributor to provide the source code with the executable software components GPL and LGPL include similar requirements For information on obtaining the source code...

Page 77: ...75 Memo ...

Page 78: ...76 Memo ...

Page 79: ......

Page 80: ...Printed in Malaysia TINS D749WJZZ 08P07 MA NG ...

Reviews: