
au-mail Settings and Changing au-mail Address
au-mail is a service which enables you to exchange e-mails with other cell phones which support e-mails and with PCs. An e-mails
address is set automatically in the initial settings. You can change the e-mails address set in the initial settings.
●
You cannot make the initial settings via Wi-Fi
®
communication.
■
Initial Settings
Home screen
→
[
].
Confirm the contents
→
[AGREE].
Check au-mail address
→
[
閉じる
] (Close).*
Display the top screen of the
au-mail.
* When the confirmation screen is displayed, follow the on-screen instructions.
■
Changing au-mail Address
Home screen
→
[
].
[
].
[Change Address/Setting
Filter].
[E
メールアドレスの変更へ
]
(To change e-mail address).
Enter the security code
→
[
送信
] (Send).
Confirm the contents
→
[
承諾する
] (Accept).
Enter an au-mail address
→
[
送信
] (Send).
[OK]
→
[
閉じる
] (Close).
■
Checking au-mail Address
Home screen
→
[
].
[
].
[E-mails information].
Check au-mail address.
Making/Receiving Calls
●
Screens displayed when receiving a call or during a call may differ depending on the settings of a call, screen for receiving a call,
operations during an incoming call/a call etc. For details, refer to the “Instruction Manual application” (Japanese version) that can be
used on the product.
■
Entering a Phone Number and Making a Call
Home screen
→
[
].
[
]
→
Enter a phone number
→
[
].
■
Making a Call Using Incoming History/Outgoing History
Home screen
→
[
].
[
]
→
Tap “
” of the other
party you want to make a call to.
■
Making a Call Using Contact Lists
Home screen
→
[
].
[
]
→
Select the other party
you want to make a call to.
Tap the phone number you
make a call to.
■
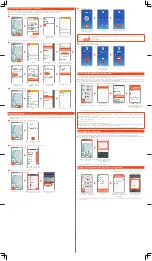
Answering a Call
Swipe “
” up while an
incoming call is arriving.
The call starts.
Tap “
” to end the call.
When a call arrives while the backlight is on (except when the lock screen is displayed), the left screen is
displayed.
Tap “ANSWER”.
■
Putting a Current Call on Hold
While the call is on hold, guidance is played for the other party.
Tap “Hold” during
a call.
The call is put on hold and the
guidance is played for
the other party.
Tap “Hold” to return to
the call.
How to Transfer Data with the au Settings Menu
You can return/store data from an old au phone to this product using a microSD™ memory card or au server. To protect important data, be
sure to save (back up) data periodically to a microSD™ memory card or au server.
●
To return data using an au server, store data from the old au phone to the au server beforehand. To use the au server, you must set an
au ID. (If the old au phone does not have au Settings Menu, use au Cloud application).
●
To return data using a microSD™ memory card, save the data from the old au phone to the microSD™ memory card beforehand. (If the
old au phone does not have au Settings Menu, use the au backup application.)
On the home screen
→
“App list screen”
→
[Settings].
[au Settings]
→
[au Settings Menu].
[Data Transfer].
*
Select “
機種変更はこちら
”
(If you have changed a model)
and transfer data by following
on-screen guidances.
* If a confirmation screen is displayed for terms of use/privacy policy, follow the on-screen guidances.
Automatically Storing Photos
Use the following steps to set automatic backup of photos to the au server using the “Data Storage” application. You can automatically
store them only with a Wi-Fi
®
connection.
●
On the home screen
→
“App list screen”
→
[Settings]
→
[au Settings]
→
[au Settings Menu]
→
[Backup Setting]
→
Select the type
of data to store automatically.
Viewing/Playing data
You can view/play data on the product by the following operations.
●
On the home screen
→
“App list screen”
→
[Settings]
→
[Storage]
→
Select the save destination (Internal shared storage/SD card/
USB memory name)*
→
Select the category and folder
→
Select the data to display.
* If the microSD™ memory card or USB memory is not inserted to the product, contents of the Internal shared storage are displayed.
Reducing Battery Consumption
You can access “function buttons” from the status panel to enable/disable functions and modify their settings. You can reduce the battery
consumption by switching their setting frequently, when not using the functions etc. Enabled functions are displayed in black.
●
You can also reduce the battery consumption using “Energy saving”. For details, refer to the “Instruction Manual application” (Japanese
version) that can be used on the product.
Slide the status bar down with
your two fingers.
Tap the functions whose setting
you want to switch by using
“function buttons”.*
* Flick the function buttons field to the left or right to switch pages.
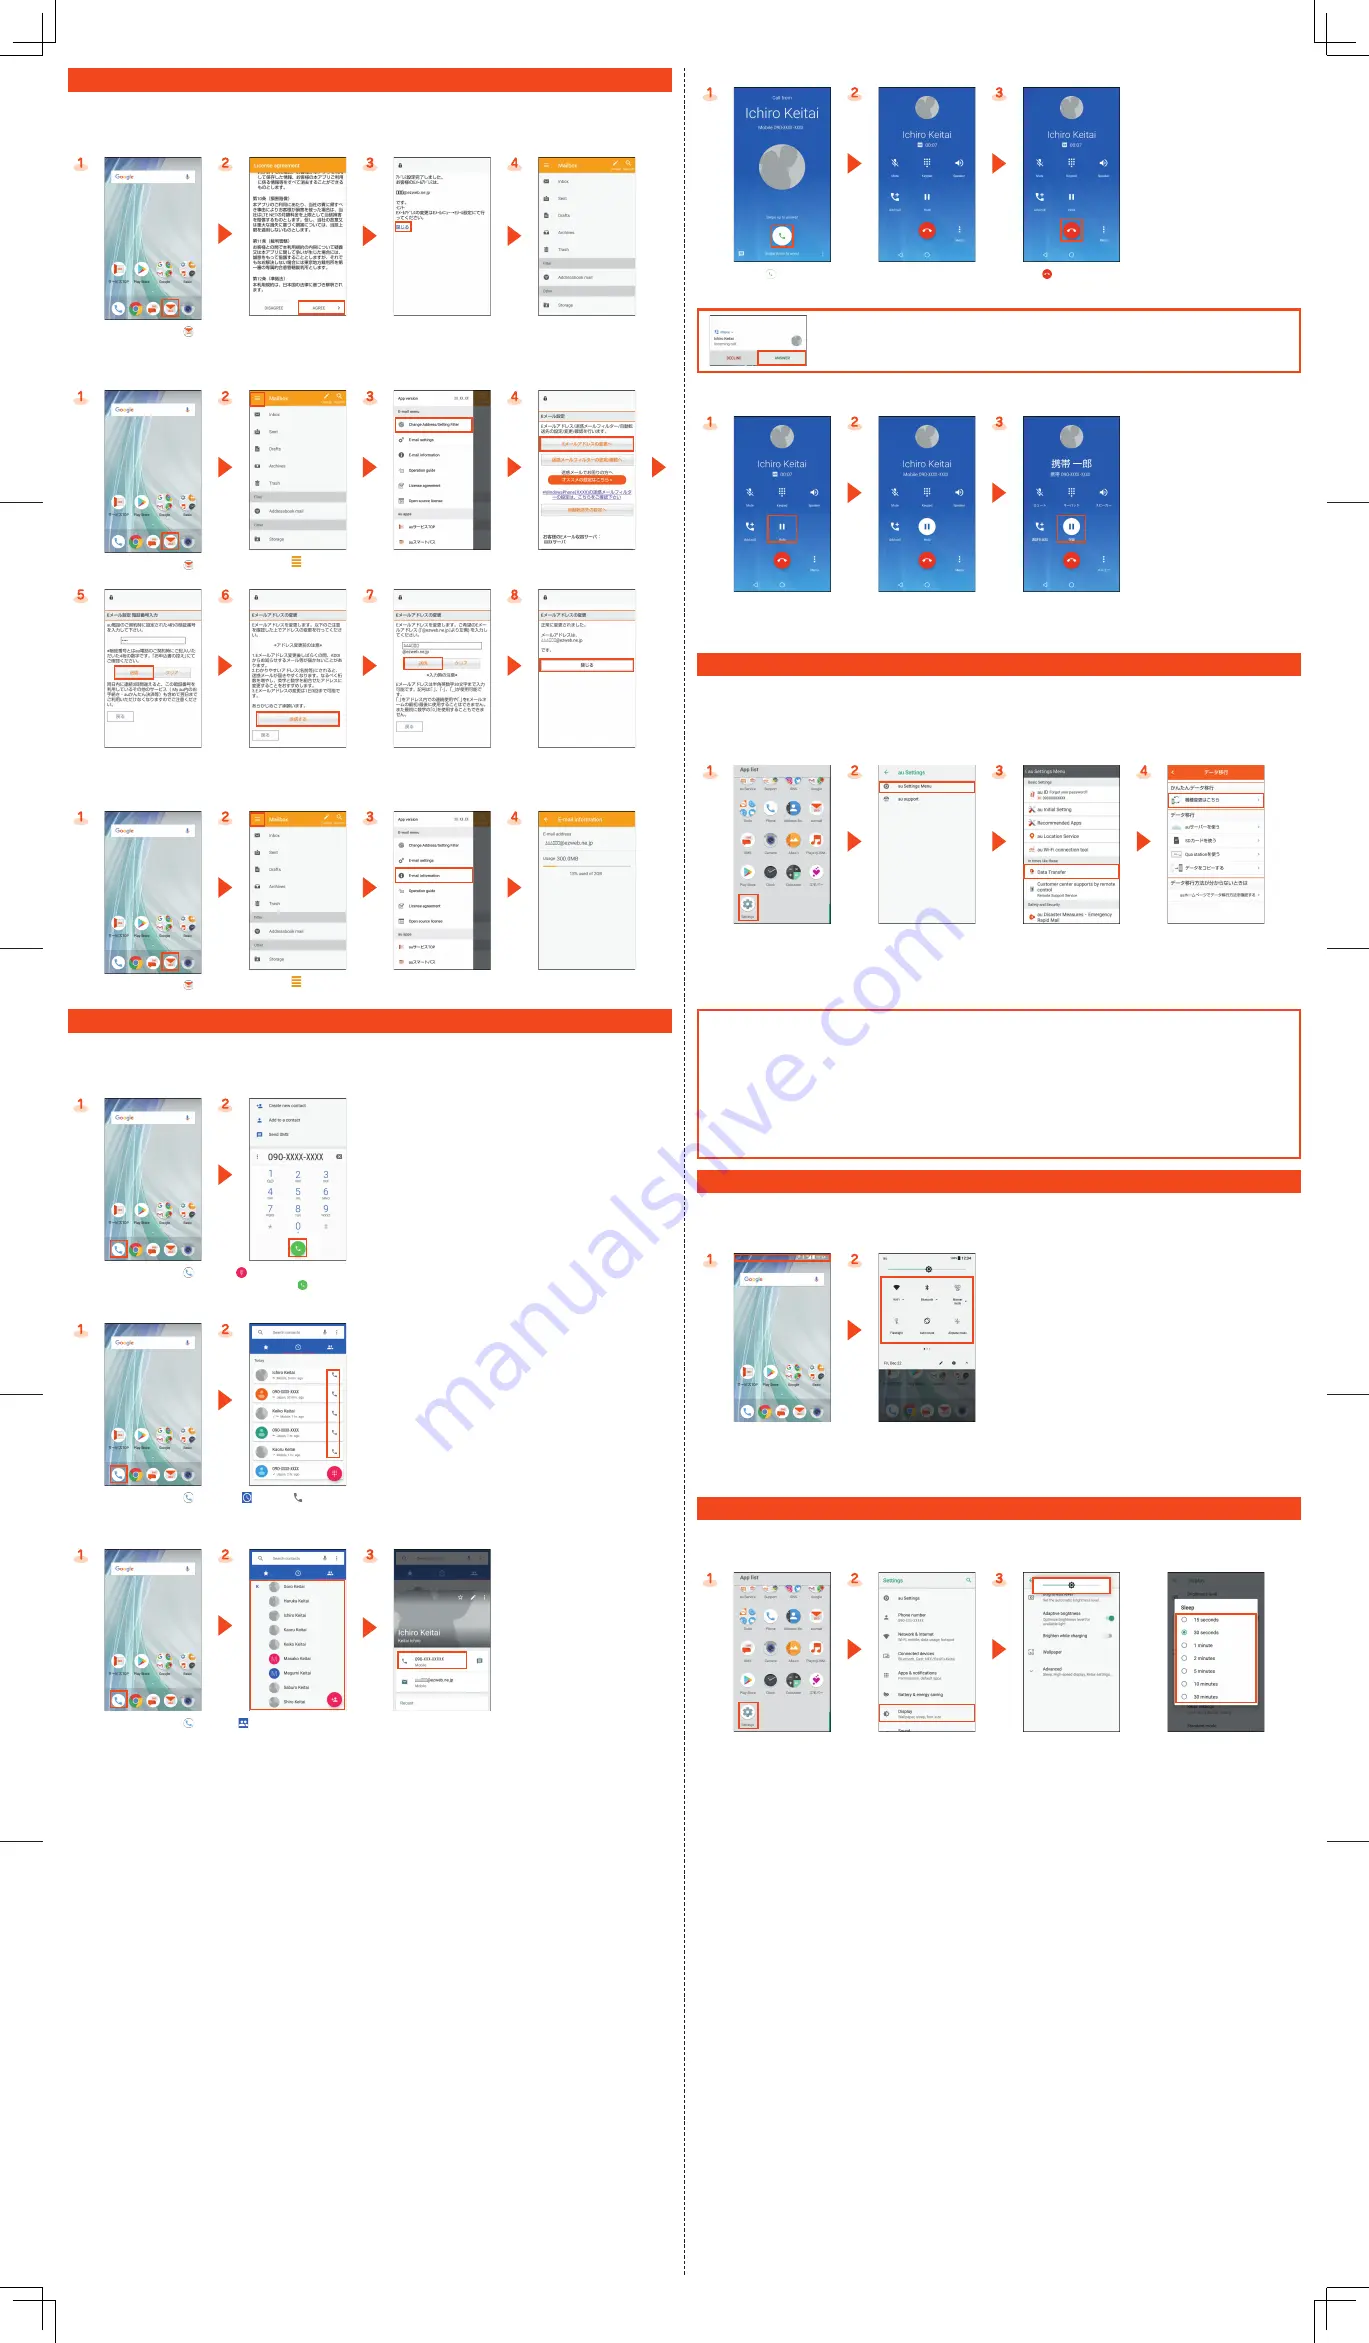
Brighten the screen/Increase the light duration of the backlight
When the screen is dark/the backlight is quickly turned off, change the setting.
Brighten the screen
Increase the light duration
of the backlight
On the home screen
→
“App
list screen”
→
[Settings].
[Display].
[Brightness level]*
→
Slide the
bar to the left or right and set
the brightness.
[Advanced]
→
[Sleep]
→
Select time.
* You can set whether to automatically adjust the screen brightness according to the ambient brightness by switching “Adaptive brightness” to be
enabled/disabled.


