
■
STEP5: au
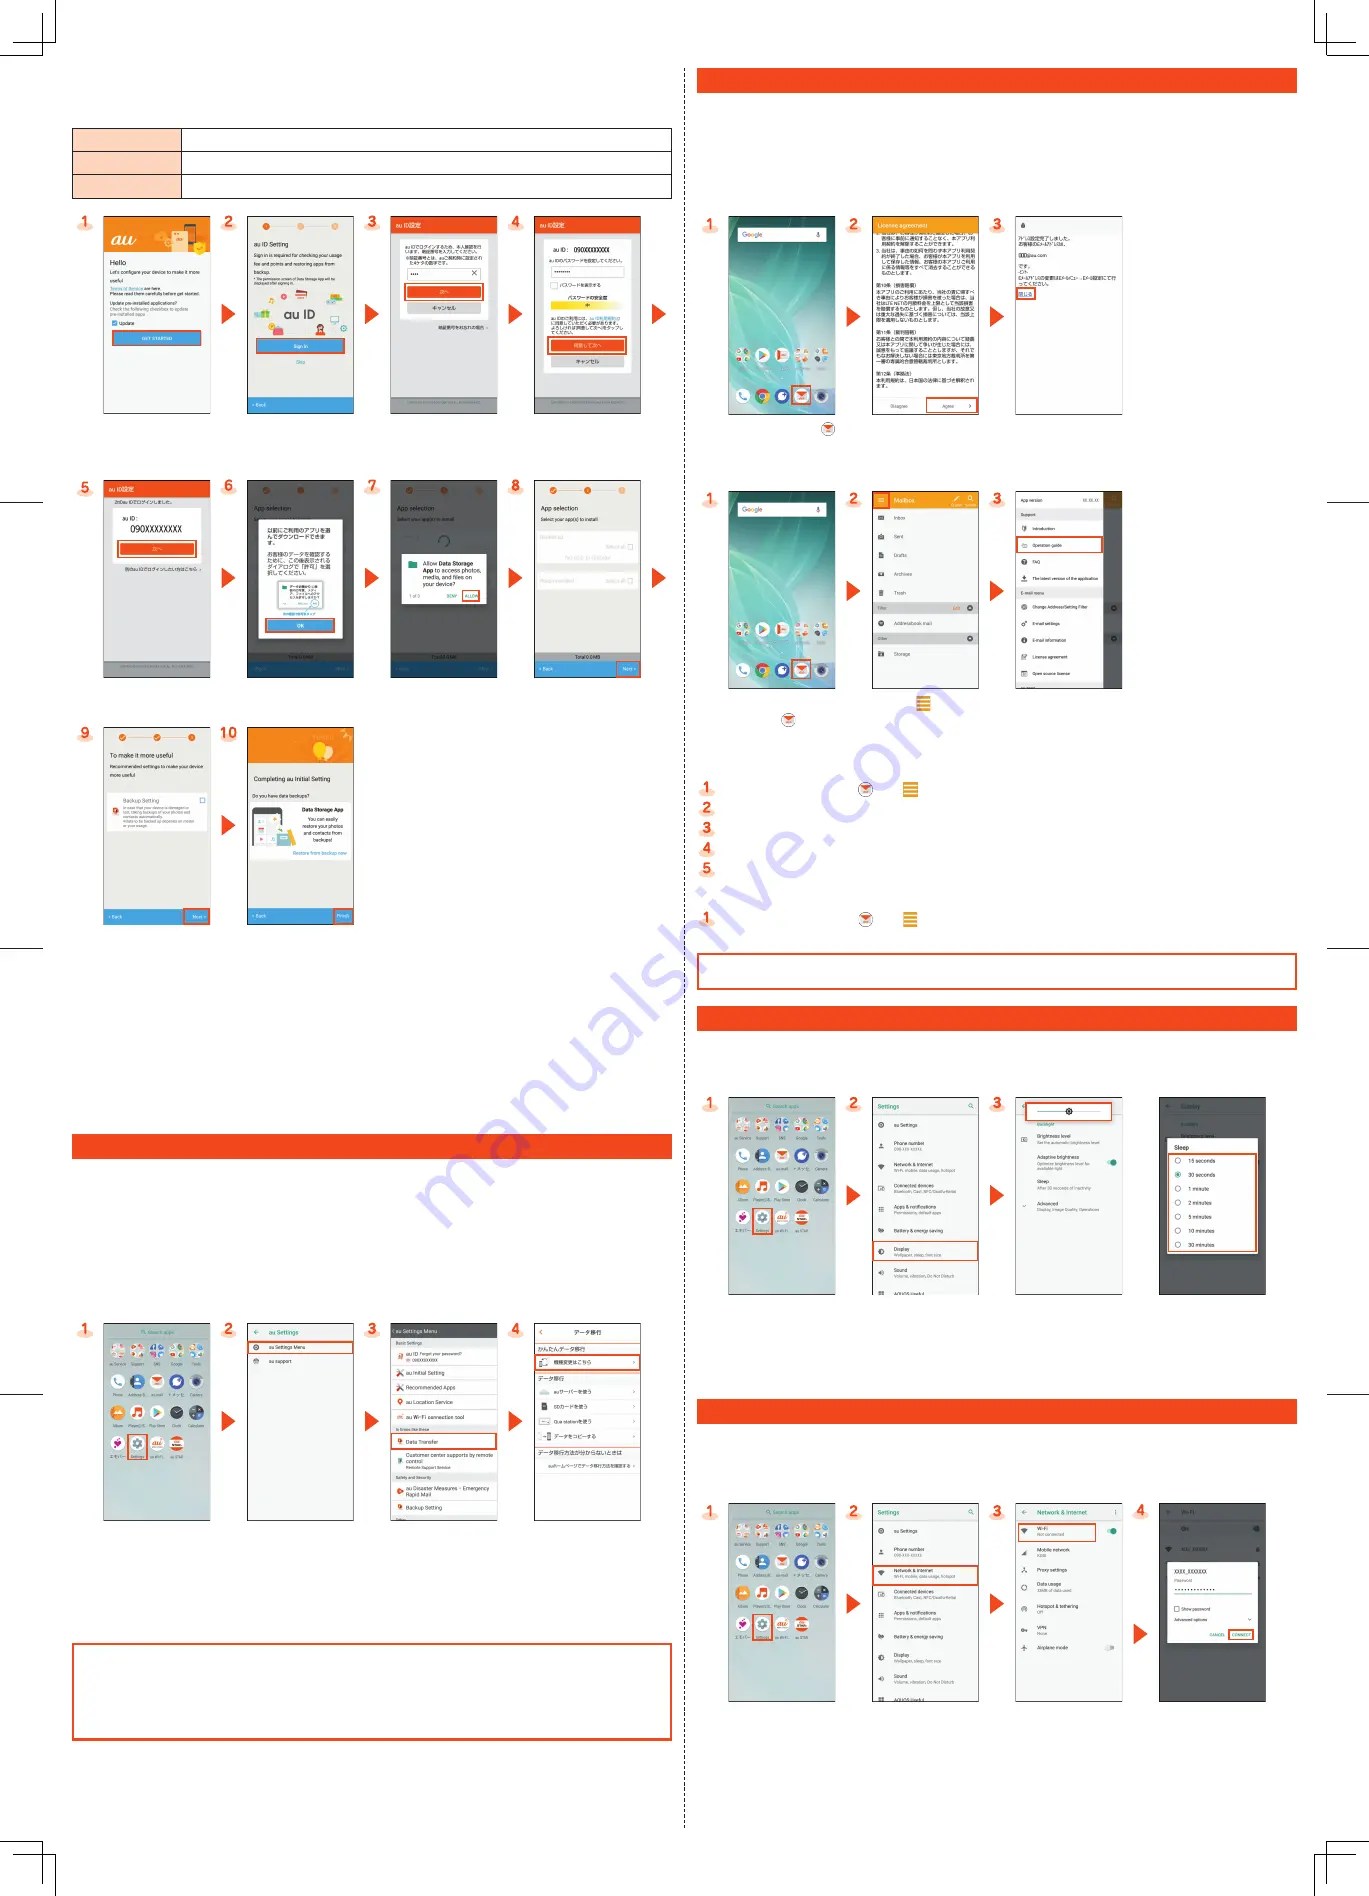
初期設定
(au Initial Setting)
You can use various services provided by au such as au Smart Pass and “au Simple Payment Service” in
which you can purchase applications displayed on Google Play™ by setting an au ID.
au ID
Register your au phone number as an au ID.
au ID password
Register the password for using your au ID.
Security code
The four-digit security code you wrote on the application form.
[GET STARTED].
*1
[Sign in].
Enter the security code
→
[
次へ
] (Next).
*2
Enter the password
→
[
同意して次へ
]
(Agree).
*2
[
次へ
] (Next).
[OK].
[ALLOW].
*3
Mark the applications
to install
→
[Next]
Confirm the contents
and mark the item to
set up
→
[Next].
*4
[Finish]
*5
.
*1 When updating apps in the product, mark “Update”.
*2 The input screen is displayed only when registering au ID for the first time.
*3 The confirmation screen for app permissions is displayed several times. Operate in the same way.
*4 To use the “Data Storage App” application and automatically store photos to the au server, mark “Backup Setting”.
*5 If there are any data stored by “Data Storage App” application, you can restore them from it. Tap “Restore from
backup now” and follow the on-screen instructions.
• Alternatively, on the home screen
→
“App list screen”
→
[Settings]
→
[au Settings]
→
[au Settings Menu]
→
[au Initial
Setting].
How to Transfer Data with the au Settings Menu
You can return/store data from an old au phone to this product using a microSD™ memory card or au
server. To protect important data, be sure to save (back up) data periodically to a microSD™ memory
card or au server.
●
To return data using an au server, store data from the old au phone to the au server beforehand. To use
the au server, you must set an au ID. (If the old au phone does not have au Settings Menu, use au
Cloud application).
●
To return data using a microSD™ memory card, save the data from the old au phone to the microSD™
memory card beforehand. (If the old au phone does not have au Settings Menu, use the au backup
application.)
On the home screen
→
“App list screen”
→
[Settings].
[au Settings]
→
[au Settings Menu].
[Data Transfer].*
Select “
機種変更はこちら
”
(If you have changed a
model) and transfer data
by following on-screen
guidances.
* If a confirmation screen is displayed for terms of use/privacy policy, follow the on-screen guidances.
Automatically Storing Photos
Use the following steps to set automatic backup of photos to the au server using the “Data Storage
App” application. You can automatically store them only with a Wi-Fi
®
connection.
●
On the home screen
→
“App list screen”
→
[Settings]
→
[au Settings]
→
[au Settings Menu]
→
[Backup Setting]
→
Select the type of data to store automatically.
au-mail Settings and Changing au-mail Address
au-mail is a service which enables you to exchange e-mails with other cell phones which support e-mails
and with PCs. An e-mails address is set automatically in the initial settings. You can change the e-mails
address set in the initial settings.
●
You cannot make the initial settings via Wi-Fi
®
communication.
■
Initial Settings
• If you have changed a model, an au-mail address from an old au phone is displayed.
Home screen
→
[
].
Confirm the contents
→
[Agree].
Check au-mail address
→
[
閉じる
] (Close).
■
Checking the Usage Method of au-mail Address
On the home screen
→
[
].
[
].
[Operation guide]
→
Select the usage
method to check.
■
Changing au-mail Address
On the home screen
→
[
]
→
[
]
→
[Change Address/Setting Filter].
[
メールアドレスの変更へ
] (To change mail address)
→
Enter the security code
→
[
送信
] (Send).
Confirm the contents
→
[
承諾する
] (Accept).
Enter an au-mail address
→
[
送信
] (Send).
[OK]
→
[
閉じる
] (Close).
■
Checking au-mail Address
On the home screen
→
[
]
→
[
]
→
[E-mail information].
You can check your au-mail address.
When the confirmation screen is displayed, follow the on-screen instructions.
Operations and displayed contents are subject to change without notice.
Brighten the screen/Increase the light duration of the backlight
When the screen is dark/the backlight is quickly turned off, change the setting.
Brighten the screen
Increase the light
duration of the backlight
On the home screen
→
“App list screen”
→
[Settings].
[Display].
[Brightness level]*
→
Slide
the bar to the left or right
and set the brightness.
[Sleep]
→
Select time.
* You can set whether to automatically adjust the screen brightness according to the ambient brightness by switching
“Adaptive brightness” to be enabled/disabled.
Wireless LAN (Wi-Fi
®
) settings
You can connect to an Internet service via a household wireless LAN (Wi-Fi
®
) environment or a public
wireless LAN environment when out and about.
To connect to an Internet via Wi-Fi
®
, you need to register an access point to connect in advance.
For detailed Wi-Fi
®
settings, refer to the “Online Manual”.
On the home screen
→
“App list screen”
→
[Settings].
[Network & Internet].
[Wi-Fi].*
1
Select an access point
*2
→
Enter the password
→
[CONNECT].
*1 When [Wi-Fi] is disabled, switch to enable it.
*2 When connecting to a WPS compatible access points, [Wi-Fi preferences]
→
[Advanced]
→
[WPS Push Button]/[WPS Pin Entry].


