background image

36

All About The Windows Event Manager and scanner events in 
Windows 98, Windows Me, Windows 2000, Windows XP and Windows 
Vista

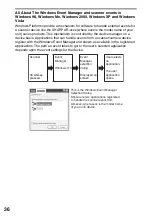
Windows Platforms provide a mechanism for software to handle external events for 
a scanner device like the SHARP AR-xxxx (where xxxx is the model name of your 
unit) series products. This mechanism is controlled by the device manager on a 
device basis. Applications that can handle events from a scanner/camera device 
register with the Windows Event Manager and shown as available in the registered 
applications. The path an event takes to get to the user's selected application 
depends upon the event settings for the device.

Scanner 

SCAN key 
pressed.

Event 
Manager

Windows OS

Event 
Manager
selection 
dialog

Displayed on 
screen

User selects 
an 
application.

The user 
application 
opens.

Thi

s

 i

s

 the Window

s

 Event M

a

n

a

ger

S

election Di

a

log.

S

hown 

a

re two 

a

pplic

a

tion

s

 regi

s

tered

to h

a

ndle the 

s

c

a

nner event from 

AR-xxxx (where xxxx i

s

 the model n

a

me

of yo

u

u

nit) device.
Summary of Contents for AR-203E X

Page 1: ...FUNCTIONAL SYSTEM OPERATION MANUAL Page INTRODUCTION LOADING PAPER MAKING COPIES SPECIAL FUNCTIONS MAINTENANCE TROUBLESHOOTING THE UNIT OPTIONS 4 7 12 42 45 50 58 61 INSTALLING THE SOFTWARE 20 APPENDIX AR 203E MODEL ...

Page 2: ...ete electrical disconnection pull out the main plug The socket outlet shall be installed near the equipment and shall be easily accessible Shielded interface cables must be used with this equipment to maintain compliance with EMC regulations Do not make copies of anything which is prohibited from copying by law The following items are normally prohibited from copying by national law Other items ma...

Page 3: ...those specified herein may result in hazardous radiation exposure The socket outlet shall be installed near the equipment and shall be easily accessible Important points when selecting an installation site Do not install your unit in areas that are damp humid or very dusty exposed to direct sunlight poorly ventilated subject to extreme temperature or humidity changes e g near an air conditioner or...

Page 4: ...he terms of the SOFTWARE LICENSE Products that have earned the ENERGY STAR are designed to protect the environment through superior energy efficiency Wave length 780 nm 15 nm 10 nm Four laser diodes Pulse times 12 88 µs 12 88 ns 7 mm Output power Max 0 2 mW Total Power At the production line the output power of the scanner unit is adjusted to 0 18 MILLIWATT Total Power PLUS 5 and is maintained con...

Page 5: ...30 USING THE SCANNER MODE 32 HOW TO USE THE ONLINE MANUAL 41 5 DESCRIPTION OF SPECIAL FUNCTIONS DESCRIPTION OF SPECIAL FUNCTIONS 42 TONER SAVE MODE 42 USER PROGRAMS 43 DISPLAYING TOTAL NUMBER OF COPIES 44 6 MAINTENANCE TONER CARTRIDGE REPLACEMENT 45 TONER CARTRIDGE LIFE 47 CLEANING THE UNIT 48 7 TROUBLESHOOTING THE UNIT TROUBLESHOOTING 50 STATUS INDICATORS 51 MISFEED REMOVAL 52 DEVELOPER REQUIRED ...

Page 6: ... screens that appear in other operating systems This operation manual refers to the Single Pass Feeder as the SPF In this manual the following icons are used to provide the user with information pertinent to the use of the unit Warns the user that injury may result if the contents of the warning are not properly followed Cautions the user that damage to the unit or one of its components may result...

Page 7: ...guide Document feeder tray Peep hole Document feeder cover Paper tray 2 as an option Original table Operation panel Front cover Paper tray Side cover open button Multi bypass tray Side cover Bypass paper guides Paper output tray 1 2 3 4 5 6 7 8 9 Paper output tray extension Power switch Handle Power cord socket Fusing unit release lever Transfer charger Charger cleaner 10 11 12 13 14 15 16 ...

Page 8: ...rogram code and error code SCAN key and indicator p 29 p 37 1 2 3 4 5 4 6 5 7 6 8 7 9 ONLINE key and indicator p 29 Lights up when the unit is used as a printer and scanner For description of the ONLINE indicator see INDICATORS ON THE OPERATION PANEL p 29 Start key and indicator Copying is possible when the indicator is on Press to start copying Use to set a user program p 43 Power save indicator ...

Page 9: ... damage to the unit For paper weighing from 105g m2 to 128g m2 A4 is the maximum size that can be fed through the multi bypass tray Special papers such as transparency film labels and envelope must be fed one sheet at a time through the multi bypass tray Type of paper feeding Type of media Size Weight Paper tray Standard paper A4 A5 B5 Letter Legal Invoice 56g m2 to 80g m2 Multi bypass tray Standa...

Page 10: ...d length Squeeze the lever of paper guide and slide the guide to match with the width of the paper Move paper guide to the appropriate slot as marked on the tray 3 Fan the paper and insert it into the tray Make sure the edges go under the corner hooks Do not load paper above the maximum height line Exceeding the line will cause a paper misfeed A B Paper guide B Paper guide A ...

Page 11: ...ide is not set too narrow causing the paper to bend Loading paper in these ways will result in document skew or a paper jam When not using the unit for an extended period remove all paper from the paper tray and store it in a dry place If paper is left in the unit for an extended period the paper will absorb moisture from the air resulting in paper jams When adding new paper to the paper tray remo...

Page 12: ... the tray 2 Set the paper guides to the paper width Insert the paper print face down all the way into the multi bypass tray The multi bypass tray can hold maximum of 50 sheets of paper Capacity will vary depending on the type of paper loaded The original image must be smaller than the paper or media for copying If the original image is bigger than the paper or media this may cause smudges on the e...

Page 13: ...r envelopes that have labels or stamps attached Envelopes of which the surface is not flat because of embossing may cause the copies prints to become smudged Under high humidity and temperature conditions the glue flaps on some envelopes may become sticky and be sealed closed when copied printed Use only envelopes which are flat and crisply folded Curled or poorly formed envelopes may be poorly co...

Page 14: ...s been loaded in the paper tray p 8 or multi bypass tray p 10 and check the paper size p 7 If paper is not loaded see page 8 3 Place the original If you are using the original table see Using the original table p 15 If you are using the SPF see Using the SPF p 16 When copying onto paper larger than A4 pull out the paper output tray extension 5 Start copying Press the start key 4 Select the copy se...

Page 15: ...itial settings see the Initial settings of operation panel described on the next page If you use the unit in a country other than the country where the unit was purchased you will need to make sure that your local power supply is compatible with your model If you plug the unit into an incompatible power supply irreparable damage to the unit will result Only insert the power cord into a properly gr...

Page 16: ...lear time setting p 42 elapses after a copy or scanner job is finished or when the clear key is pressed twice The initial settings of the operation panel are shown below When copying is begun in this state the settings in the following table are used Power off methods If not used for a certain period of time the unit will automatically enter auto power shut off mode p 43 in order to minimise power...

Page 17: ... To reattach the original cover reverse the above procedure The original table can read up to A4 original Image loss 4mm can occur at the leading and trailing edges of the copies Also image loss 4 5mm in total can occur along the other edges of the copies When copying a book or an original which has been folded or a crumpled original press down the original cover lightly If the original cover is n...

Page 18: ...m Before placing curled or wavy originals into the original feeder tray be sure to flatten them If not original misfeeds may result The SPF indicator on the operation panel will light up If this indicator does not light up the originals are not properly set or the SPF is not properly closed Badly damaged originals may misfeed in the SPF It is recommended that such originals be copied from the orig...

Page 19: ...opy density manually or to copy photographs the exposure level can be adjusted in 2 steps manually 1 Press the exposure mode selector key to select the MANUAL mode or PHOTO mode 2 Use the light and dark keys to adjust the exposure level If exposure level 2 is selected the two left handmost indicators for that level will light up simultaneously Also if level 4 is selected the two right handmost ind...

Page 20: ... hold down the exposure mode selector key for approximately 5 seconds The PHOTO indicator will go out and the AUTO indicator will begin to blink One or two light and dark indicators corresponding to the automatic exposure level which has been selected will light up 4 Press the light or dark key to lighten or darken the automatic exposure level as desired If exposure level 2 is selected the two lef...

Page 21: ...ress the tray select key Each time you press the tray select key the location indicated by the paper feed location indicator changes in the following order paper tray 1 paper tray 2 if installed multi bypass tray To verify a zoom setting without changing the zoom ratio press and hold down the copy ratio display key When the key is released the display will return to the copy quantity display To re...

Page 22: ...nted and error messages Scanner driver The scanner driver allows you to use the scanning function of the machine with TWAIN compliant and WIA compliant applications Sharpdesk Sharpdesk is an integrated software environment that makes it easy to manage documents and image files and launch applications Button Manager Button Manager allows you to use the scanner menus on the machine to scan a documen...

Page 23: ...table shows the drivers and software that can be installed for each version of Windows and interface connection method The printer driver that is installed will vary depending on the type of connection between the machine and your computer Computer type IBM PC AT or compatible computer equipped with a USB 2 0 1 Operating system 2 3 Windows 98 Windows Me Windows 2000 Professional 4 Windows XP 4 Win...

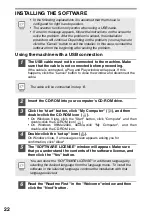
Page 24: ...5 The SOFTWARE LICENSE window will appear Make sure that you understand the contents of the software license and then click the Yes button 6 Read the Readme First in the Welcome window and then click the Next button 7 8 9 In the following explanations it is assumed that the mouse is configured for right hand operation The scanner function only works when using a USB cable If an error message appea...

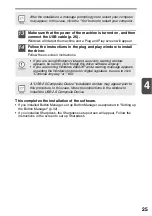
Page 25: ...elect Connected to this computer and click the Next button Follow the on screen instructions When The installation of the SHARP software is complete appears click the OK button and go to step 12 If you are using Windows Vista and a security warning window appears be sure to click Install this driver software anyway If you are running Windows 2000 XP and a warning message appears regarding the Wind...

Page 26: ...e prompting you to restart your computer may appear In this case click the Yes button to restart your computer In Windows 98 Me 2000 if the following screen appears click the Skip button or the Continue button as appropriate to continue the Sharpdesk installation If Skip is selected the Sharpdesk installation will continue without installing Sharpdesk Imaging If Continue is selected Sharpdesk Imag...

Page 27: ...etup screen will appear Follow the instructions in the screen to set up Sharpdesk After the installation a message prompting you to restart your computer may appear In this case click the Yes button to restart your computer If you are using Windows Vista and a security warning window appears be sure to click Install this driver software anyway If you are running Windows 2000 XP and a warning messa...

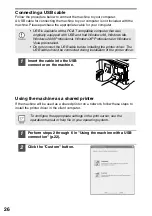
Page 28: ...to install the printer driver in the client computer 1 Perform steps 2 through 6 in Using the machine with a USB connection p 22 2 Click the Custom button USB is available with a PC AT compatible computer that was originally equipped with USB and had Windows 98 Windows Me Windows 2000 Professional Windows XP Professional or Windows Vista preinstalled Do not connect the USB cable before installing ...

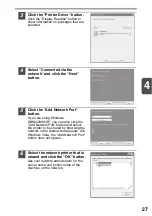
Page 29: ...rt button If you are using Windows 98 Me 2000 XP you can also click the Add Network Port button and select the printer to be shared by browsing the network in the window that appears On Windows Vista the Add Network Port button does not appear 6 Select the network printer that is shared and click the OK button Ask your network administrator for the server name and printer name of the machine on th...

Page 30: ...ose button This completes the installation of the software If you are using Windows Vista and a security warning window appears be sure to click Install this driver software anyway If you are running Windows 2000 XP and a warning message appears regarding the Windows logo test or digital signature be sure to click Continue Anyway or Yes After the installation a message prompting you to restart you...

Page 31: ...ssed and on line and off line are changed On Indicates the unit is ready for printing or scanning is being performed On line Blinking Printing or data is being received from a computer Off Copying is being performed Off line Power save indicator On Indicates the unit is in a power save mode Blinking Indicates that the unit is initialising when the side cover is opened and closed or the power turne...

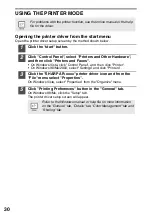
Page 32: ...lect Settings and click Printers 3 Click the SHARP AR xxxx printer driver icon and from the File menu select Properties 4 On Windows Vista select Properties from the Organize menu 5 Click Printing Preferences button in the General tab On Windows 98 Me click the Setup tab The printer driver setup screen will appear For problems with the printer function see the online manual or the help file for th...

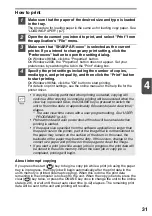
Page 33: ...interrupt copying When this is done the print data remaining in the computer is not sent to the unit When the copy job ends press the clear key twice or press the ONLINE key once to change the unit to the online state p 29 or wait until the set auto clear time p 42 elapses The remaining print data will be sent to the unit and printing will resume If copying is being performed when printing is star...

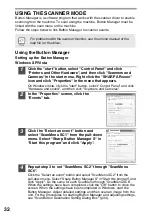
Page 34: ...nd Cameras 2 In the Properties screen click the Events tab 3 Click the Select an event button and select ScanMenu SC1 from the pull down menu Select Sharp Button Manager S in Start this program and click Apply 4 Repeat step 3 to set ScanMenu SC2 through ScanMenu SC6 Click the Select an event button and select ScanMenu SC2 from the pull down menu Select Sharp Button Manager S in Start this program ...

Page 35: ...select ScanMenu SC2 from the pull down menu Select Sharp Button Manager S in Start this program and click Apply Do the same for each ScanMenu through ScanMenu SC6 When the settings have been completed click the OK button to close the screen When the settings have been completed in Windows start the Button Manager Adjust detailed settings and then scan an image from the unit For the procedures for ...

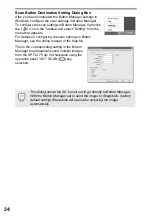
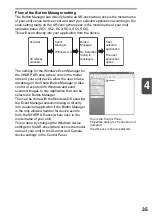
Page 36: ...r details on configuring the scan settings in Button Manager see the online manual or the help file This is the corresponding setting in the Button Manager to automatically send multiple images from the SPF at 75 dpi to Sharpdesk using the operation panel SC1 SCAN key selection This dialog shows the SC1 event set to go directly to Button Manager With the Button Manager set to send the image to Sha...

Page 37: ...from Windows and send scanned images to any application that can be selected in Button Manager This can be done with the Windows OS showing the Event Manager selection dialog or directly into a selected application if the Button Manager is the only allowed handler for device events from the SHARP AR xxxx where xxxx is the model name of your unit This is done by changing the Windows device settings...

Page 38: ...t can handle events from a scanner camera device register with the Windows Event Manager and shown as available in the registered applications The path an event takes to get to the user s selected application depends upon the event settings for the device Scanner SCAN key pressed Event Manager Windows OS Event Manager selection dialog Displayed on screen User selects an application The user applic...

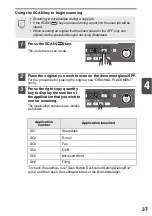
Page 39: ...ning The application numbers are initially as follows To check the settings see Scan Button Destination Setting Dialog Box p 34 and then open the settings window of the Button Manager Scanning is not possible during a copy job If the SCAN key is pressed during a print job the scan job will be stored When scanning an original that has been placed in the SPF only one original can be placed unless yo...

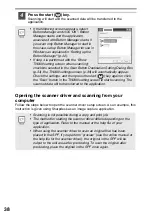
Page 40: ...tting screen when scanning checkbox selected in the Scan Button Destination Setting Dialog Box p 34 the TWAIN settings screen p 39 will automatically appear Check the settings and then press the start key again or click the Scan button in the TWAIN setting screen to start scanning The scanned data will be transferred to the application Scanning is not possible during a copy and print job The metho...

Page 41: ...elect button 4 Select Acquire Image from the File menu or click the Acquire button 5 Set the configuration for scanning refer to the online manual and help file and click the Scan button Scan is started If you use more than one scanning device select the scanner you want to use through the application The method for accessing the Select Scanner option depends upon the application For more informat...

Page 42: ...Camera Wizard appears Click Next and establish the basic settings for scanning For information on the settings see the Windows XP help file After completing each setting click Next 4 Select a name format and folder for the scanned image For information on the image name file format and folder see the Windows XP help file 5 Scanning begins When scanning ends select the next task you wish to perform...

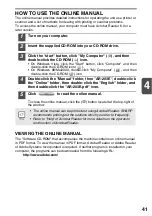
Page 43: ...lick the Manual folder then AR 203E double click the Online folder then double click the English folder and then double click the AR 203E pdf icon 5 Click to read the online manual To close the online manual click the button located at the top right of the window VIEWING THE ONLINE MANUAL The Software CD ROM that accompanies the machine contains an online manual in PDF format To view the manual in...

Page 44: ...normal copying procedure Auto clear page 43 The unit returns to the initial settings a preset amount of time after the end of copy or scanner job This preset amount of time auto clear time can be changed Resolution of AUTO MANUAL mode page 43 You can set the copy resolution used for AUTO and MANUAL exposure mode Prevention of OC copies when the SPF is up function When enabled this function may hel...

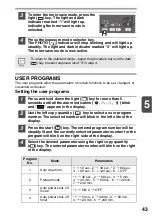
Page 45: ...eft copy quantity key to select a user program number The selected number will blink in the left side of the display 3 Press the start key The entered program number will be steadily lit and the currently selected parameter number for the program will blink on the right side of the display 4 Select the desired parameter using the right copy quantity key The entered parameter number will blink on t...

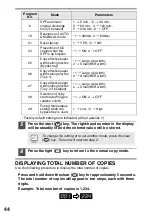
Page 46: ...installed 1 5 min 2 30 min 3 60 min 4 120 min 5 240 min 6 OFF 10 Resolution of AUTO MANUAL mode 1 300dpi 2 600dpi 21 Reset factory 1 YES 2 NO 24 Prevention of OC copies when the SPF is up function 1 ON 2 OFF 25 Copy effective paper width setting function Bypass tray 1 Large A4 width 2 Small B5R width 26 Copy effective paper width setting function Tray 1 1 Large A4 width 2 Small B5R width 27 Copy e...

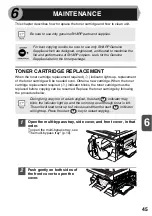
Page 47: ...ont cover in that order To open the multi bypass tray see The multi bypass tray p 10 2 Push gently on both sides of the front cover to open the cover Be sure to use only genuine SHARP parts and supplies For best copying results be sure to use only SHARP Genuine Supplies which are designed engineered and tested to maximise the life and performance of SHARP copiers Look for the Genuine Supplies labe...

Page 48: ... out of the toner cartridge as shown in the illustration Discard the shutter After removing the toner cartridge do not shake it or tap on it Doing so may cause toner to leak from the cartridge Put the old cartridge immediately in the bag contained in the box of the new cartridge Dispose of the old toner cartridge in accordance with local regulations Grasp the toner cartridge as shown in the illust...

Page 49: ...onds The approximate quantity of toner remaining will be indicated in the display as a percentage 100 75 50 25 or 10 is displayed When the percentage is less than 10 will be displayed 3 Press the light key All alarm indicators wil go out When closing the covers be sure to close the front cover securely and then close the side cover If the covers are closed in the wrong order the covers may be dama...

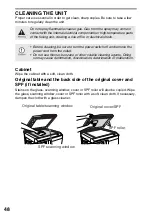
Page 50: ...r with a soft clean cloth If necessary dampen the cloth with a glass cleaner Do not spray flammable cleaner gas Gas from the spray may come in contact with the internal electrical components or high temperature parts of the fusing unit creating a risk of fire or electrical shock Before cleaning be sure to turn the power switch off and remove the power cord from the outlet Do not use thinner benzen...

Page 51: ...e tab Set the charger cleaner onto the right end of the transfer charger gently slide the cleaner to the left end and then remove it Repeat this operation two or three times 4 Return the charger cleaner to its original position Close the side cover by pressing the round projections near the side cover open button 5 Turn the power switch on p 13 Slide the charger cleaner from the right end to the l...

Page 52: ... dirt smudges appear on copies Original table or original cover dirty Clean regularly 48 Original smudged or blotchy Use a clean original Striped copies Is transfer charger clean Clean the transfer charger 49 Paper misfeeds frequently Non standard paper used Use standard paper If using special papers feed the paper through the multi bypass tray 7 Paper curled or damp Store paper flat in the wrappe...

Page 53: ...off mode Press the start key to cancel the auto power shut off mode 42 The paper tray indicator is blinking The paper tray is not installed properly Push the tray into the unit securely CH is blinking in the display The toner cartridge is not installed Check if the cartridge is installed If CH is blinking even if a cartridge is installed properly contact your SHARP service centre immediately CH is...

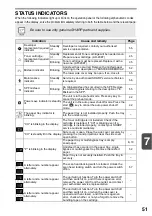
Page 54: ...1 Open the multi bypass tray and side cover in that order To open the multi bypass tray see The multi bypass tray p 10 To open the side cover see TONER CARTRIDGE REPLACEMENT p 45 2 Check the misfeed location Remove the misfed paper following the instructions for each location in the illustration below If the misfeed indicator blinks proceed to A Misfeed in the paper feed area p 53 If the unit is t...

Page 55: ...feed in the fusing area 2 Close the side cover by pressing the round projections near the side cover open button The misfeed indicator will go out and the start indicator will light up B Misfeed in the fusing area 1 Lower the fusing unit release lever The fusing unit is hot Do not touch the fusing unit when removing misfed paper Doing so may cause a burn or other injury Do not touch the photocondu...

Page 56: ...ee B Misfeed in the fusing area p 53 2 Open the front cover To open the front cover see TONER CARTRIDGE REPLACEMENT p 45 3 Rotate the feeding roller in the direction of the arrow and gently remove the misfed paper from the exit area The fusing unit is hot Do not touch the fusing unit when removing misfed paper Doing so may cause a burn or other injury Do not touch the photoconductive drum green po...

Page 57: ...t and the start indicator will light up E Misfeed in the SPF An original misfeed may occur at one of three locations if the misfed original is seen from the original feeder tray A in the original feeder tray if the misfed original is not seen from the original feeder tray B in the exit area or C under the feeding roller Remove the misfed original following the instructions for each location A Open...

Page 58: ...OPER REPLACEMENT SHOULD ONLY BE DONE BY AN AUTORIZED SHARP SERVICE TECHNICIAN Contact your service centre as soon as possible MAINTENANCE REQUIRED When maintenance indicator lights up service by an authorised SHARP service technician is required Contact your service centre as soon as possible A number may appear in the display after a minus sign indicating the number of the originals that must be ...

Page 59: ...he switch is locked the unit will not operate Unlock the switch as shown below To lock the scan head locking switch hold up the catch in illustration and turn the center knob counter clockwise 90 degrees until you hear a click A Lock Unlock Grasp here and turn in the direction of the arrow A ...

Page 60: ...feeder SPF holds up to 50 originals for automatic feeding The procedures for placing originals in the SPF cleaning the SPF and removing a misfeed are explained in the following sections See Using the SPF p 16 CLEANING THE UNIT p 48 and E Misfeed in the SPF p 55 250 sheet paper feed unit AR D33 Single Pass Feeder AR SP9 AR 203E Exit area Original guide Document feeder tray Peep hole Document feeder...

Page 61: ...not yet been scanned from the document feeder tray For the original s stuck in the SPF do not remove manually This may cause a machine malfunction See the step 3 3 Press the copy ratio display key The originals that were being scanned in the SPF will be discharged and the number of original sheets to be returned will blink in the display Place the displayed number of original sheets back in the do...

Page 62: ... driver 1 Click the start button 2 Click Control Panel select Printer and Other Hardware and then click Printer and Faxes On Windows Vista select Settings and click Printers On Windows 98 Me 2000 select Setting and click Printers 3 Click the SHARP AR xxxx printer driver icon and from the File menu select Properties On Windows Vista click the SHARP AR xxxx printer driver icon and select Properties ...

Page 63: ...copy time Approximately 8 0 seconds When user program 24 is set to OFF 10 7 seconds When user program 24 is set to ON paper A4 exposure mode AUTO copy ratio 100 Copy ratio Original table Variable 25 to 400 in 1 increments total 376 steps Fixed 50 70 86 100 141 200 SPF Variable 50 to 200 in 1 increments total 151 steps Fixed 50 70 86 100 141 200 Exposure system Original table Moving optical source ...

Page 64: ...ight 295 6mm Operating conditions Temperature 10 C to 30 C Humidity 20 to 85 Emulation SHARP GDI Interface port USB interface USB 2 0 Full Speed Noise level Sound Power Level LwA 1B 10dB Copying 6 4 B Standby 3 3 B Sound Pressure Level LpA bystander positions Copying 48 dB A Standby 17 dB A Sound Pressure Level LpA operator position Copying 52 dB A Standby 17 dB A Noise emission measurement in acc...

Page 65: ...80g m2 Paper capacity One paper tray with capacity for 250 sheets of 80g m2 bond paper Weight 3kg Dimensions 498mm W x 395mm D x 88mm H Power supply Drawn from the unit As a part of our policy of continuous improvement SHARP reserves the right to make design and specification changes for product improvement without prior notice The performance specification figures indicated are nominal values of ...

Page 66: ...te cable for your computer USB interface cable Use a shielded cable Be sure to use only genuine SHARP parts and supplies For best copying results be sure to use only SHARP Genuine Supplies which are designed engineered and tested to maximize the life and performance of SHARP copiers Look for the Genuine Supplies label on the toner package Supply Part number Usable life Toner cartridge AR 208T Appr...

Page 67: ...tity 17 Copy quantity key 6 14 17 Copy ratio display key 6 17 Copy ratio selector indicator 6 17 Copy ratio selector key 6 17 D Dark key 6 17 Developer replacement required indicator 6 51 56 Developer required 56 Display 6 Displaying total number of copies 44 E Exposure adjustment 17 Exposure mode indicator 6 17 Exposure mode selector key 6 17 F Front cover 5 Fusing unit release lever 5 53 H Handl...

Page 68: ...itch 5 13 Preheat mode 43 Printer driver 20 Proper storage 2 R Reduction enlargement zoom 19 S Scan head locking switch 57 Scanner driver 20 Scanner indicator 6 29 SCAN key 6 37 Scanning from your computer 38 Scanning with the Scanner and Camera Wizard 40 Sharpdesk 20 Side cover 5 Side cover open button 5 Software 20 Specifications 61 SPF 16 SPF indicator 6 16 SPF misfed indicator 6 52 55 Start in...

Page 69: ...original 15 Original table 15 SPF 16 Opening the printer driver 30 Power off 14 Power on 13 Printing 30 Removing paper jams Fusing area 53 Lower paper feed area 55 Paper feed area 53 SPF 55 Transport area 54 Replacing the toner cartridge 45 Scanning Button Manager 37 Scanner and Camera Wizard 40 SHARP TWAIN 39 Selecting the tray 19 Setting the copy quality AUTO 17 MANUAL 17 PHOTO 18 Setting the co...

Page 70: ...ber for information 08705 274 277 France Sharp Electronics France S A Telephone number for information 01 49 90 34 00 Austria Sharp Electronics GMBH Telephone number for information 01 727 19 0 Italy Sharp Electronics Italy S P A Telephone number for information 02895951 Spain Sharp Electronics Espana S A Telephone number for information 93 581 97 00 Netherlands Sharp Electronics Benelux B V Telep...

Page 71: ...n does occur consult medical personnel Ingestion Rinse with water and drink several glasses of water If irritation or discomfort does occur consult medical personnel 5 FIRE FIGHTING MEASURES Extinguishing Media Water CO2 foam and dry chemicals Special Fire Fighting Procedures None Fire and Explosion Hazards Toner material like most finely divided organic powders may form an explosive mixture 6 ACC...

Page 72: ...terials Hazardous Decomposition Products CO CO2 and NOX Further Information None 11 TOXICOLOGICAL INFORMATION Acute Toxicity Ingestion oral LD50 2500mg kg Estimated from the other product containing similar material Inhalation No data Eye irritation Not an irritant Estimated from the other product containing similar material Skin irritation Not an irritant Estimated from the other product containi...

Page 73: ...es or order under TSCA SARA Superfund Amendments and Reauthorization Act Title III 302 Extreme Hazardous Substance None 311 312 Hazard Classification None EU Information 1999 45 EC and 67 548 EEC Symbol Indication Not required R Phrase Not required 76 769 EEC All chemical substances in this product comply with all applicable rules or order under 76 769 EEC 16 OTHER INFORMATION NFPA Rating USA Heal...

Page 74: ...ion 040 2376 2613 United Kingdom Sharp Electronics U K Ltd Telephone number for information 08705 274 277 France Sharp Electronics France S A Telephone number for information 01 49 90 34 00 Austria Sharp Electronics GMBH Telephone number for information 01 727 19 0 Italy Sharp Electronics Italy S P A Telephone number for information 02895951 Spain Sharp Electronics Espana S A Telephone number for ...

Page 75: ...n does occur consult medical personnel Ingestion Rinse with water and drink several glasses of water If irritation or discomfort does occur consult medical personnel 5 FIRE FIGHTING MEASURES Extinguishing Media Water CO2 foam and dry chemicals Special Fire Fighting Procedures None Fire and Explosion Hazards Toner material like most finely divided organic powders may form an explosive mixture 6 ACC...

Page 76: ...ardous Decomposition Products CO CO2 and NOX Further Information None 11 TOXICOLOGICAL INFORMATION Acute Toxicity Ingestion oral LD50 2000mg kg Estimated from the other product containing similar material Inhalation No data Eye irritation Not an irritant Estimated from the other product containing similar material Skin irritation Not an irritant Estimated from the other product containing similar ...

Page 77: ... All chemical substances in this product comply with all applicable rules or order under TSCA SARA Superfund Amendments and Reauthorization Act Title III 302 Extreme Hazardous Substance None 311 312 Hazard Classification None EU Information 1999 45 EC and 67 548 EEC Symbol Indication Not required R Phrase Not required 76 769 EEC All chemical substances in this product comply with all applicable ru...

Page 78: ...sposing of this product correctly you will help ensure that the waste undergoes the necessary treatment recovery and recycling and thus prevent potential negative effects on the environment and human health which could otherwise arise due to inappropriate waste handling 2 In other Countries outside the EU If you wish to discard this product please contact your local authorities and ask for the cor...

Page 79: ...SERSÄTEILYLLE ÄLÄ KATSO SÄTEESEEN Laserstrahl CAUTION CLASS 3B INVISIBLE LASER RADIATION WHEN OPEN AND INTERLOCKS DEFEATED AVOID EXPOSURE TO BEAM VORSICHT UNSICHTBARE LASERSTRAHLUNG DER KLASSE 3B WENN ABDECKUNG GEÖFFNET UND SICHERHEITSVERRIEGELUNG ÜBERBRÜCKT NICHT DEM STRAHL AUSSETZEN ADVARSEL USYNLIG LASERSTRÅLING AF KLASSE 3B VED ÅBNING NÅR SIKKERHEDSBRYDERE ER UDE AF FUNKTION UNDGÅ UDSÆTTELSE F...

Page 80: ...SHARP Manufacturing France S A Route de Bollwiller 68360 SOULTZ FRANCE ...

Page 81: ...AR 203E_v1 AR 203E OPERATION MANUAL ...

Reviews: