FINISHER AND SADDLE STITCH FINISHER
3-11
3
Removing a misfeed
When a misfeed occurs, remove the misfed paper as explained below.
■
■
■
■
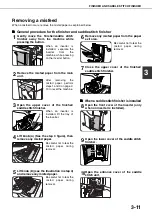
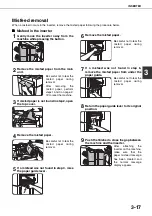
General procedure for the finisher and saddle stitch finisher
1
Gently move the finisher/saddle stitch
finisher away from the machine while
pressing the button.
When an inserter is
installed, separate the
inserter from the
machine while pressing
on the inserter button.
2
Remove the misfed paper from the main
unit.
After removing the
misfed paper, perform
steps 1 and 3 on page 2-
19 to reset the machine.
3
Open the upper cover of the finisher/
saddle stitch finisher.
When an inserter is
installed, lift the tray of
the inserter.
4
Lift knob
(A)
(See the step 3 figure), then
remove any misfed paper.
Be careful not to tear the
misfed paper during
removal.
5
Lift knob
(B)
(see the illustration in step 4)
and remove any misfed paper.
Be careful not to tear the
misfed paper during
removal.
6
Remove any misfed paper from the paper
exit area.
Be careful not to tear the
misfed paper during
removal.
7
Close the upper cover of the finisher/
saddle stitch finisher.
■
■
■
■
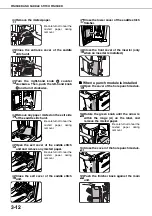
When a saddle stitch finisher is installed
8
Open the front cover of the inserter (only
when an inserter is installed).
9
Open the lower cover of the saddle stitch
finisher.
10
Open the entrance cover of the saddle
stitch unit.
(A)
(B)
Summary of Contents for AR M550N - B/W Laser - Copier
Page 3: ...Part 1 General Information ...
Page 4: ......
Page 28: ......
Page 75: ...Part 2 Copier Operation ...
Page 76: ......
Page 130: ......
Page 134: ......
Page 170: ......

