background image

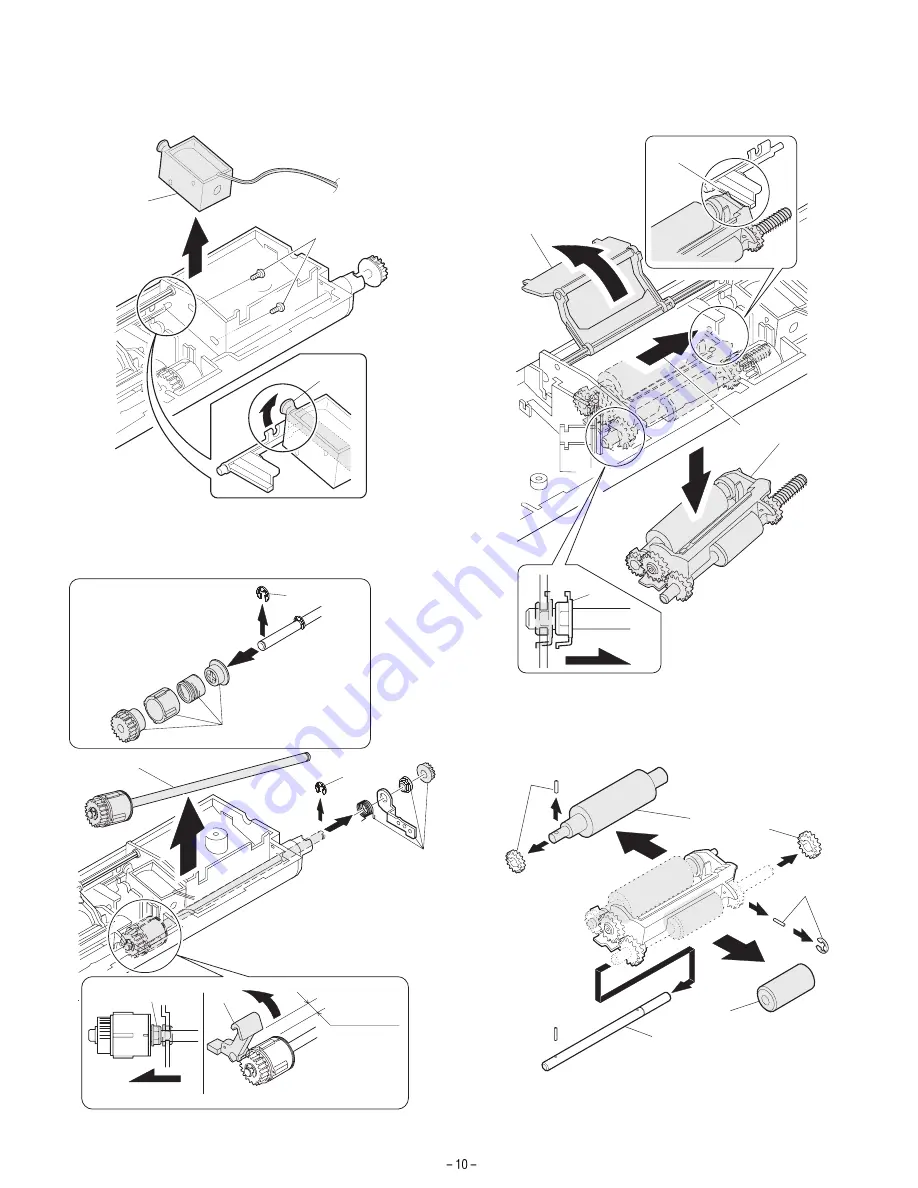
5) Pickup solenoid

(Note) Remove section A of the pickup solenoid from the solenoid

arm groove.

6) Clutch gear ass’y

7) Pickup roller ass’y

(Note) When assembling the pickup roller ass’y 4, check that rib A is

on the rib of the solenoid arm.

8) Pick up roller, paper feed roller

A

1

2

1

5

2

4

3

6

6

2.5~4.0

From Edge pawl

1

4

2

3

A

1

2

3

1

1

4

Summary of Contents for AR-RP3

Page 1: ...TS 6 7 DISASSEMBLY AND ASSEMBLY 9 8 MAINTENANCE 14 9 ELECTRICAL SECTION 15 CONTENTS Parts marked with are important for maintaining the safety of the set Be sure to replace these parts with specified ones for maintaining the safety and performance of the set SHARP CORPORATION This document has been published to be used for after sales service only The contents are subject to change without notice ...

Page 2: ...hickness 4mm Dimensions 583mm W x 435mm D x 133mm H Weight About 5 5 kg Power source Supplied from the copier DC 24V Power consumption 26 4W Document size detection On the document feed tray Detection size Japan A3 B4 A4 A4R B5 B5R A5 A5R for FAX only Inch series 11 x 17 8 5 x 14 8 5 x 11 8 5 x 11R 8 5 x 5 5 EX AB series A3 B4 A4 A4R A5 A5R for FAX only Mixture of different document sizes Mixture ...

Page 3: ...nd remove the document glass Remove the right and left glass holders and remove the document glass 5 Attach the front cabinet Attach the front cabinet of the copier At this time ensure that the three pawls on the rear side are securely inserted to the frame of the copier 6 Attach the RSPF glass holder Insert the RSPF glass holder to the document glass Then attach the document glass to the copier f...

Page 4: ...e RSPF is different from that of the copy from the document glass carry out adjustment refer ring to the service manual 13 Check the center displacement Set an original on the document glass and copy it Then set an original in the document feeder tray and copy it If the center of the copy image from the RSPF is different from that of the copy image from the document glass carry out adjustment refe...

Page 5: ... width on the tray 5 W3 Document width sensor WL TR A5R A4 LT Photo transmission Detects the document width on the tray 6 PSOL Pickup solenoid 7 PAPER Paper entry sensor Photo transmission Detects presence of documents 8 RSOL Pressure release solenoid 9 CLH Transport clutch 10 MOT SPF motor Stepping motor Drives document feed on the tray transport and paper exit roller 11 GSOL Gate solenoid 12 Int...

Page 6: ...ay during document reverse 2 Out line of operations Duplex documents 1 Document set Document set sensor ON 2 Document size detection Document width sensors W1 W2 W3 detect the document width and document length sensors L1 L2 detect the document length 3 Copier COPY key ON 4 SPF motor ON 5 Pickup solenoid ON 6 Pickup roller and paper feed roller rotation 7 Paper entry sensor detects the document pr...

Page 7: ...e adjustment in copying is completed 1 Place a scale on the document table as shown below and make a normal copy to make a test chart 2 Set the test chart to the SPF and make a normal copy 3 Compare the copy and the test chart If an adjustment is needed perform the following procedures 4 Execute SIM 8 1 The auto exposure lamp lights up Sim63 7 SPF ADJ WHITE ADJUST PRESS OK KEY EXEC Sim63 7 SPF ADJ...

Page 8: ...ts 5 Enter the set value and press the START key The entered correction value is started and a copy is made Adjustment specifications Mode Specification SIM Set value Set range Document off center RSPF mode Simplex Center 3 0mm Duplex Center 3 5mm SIM 50 12 2 SPF surface 3 SPF back Add 1 0 1mm shifted to R side Reduce 1 0 1mm shifted to L side 1 99 4 RSPF image lead edge position adjustment 1 Set ...

Page 9: ...ETE the adjustment is completed 4 If the operation panel displays ERROR perform the following measures When the display is 0 Check that the SPF is open Check that the lamp is ON If the lamp is OFF check the MCU con nector Check that the CCD harness is properly inserted into the MCU con nector When the display is 281 or above 1 Remove the table glass 2 Remove the dark box 3 Slide the lens unit towa...

Page 10: ...LY 1 External fitting section Note Turn the paw in the arrow direction 2 Paper feed unit section 1 Paper feed unit 2 Document transport section cover 3 Document feed section cover 4 Sensor PWB 1 2 2 3 1 2 1 2 3 2 1 1 1 3 2 2 4 ...

Page 11: ...om the solenoid arm groove 6 Clutch gear ass y 7 Pickup roller ass y Note When assembling the pickup roller ass y 4 check that rib A is on the rib of the solenoid arm 8 Pick up roller paper feed roller A 1 2 1 5 2 4 3 6 6 2 5 4 0 From Edge pawl 1 4 2 3 A 1 2 3 1 1 4 ...

Page 12: ...3 Interface PWB 4 Document tray section 1 Document tray 2 Rack cover 3 Document length sensor SW 5 Drive frame section 1 Book sensor 2 1 1 1 2 1 3 2 1 3 4 3 4 2 1 1 2 ...

Page 13: ...ive frame ass y and drive belt 4 Pressure release solenoid 5 SPF motor 6 Transport section 1 Clutch Note When assembling check that the rib is in the clutch groove A and fix it with E ring 1 2 1 1 1 2 3 4 3 2 1 1 2 4 3 2 A 1 ...

Page 14: ...ate 4 Transport roller 5 PS roller 6 Paper feed paper guide lower Note When assembling check that the paper feed paper guide lower is securely set to rib A and boss B 7 Paper feed paper guide upper 1 1 1 1 2 3 1 1 1 2 1 1 1 1 1 2 B A 1 2 ...

Page 15: ...AINTENANCE 1 Maintenance parts No Name Work item Service call Remark 1 Pickup roller Cleaning 2 1 Separation unit Cleaning Replace when worn down 2 2 Front separation sheet Cleaning 3 Paper feed roller Cleaning 4 PS roller Cleaning 5 Transport roller Cleaning 6 Paper exit roller Cleaning Note When performing maintenance refer to 7 DISASSEMBLY AND ASSEMBLY 2 1 1 1 Bearing 1 3 4 5 6 2 1 2 2 ...

Page 16: ...EL A B C YSPF GSOL SPF CLH PSOL RSOL GSOL PDOWNA PDOWNB PAPER SPFCOVER SPFOPEN SPFOUT SPFOUT SPFCOVER W0 W1 W2 W3 SPF SENSOR PWB 24V 24V 24V 24V 24V 24V 5V 5V 5V 5V 24V SENSOR SOL CLU RSPF ONLY MOTOR A B A B TRANSISTOR ARRAY DATA SELECTOR LEOPARD OPTION INTERFACE PWB SPF MODA MODB MODA MODB 9 ELECTRICAL SECTION 1 Block diagram ...

Page 17: ...GSOL PGND SPFMODA 1 2 3 1 2 3 PHR 7 7 1 20 3 14 9 5 SPFCOVER SGND W2 5V W0 W1 W3 W0 5v SPFCOVER W3 W2 W1 1 2 6 5 4 3 SGND 7 GY L1 SGND 2 3 5 4 5V 1 6 SGND 6 1 L2 5 2 5V 4 3 SPFRSOL SPFRSOL 24V1 1 2 1 2 LB RD SMP 02V BC JST SMR 02V N JST 3 2 1 3 2 1 5V W1 2 3 6 5 W0 1 7 SGND 7 1 SPFCOVER 6 2 W3 5 3 W2 4 4 2 1 3 L2 13 17 SGND RSOL 10 12 24V1 18 SGND pull up 8 19 PAPER PHNR 7 H PHNR 7 H BU7P TR P H P...

Page 18: ... UDZ5 6 ZD104 UDZ5 6 ZD101 UDZ5 6 ZD103 UDZ5 6 C119 1000p 50V C117 1000p 50V C118 1000p 50V SELA SELC SELB CN1 5 A4 CN1 7 A4 CN1 3 A4 YSPF CN1 11 A4 CN7 4 B2 CN7 3 A2 CN7 2 B3 CN7 1 B3 CN7 6 7 B3 B A B A 24V1 C103 0 047u 50V C104 0 047u 50V C1 47u 35V IC1 CrA CrB VsA RsA VrefA VrefB RsB VsB In A In A In B In B Vmm OUT A OUT A OUT B OUT B PG LG NC NC NC NC NC NC PG PG MTD1361 C4 CN1 16 C4 CN1 6 C4 ...

Page 19: ... C1 B3 CN1 2 C4 E4 B3 B3 B3 CN1 1 A4 D4 B3 B3 E4 CN1 14 C4 CN1 12 C4 E4 E4 E4 E4 E4 24V1 5V 24V1 5V 5V 24V1 24V1 5V C105 0 047u C116 0 1u 25V C3 10u 16V F1 ICP N38 C106 0 047u CN5 B26B PHDSS 1 3 5 7 9 11 13 15 17 19 21 23 25 2 4 6 8 10 12 14 16 18 20 22 24 26 CN6 B20B PHDSS 1 3 5 7 9 11 13 15 17 19 2 4 6 8 10 12 14 16 18 20 C127 0 1u 25V CN2 B3B PH K E BL 1 2 3 CN1 1 2 3 CN4 B2B PH K S 1 2 CN7 B3B...

Page 20: ......

Page 21: ...n battery Must be disposed of properly Remove the battery from the product and contact federal or state environmental agencies for information on recycling and disposal options For USA CANADA CAUTION FOR BATTERY DISPOSAL ...

Page 22: ...toredinaretrievalsystem ortransmitted Inanyformorbyanymeans electronic mechanical photocopying recording orotherwise withoutpriorwrittenpermissionofthepublisher SHARP CORPORATION Digital Document Systems Group Quality Reliability Control Center Yamatokoriyama Nara 639 1186 Japan 2001 April Printed in Japan ...

Reviews: