background image

Info Display

OPERATION MANUAL

J

MODEL R-980E

®

CONVECTION MICROWAVE OVEN

TM

CONTENTS

Page

Warranty

1

Introduction

2

Warning

3

Special Notes

4

Installation Instructions

5

Oven Diagram

5

Operation of Touch Control Panel

6

Control Panel Display

6

Touch Control Panel Layout

6

Before Operating

7

Getting Started

7

Clock Setting

7

Stop/Clear

7

To Cancel Program

7

 Manual Operations

8

Microwave Time Cooking

8

Sequence Cooking

9

Instant Cook

9

Heating without Food

10

Convection Cooking

10

To Cook by Convection

10

To Preheat and Cook by Convection

11

Mix Cooking

12

To Use Automatic Mix Settings

12

To Preheat and Cook

    with Automatic Mix Settings

13

Convection and Microwave Cooking

14

Grilling

15

Preheating

16

Automatic Operations

17

Notes for Automatic Operations

17

Sensor Instant Action

17

Reheat Sensor

18

Multi Cook

19

Easy Defrost

20

Other Convenient Features

21

Help Feature

21

Less/More Setting

24

Increasing/Decreasing Time

24

Memory

25

Alarm

25

Care and Cleaning

26

Service Call Check

26

Specifications

26

Cooking Guides

1  –  12

Summary of Contents for Carousel R-980E

Page 1: ...king 9 Instant Cook 9 Heating without Food 10 Convection Cooking 10 To Cook by Convection 10 To Preheat and Cook by Convection 11 Mix Cooking 12 To Use Automatic Mix Settings 12 To Preheat and Cook with Automatic Mix Settings 13 Convection and Microwave Cooking 14 Grilling 15 Preheating 16 Automatic Operations 17 Notes for Automatic Operations 17 Sensor Instant Action 17 Reheat Sensor 18 Multi Coo...

Page 2: ...juries caused by or resulting from causes not attributable to faulty parts or the manufacture of the product including but not limited to defect or injury caused by or resulting from misuse abuse neglect accidental damage improper voltage liquid spillage vermin infestation software or any alterations made to the product which are not authorised by Sharp Please retain your sales documentation as th...

Page 3: ...the step by step instructions are followed When selecting another home appliance please again consider our full range of Sharp products INFO DISPLAY COOKING SYSTEM Thank you for buying a Sharp Microwave Oven Your new oven has an Information Display System which offers you step by step instructions to easily guide you through each feature Your oven also has a HELP key for instructions on using Auto...

Page 4: ...seal faces Do not bump or catch utensils loose clothes and your accessories on the door safety latches when removing food from the oven Never poke an object particularly a metal object through a grille or between the door and the oven while the oven operating Never tamper with or deactivate the door safety latches Always use oven gloves to prevent burns when handling utensils that are in contact w...

Page 5: ...prevent explosion Pierce skins of potatoes apples squash hot dogs sausages and oysters so that steam escapes Use specially bagged popcorn for the microwave oven Listen while popping corn for the popping to slow to 1 2 seconds Transfer baby food to small dish and heat carefully stirring often Check for suitable temperature to prevent burns Remove the screw cap and teat before warming baby bottles A...

Page 6: ...to the Sharp built in kit installation instructions for clearances and ventilation requirements 7 Neither the manufacturer nor the distributors can accept any liability for damage to the machine or personal injury for failure to observe the correct electrical connecting procedure The A C voltage must be single phase 230 240V 50Hz 8 Operate the oven from a general purpose domestic outlet If a gener...

Page 7: ...SOR PAD Press to select 3 popular Re heat menus SENSOR INSTANT ACTION PADS Press once to cook or reheat 6 popular menus MEMORY PAD Press to enter the frequently used cooking programme Press to recall the memorised programme INSTANT COOK START PAD Press once to cook for 1 minute on HIGH or increase by 1 minute multiples each time this pad is pressedduringMicrowave Con vection Grill or Mix cooking P...

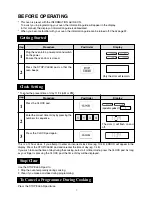
Page 8: ... the correct time of day by pressing the numbers in sequence To enter the present time of day 11 34 AM or PM operation guide off The dots will flash on and off Press the CLOCK pad again 2 1 3 Clock Setting Pad Order Display This is a 12 hour clock If you attempt to enter an incorrect clock time eg 13 45 ERROR will appear in the display Press the STOP CLEAR pad and re enter the time of day eg 1 45 ...

Page 9: ...lower to M HIGH press the POWER LEVEL pad again Repeat as necessary to select MEDIUM M LOW or LOW power levels Suppose you want to cook Fish Fillets for 10 minutes on MEDIUM power Procedure Display Step Pad Order Press the INSTANT COOK START pad COOK 3 The timer begins to count down If the door is opened during cooking process the cooking time in the display automatically stops The cooking time st...

Page 10: ...d sequence select microwave cooking and power level for HIGH press the POWER LEVEL pad once Enter desired cooking time for the second sequence Instant Cook Step Procedure Display For your convenience Sharp s Instant Cook allows you to easily cook for one minute on HIGH power Press the INSTANT COOK START pad Within one minute of closing the door The timer begins to count down Pad Order Pad Order CO...

Page 11: ...windows or run the ventillation fan in the room COOK CONV Open the door to cool the oven cavity The cooling fan will remain on until the oven cavity has cooled WARNING The oven door outer cabinet turntable and oven cavity will be hot Pay attention to avoid burns when cooling the oven 5 4 3 2 1 The timer begins to count down to zero When timer reaches zero all indicators will go out and the oven wi...

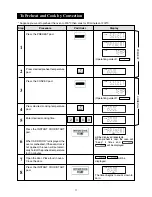
Page 12: ...ration guide off Press desired cooking temperature pad Enter desired cooking time CONV CONV Press the INSTANT COOK START pad When ADD FOOD is displayed the oven is preheated If the oven door is not opened the oven will automati cally hold at the preheat temperature for 30 minutes will be displayed repeatedly When preheat is over the oven will beep 4 times and will be displayed will be displayed Op...

Page 13: ...OK START pad COOK MIX The timer begins to count down to zero When timer reaches zero all indicators will go out and the oven will beep will appear on the display Thecoolingfanwillremainon until the oven cavity has cooled NOTE 1 To cook on HIGH MIX setting use the above procedure pressing the HIGH MIX pad in Step 1 2 If you want to change convection temperature of Automatic Mix Settings using the a...

Page 14: ... pad When ADD FOOD is displayed the oven is preheated If the oven door is not opened the oven will automati cally hold at the preheat temperature for 30 minutes will be displayed repeatedly When preheat is over the oven will beep 4 times and will be displayed Open the door Place food in oven Close the door will be displayed If you wish to change convection temperature of Automatic Mix settings usi...

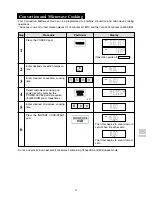
Page 15: ...ss three times Enter desired microwave cooking time Press the INSTANT COOK START pad The timer begins to count down to zero When it reaches zero 1 2 3 4 5 Your Convection Microwave Oven can be programmed to combine convection and microwave cooking operations Suppose you want to roast chicken pieces for 15 minutes at 180 C and then cook at 8 minutes on MEDIUM COOK The timer begins to count down to ...

Page 16: ...pad 1 Place turntable in the oven Press the GRILL pad Enter desired grilling time Open the door and place food in oven Close the door will be displayed 4 The timer begins to count down to zero When it reach es zero all indicators will go off and the oven will beep will appear on the display The cooling fan will remain on until the oven cav ity has cooled Press the INSTANT COOK START pad 3 Oven wil...

Page 17: ...u want to cook profiteroles for 20 minutes on convection 200 C Open the door and place food Close the door CONV CONV Operation guide off The timer begins to count down 6 7 8 9 Press the CONVEC pad Enter desired temperature Enter desired cooking time Press the INSTANT COOK START pad After preheating suppose you want to cook with automatic Mix settings Press the HIGH MIX or LOW MIX pad instead of th...

Page 18: ...TION or REHEAT SENSOR the food may be cooked without displaying any remaining cooking time 6 Food weighing more or less than the quantity or weight listed in each MENU GUIDE cook manually See cookbook 7 When entering the weight of the food round off the weight to the nearest 0 1kg 100g For example 1 65kg would become 1 7kg 8 To change the final cooking or defrosting result from the standard settin...

Page 19: ...d twice within 3 seconds COOK SENSOR COOK HELP SENSOR COOK HELP COOK SENSOR HELP SENSOR HELP To reheat Casseroles Canned Food presstheREHEATSEN SOR pad 3 times within 3 sec onds SENSOR HELP SENSOR HELP SENSOR HELP SENSOR HELP Suppose you want to reheat a dinner plate Press the INSTANT COOK START pad SENSOR COOK HELP The timer begins to count down When the cooking time reaches zero will be displaye...

Page 20: ...r will be displayed repeatedly Press the INSTANT COOK START pad When the cooking time reaches zero will be displayed repeatedly 2 4 NOTE 1 You can get a cooking hint whenever HELP is lit in the display See page 23 2 For menus 3 5 and 6 After Step 3 press the INSTANT COOK START pad and preheat will start automatically When the display shows or open the door and enter the food Then continue with Ste...

Page 21: ...ROST HELP KG KG Enter the weight DEFROST KG HELP KG stops flashing Press the INSTANT COOK START pad The timer begins to count down The oven will beep 4 times and will stop will be dis played repeatedly Press the EASY DEFROST pad Open the door Turn over the chicken pieces Close the door will be displayed re peatedly The timer begins to count down when it reaches zero the oven will beep will be disp...

Page 22: ...ill appear in the display 3 4 5 6 7 To check the current time simply press the CLOCK pad the time will be displayed If the door is opened after step 7 close the door and press the START pad to continue with Auto Start Press the STOP CLEAR pad to cancel Auto Start The correct time of day must be set before using Auto Start see clock setting on page 7 Auto Start The Auto Start feature allows you to ...

Page 23: ...ar in the display Display Step Procedure Pad Order Press the number 3 pad 3 Press the INSTANT COOK START pad The time of day will appear in the display 2 3 The control panel is now locked each time a pad is pressed the display will show LOCK To unlock the control panel After step 2 above If the oven is accidentally started with no food or liquid in the cavity the life of the oven can be reduced To...

Page 24: ...After step 2 above 3 Display Step Procedure Pad Order Press the MULTI COOK pad 2 The guide message will be repeated twice and then the display will show the time of day If you want to cancel the guide press the STOP CLEAR pad NOTE For SENSOR INSTANT ACTION HELP is not lit in the display so press the HELP pad before pressing the desired SENSOR INSTANT ACTION pad Demonstration Mode This feature is m...

Page 25: ...Press the MULTI COOK pad Operation guide off 2 Select food category for Multi Cook Press 2 to cook Roast Lamb 3 KG HELP MIX HELP MIX Enter the weight 4 Press the INSTANT COOK START pad 5 Microwave Convection Mix or Grilling time can be added or decreased during a cooking programme using the MORE or LESS pads Suppose you want to increase cooking time by 2 minutes during 5 minutes on MEDIUM cooking ...

Page 26: ...ly Suppose you want to check the cooking programme of memory The memorized cooking programme will appear Press the MEMORY pad 1 Step Procedure Display Pad Order Press the STOP CLEAR pad Time of day will appear 2 2 Press the INSTANT COOK START pad COOK Your oven has an alarm function If you leave food in the oven after cooking the oven will beep 3 times and will be appeared in the display after 2 m...

Page 27: ...OR SCOURING PADS ON YOUR OVEN NEVER SPRAY OVEN CLEANERS DIRECTLY ONTO ANY PART OF YOUR OVEN DO NOT USE A STEAM CLEANER At regular intervals heat the oven referring to Heating without Food on page 10 Splashed food on the oven walls may cause smoke and odour Turntable Roller Stay Racks Wash with mild soapy water and dry thoroughly CLEAN THE OVEN AT REGULAR INTERVALS Disconnect the power supply cord ...

Page 28: ...A894WRRZ J22 Printed in Thailand 1 HELPFUL HINTS 2 COOKWARE AND UTENSIL GUIDE 4 5 REHEAT SENSOR MENU GUIDE 8 MULTI COOK MENU GUIDE 9 EASY DEFROST MENU GUIDE 12 SENSOR INSTANT ACTION MENU GUIDE SHARP CORPORATION OSAKA JAPAN QUICK REFERENCE GUIDE ...

Page 29: ...Preheat Manual Convection Cooking Mix Cooking Grill Cooking QUICK REFERENCE GUIDE PRESS PRESS REHEAT SENSOR Weight Menu Number Cooking Time Cooking Time Once to automatically cook 1 to 10 potatoes Once for DINNER PLATE Twice for SOUP Three times for CASSEROLES CANNED FOOD eg No 1 eg 1 0kg To soften Cream Cheese or Butter for 40 seconds on M LOW eg 15 minutes eg 1 0kg Weight eg 160 C Temp eg 180 C ...

Page 30: ...les in between 2 COVERING Cover foods in the microwave if you would normally cover the food in your ordinary oven or to retain moisture Cover foods such as Vegetables Casseroles or when Reheating Use to cover foods 3 SHIELDING Shield using small pieces of aluminium foil to shield thin areas of meat fish and poultry or edges of cakes to prevent overcooking 4 STIRRING Stir foods from the outside to ...

Page 31: ... favourite recipes 3 Metal cookware can be used During mix cooking some metal utensils may cause arcing when they come in contact with oven walls or accessory racks To prevent arcing when using a metal tin place a heat resistant dish Pyrex pie plate dinner plate between the tin and the rack 4 If you are cooking and wish to check the temperature you have pro grammed simply press the CONVEC pad The ...

Page 32: ... SQUARE DISH FOIL CAKE TIN PAPER TOWEL YES LOW RACK ONLY YES NO YES For Shielding YES YES YES YES YES YES YES Defrost Only YES NO METAL RACKS GLASSWARE CERAMIC HEAT RESISTANT METAL COOKWARE OVEN BAGS ALUMINIUM FOIL NON STICK PAPER GREASE PROOF PAPER WAXED PAPER PLASTIC WRAP PAPER TOWEL PLASTIC COOKWARE MICROWAVE SAFE BROWNING DISH DEFROST RACK THERMOMETERS MICROWAVE SAFE CONVENTIONAL YES YES YES N...

Page 33: ...h fork on each side Place on outside of turntable When oven stops and is displayed turn over potatoes and continue cooking After cooking stand covered with aluminium foil MICRO 3 10 0 1 1 0 kg 18 C Frozen Frozen Vegetables Carrots Beans Brussels Sprouts Broccoli Cauliflower Corn Green Peas Mixed Vegetables Before cooking separate vegetables eg broccoli as much as possible Arrange the vegetables in...

Page 34: ...age stir the casserole add the corn and celery Cover with lid Press Start pad to continue cooking 5 After cooking stir in sour cream and stand covered 2 5 minutes before serving Springtime Lamb Casserole Serves Ingredients lamb cubed French onion soup mix plain flour spring onion chopped small carrot sliced chicken stock corn kernels celery sour cream 250 g 2 tbs 2 tbs 1 1 1 2 cup 60 g 1 stick 75 ...

Page 35: ...nd cinnamon Sprinkle over crunch 5 Press the Sensor Instant Action pad for Desserts 6 After cooking stand 3 5 mins Chocolate Self Saucing Pudding Serve 2 4 serves 4 6 serves 6 8 serves 400 g 1 2 cup 50 g 1 tbs 1 tbs 1 tbs 1 2 ts 600 g 3 4 cup 75 g 2 tbs 2 tbs 2 tbs 1 ts 800 g 1 1 2 cups 150 g 3 tbs 3 tbs 3 tbs 1 ts 1 Spread sour cream evenly over base of pie plate Sprinkle with drained peaches 2 C...

Page 36: ...h plastic wrap After cooking stand covered and stir Place into a casserole dish and cover with lid Place on the low rack After cooking stir and stand covered 20 C Room temperature 3 C Refrigerated MICRO 1 4 cups 1 cup 250 ml 1 4 cups 1 cup 250 ml 1 5 20 C Room temperature MICRO 2 3 For other beverages see HINT below Qty 250 ml per 1 cup Cooking Time Power Level 1 cup 1 1 2 minutes HIGH 2 cups 2 1 ...

Page 37: ...en oven stops and is displayed turn chicken over After cooking stand covered with aluminium foil Preparation before cooking Remove neck and excess fat from chicken Wash and dry chicken Tie legs together 3 1 0 2 5 kg 5 15 Roast Chicken HIGH MIX CONV 3 C Refrigerated For best results we recommend to parboil potatoes prior to cooking See NOTE below Place seasoned meat directly on the greased turntabl...

Page 38: ...rilling otherwise the dripping fat drops on the hot turntable causing the smoke Place turntable with meat on the high rack in oven after preheating After cooking stand covered with aluminium foil 1 2 layers 1 layer approx 200 250 g Weight Range 0 1 1 5 kg Preheat is automatic for this menu ADD BISCUITS AFTER PREHEATING Place biscuits on a small pizza tray Bake on low rack If cooking more than one ...

Page 39: ...or 2 minutes on HIGH 2 Mix soda with boiling water add to melted butter mixture 3 Combine all dry ingredients mix into butter 4 Place teaspoonfuls of mixture on a lightly greased pizza tray 5 Cook on Multi Cook 6 Biscuits 6 After cooking remove biscuits from the oven immediately and cool Apricot Wheatgerm Crunchies 125g butter 3 4 cup wheatgerm 3 4 cup brown sugar lightly packed 1 3 cup coconut 1 ...

Page 40: ...entre in a single layer on a defrost rack If pieces are stuck together try to separate as soon as possible When the oven has stopped remove defrosted pieces turn over and shield the warm portions of remaining pieces After defrost time stand covered with aluminium foil See NOTE below Shield the exposed bone with foil Place chicken pieces on a defrost rack When the oven has stopped remove any defros...

Reviews: