background image

3

STEP 3

POWER SUPPLY CORD BOX ASSEMBLY AND REAR DUCT INSTALLATION

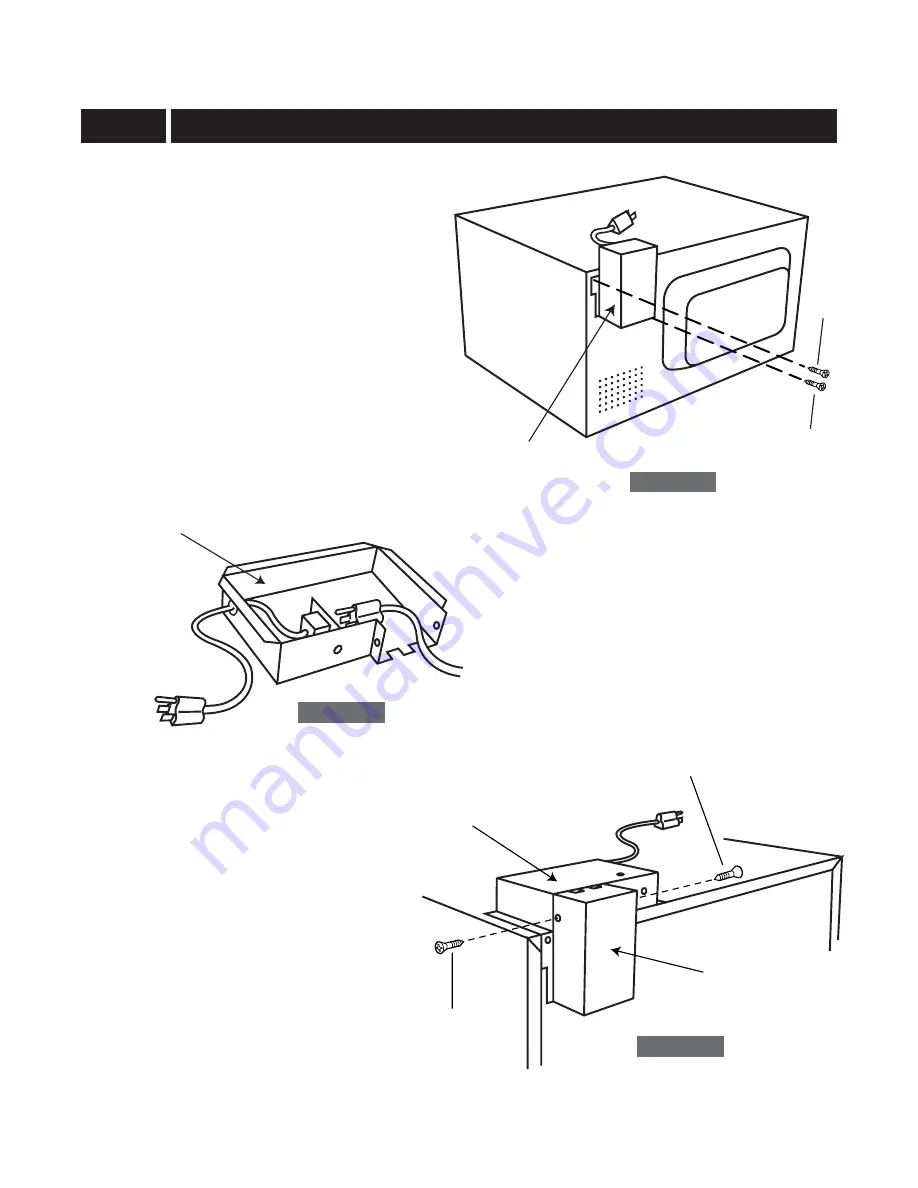
1. Roll the power supply cord into the REAR DUCT.

2. Remove the screw 

  from left top of outer

cabinet. Secure the left flange of the REAR
DUCT with the screw 

 removed from the oven

and secure the right flange of the REAR DUCT
with SCREW A. See Sketch 3.

3. Plug the oven power supply cord into the

POWER SUPPLY CORD BOX ASSEMBLY
receptacle. See Sketch 4.

4. Slide the POWER SUPPLY CORD BOX

ASSEMBLY into the REAR DUCT and secure
the POWER SUPPLY CORD BOX ASSEMBLY
and REAR DUCT with two SCREWS A. See
Sketch 5.

SCREW A

Sketch 3

REAR DUCT

POWER SUPPLY

CORD BOX ASSEMBLY

Sketch 4

Sketch 5

REAR DUCT

SCREW A

POWER SUPPLY

CORD BOX ASSEMBLY

SCREW A

Summary of Contents for Carousel RK-42S24

Page 1: ...oved only for those Sharp Microwave Ovens specifying Built In Kit RK 42S24 RK 51S27 RK 51K30 RK 51S30 or RK 51W30 on the rating label on the left side wall of the oven cavity The cabinet or wall opening must be within the following dimensions RK 42S24 HEIGHT 15 11 16 to 16 WIDTH 22 1 16 to 22 3 8 DEPTH minimum 19 1 4 RK 51S27 RK 51K30 HEIGHT 16 3 4 to 17 RK 51S30 RK 51W30 WIDTH 24 3 8 to 24 11 16 ...

Page 2: ...P 1 CABINET OR WALL OPENING SCREW B SCREW B EXHAUST DUCT ASSEMBLY The opening in the wall or cabinet must be within the following dimensions Outlet should NOT be in the shaded area as indicated on Sketch 1 NOTE 1 If the dimension of DEPTH C is more than 21 the outlet location may be any area on the rear wall NOTE 2 The floor of the opening should be constructed of plywood strong enough to support ...

Page 3: ...ecure the right flange of the REAR DUCT with SCREW A See Sketch 3 3 Plug the oven power supply cord into the POWER SUPPLY CORD BOX ASSEMBLY receptacle See Sketch 4 4 Slide the POWER SUPPLY CORD BOX ASSEMBLY into the REAR DUCT and secure the POWER SUPPLY CORD BOX ASSEMBLY and REAR DUCT with two SCREWS A See Sketch 5 SCREW A Sketch 3 REAR DUCT POWER SUPPLY CORD BOX ASSEMBLY Sketch 4 Sketch 5 REAR DU...

Page 4: ...tch 7 3 Position the FRAME ASSEMBLY to be square with the oven Carefully place the FRAME ASSEMBLY on the oven Check that it is level and then secure with two SCREWS C See Sketch 8 4 Secure the bottom portion of the FRAME ASSEMBLY with the two remaining SCREWS C See Sketch 8 SHARP ELECTRONICS CORPORATION Sharp Plaza Mahwah New Jersey 07430 2135 TINSEB279MRR0 Printed in U S A Sketch 6 FOOT POWER SUP...

Reviews: