ENGLISH
■
If trouble occurs
When this product is subjected to strong external interference (mechanical shock, ex-
cessive static electricity, abnormal supply voltage due to lightning, etc.) or if it is oper-
ated incorrectly, it may malfunction.
If such a problem occurs, do the following:
1
. Set the unit to the stand-by mode and turn the power on again.
2
. If the unit is not restored in step 1, unplug and plug in the unit, and then turn
the power on.
3
. If neither step 1 nor 2 restores the unit, do the following:
¡
Press the ON/STAND-BY button to enter the power stand-by mode.
™
Whilst pressing down the MEMORY/SET button and X-BASS/DEMO button,
press the ON/STAND-BY button until “CLEAR AL” appears.
■
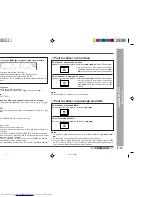
Cleaning the tape-handling parts
●
Dirty heads, capstans or pinch rollers can cause poor sound and tape jams. Clean
these parts with a cotton swab moistened with commercial head/pinch roller cleaner
or isopropyl alcohol.
●
When cleaning the heads, pinch rollers, etc., unplug the unit which contains high
voltages.
A Playback head
D Erase head
B Capstan
E Recording/Playback head
C Pinch roller
●
After long use, the deck’s heads and capstans may become magnetised, causing
poor sound. Demagnetise these parts once every 30 hours of playing/recording
time by using a commercial tape head demagnetiser. Read the demagnetiser’s
instructions carefully before use.
■
Cleaning the CD pickup lens
In order to ensure proper operation of the CD player, preventative maintenance (clean-
ing of the laser pickup lens) should be performed periodically.
Lens cleaners are commercially available. Contact your local CD software dealer for
options.
■
Cleaning the cabinet
Periodically wipe the cabinet with a soft cloth and a diluted
soap solution, then with a dry cloth.
Caution:
●
Do not use chemicals for cleaning (petrol, paint thinner, etc.).
It may damage the cabinet finish.
●
Do not apply oil to the inside of the unit.
It may cause malfunctions.
Maintenance
Troubleshooting Chart (continued)
TAPE 1
TAPE 2
A
C
C
D
E
B
B
References
– T
roubleshooting Chart / Maintenance –
Caution:
This operation will erase all data stored in memory including clock, timer settings,
tuner preset, and CD programme.
E-27
■
Before transporting the unit
1. Press the ON/STAND-BY button to turn the power on.
2. Remove all discs from the unit, close the disc tray.
“NO DISC” is displayed.
3. Press the ON/STAND-BY button to enter the stand-by mode.
“GOOD-BYE” is displayed.
4. When “GOOD-BYE” disappears, unplug the AC power lead from the AC
socket.
*BA3100C_EP26_28
01.2.19, 7:33 PM
2


