CD-MPS600/CD-MPS66
8 – 4
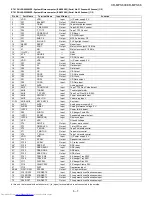
IC2 VHILA6261//-1: Focus/Tracking/Spin/Sled Driver (LA6261)
In this unit, the terminal with asterisk mark (*) is (open) terminal which is not connected to the outside.
* Set power system GND to the minimum potential together with SGND
* Short-circuit three pins of power system SVSS and PVCC1 externally before use.
Pin No.
Terminal Name
Function
1
VO3+
BTL Output pin (+) for channel 3.
2
VO3-
BTL Output pin (-) for channel 3.
3
VO2+
BTL Output pin (+) for channel 2.
4
VO2-
BTL Output pin (-) for channel 2.
5
VO1+
BTL Output pin (+) for channel 1.
6
VO1-
BTL Output pin (-) for channel 1.
7
PGND1
Power GND for channels 1,2,3 and 4 (BTL).
8
REGIN
Regulator pin (External PNP base).
9
PVCC1
Power for channels 1,2,3 and 4 (BTL). (SVCC short-crircuited)
10
REGOUT
Regulator pin (External PNP collector).
11
VIN1
Input pin for channel 1
12*
VIN1G
Input pin for channel 1 (for gain control)
13
VIN2
Input pin for channel 2
14*
VIN2G
Input pin for channel 2 (for gain control)
15
VIN3
Input pin for channel 3
16*
VIN3G
Input pin for channel 3 (for gain control)
17
VIN4
Input pin for channel 4
18
VIN4G
Input pin for channel 4 (for gain control)
19
FWD5
CH5 Output change pin (FWD). Logic input for bridge.
20
REV5
CH5 Output change pin (REV). Logic input for bridge.
21
VCONT5
Input pin for CH5 output voltage control
22
FWD6
CH6 Output change pin (FWD). Logic input for bridge.
23
REV6
CH6 Output change pin (REV). Logic input for bridge.
24
VCONT6
Input pin for CH5 output voltage control.
25
VREFIN
Reference voltage input pin.
26
SGND
Signal system GND
27
SVCC
Signal system power (PVCC1 short - circuited)
28
PVCC2
Power for channel 5 and 6 (H bridge).
29
MUTE
Input pin for BTL mute.
30
PGND2
Power GND for channels 5 and 6 (H bridge).
31
VO6+
H bridge Output pin (+) for channel 6.
32
VO6-
H bridge Output pin (-) for channel 6.
33
VO5+
H bridge Output pin (+) for channel 5.
34
VO5-
H bridge Output pin (-) for channel 5.
35
VO4+
BTL Output pin (+) for channel 4.
36
VO4-
BTL Output pin (-) for channel 4.
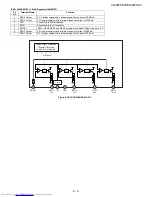
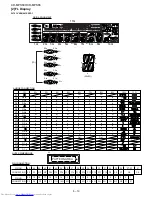
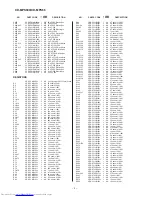
Summary of Contents for CD-MPS600
Page 12: ...CD MPS600 CD MPS66 2 7 APPLY GREASE PULL THE LEVER UNITIL REACH THE ARROW MARK 143 112 3 ...
Page 16: ...CD MPS600 CD MPS66 2 11 CHANGE COLOR TO BLACK 150 151 148 7 ...
Page 19: ...CD MPS600 CD MPS66 2 14 10 148 147 146 145 ...
Page 20: ...CD MPS600 CD MPS66 2 15 APPLY GREASE WHEN FIXING ITEM 2 MUST FOLLOW AS SHOWN 121 144 130 11 ...
Page 21: ...CD MPS600 CD MPS66 2 16 FIGURE 1 FIGURE 3 FIGURE 2 APPLY GREASE SC141 APPLY GREASE 117 12 ...
Page 29: ...CD MPS600 CD MPS66 2 24 BIG SLOT FACING OUT 110 20 ...
Page 33: ...CD MPS600 CD MPS66 2 28 804 24 SCREW TORQUE 3 kgf cm 0 5 0 ...
Page 41: ...CD MPS600 CD MPS66 2 36 NO GAP HAVE GAP O K N G 32 ...
Page 55: ...CD MPS600 CD MPS66 5 4 MEMO ...


