background image

09/11/03

CD-SW440N_EN.fm

E-13

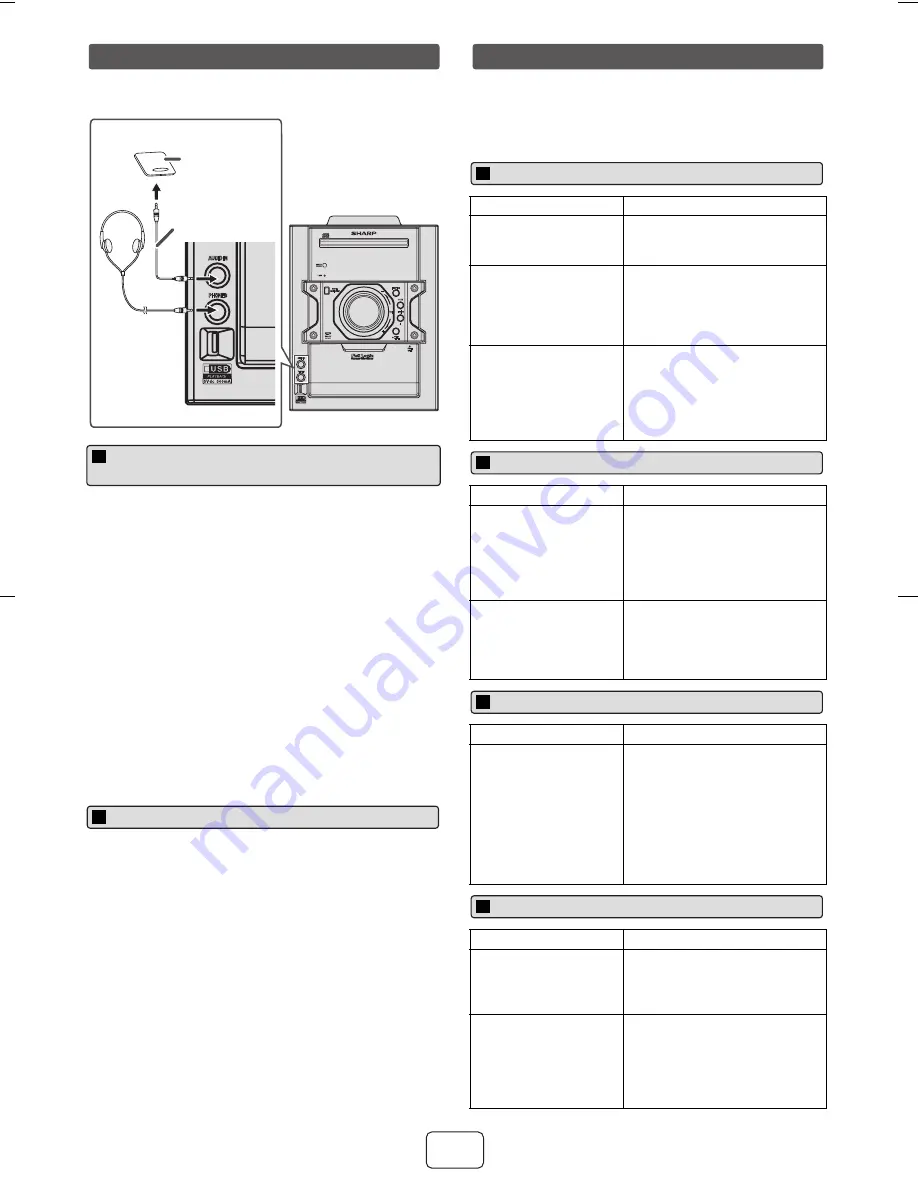
The connection cord is not included. Purchase a
commercially available cord as shown below.

Note:
To prevent noise interference, place the unit away from the
television.

Do not turn the volume on to full at switch on and listen
to music at moderate levels. Excessive sound pressure
from earphones and headphones can cause hearing
loss.

Before plugging in or unplugging the headphones,
reduce the volume.

Be sure your headphones have a 1/8" (3.5 mm)
diameter plug and impedance between 16 and 50
ohms. The recommended impedance is 32 ohms.

Plugging in the headphones disconnects the speakers
automatically. Adjust the volume using the VOLUME
control.

Many potential problems can be resolved by the owner
without calling a service technician.
If something is wrong with this product, check the following
before calling your authorized SHARP dealer or service
center.

1

Use a connection cord to connect the portable audio
player etc. to the AUDIO IN jack. When using video
equipment, connect the audio output to this unit and
the video output to a television.

2

Press the ON/STAND-BY button to turn the power on.

3

Press the AUDIO IN button on the remote control or
FUNCTION button repeatedly on main unit to select
AUDIO IN function.

4

Play the connected equipment. If volume level of the
connected device is too high, sound distortion may
occur. Should this happen, lower the volume of the
connected device. If volume level is too low, increase
the volume of the connected device.

Enhancing your system

FUNCTION

AUDIO IN

PHONES

VOL

POWER

ON/STAND-BY

M I N I   C O M P O N E N T   S Y S T E M

CD-SW440

PUSH
OPEN

AUDIO IN

PHONES

Audio cable
(not supplied)

Portable audio
player, etc.

Listening to the playback sounds of 
portable audio player, etc.

Headphones

Symptom

Possible cause

The clock is not set 
to the correct time.

Did a power failure occur?
Reset the clock. (Refer page 
11)

When a button is 
pressed, the unit 
does not respond.

Set the unit to the power 
stand-by mode and then turn 
it back on.

If the unit still malfunctions, 
reset it. (Refer page 14)

No sound is heard.

Is the volume level set to 
“0”?

Are the headphones 
connected?

Are the speaker wires 
disconnected?

Symptom

Possible cause

Playback does not 
start.

Playback stops in 
the middle or is not 
performed properly.

Is the disc loaded upside 
down?

Does the disc satisfy the 
standards?

Is the disc distorted or 
scratched?

Playback sounds 
are skipped, or 
stopped in the 
middle of a track.

Is the unit located near 
excessive vibrations?

Is the disc very dirty?

Has condensation formed 
inside the unit?

Symptom

Possible cause

The remote control 
does not operate.

Is the AC power cord of the 
unit plugged in?

Is the battery polarity 
correct?

Are the batteries dead?

Is the distance or angle 
incorrect?

Does the remote control 
sensor receive strong light?

Symptom

Possible cause

Sound skipping.

Cannot hear treble.

Sound Fluctuation.

Is there any slack?

Is the tape stretched?

Are the capstans, pinch 
rollers or heads dirty?

Cannot remove the 
tape.

If a power failure occurs 
during playback, the heads 
remain engaged with the 
tape. Do not open the 
compartment with great 
force.

Troubleshooting chart

General

CD player

Remote control

Cassette deck

Summary of Contents for CD-SW440N

Page 1: ... audio on demand applications and the like or on revenue generating physical media compact discs digital versatile discs semiconductor chips hard drives memory cards and the like An independent license for such use is required For details please visit http mp3licensing com MPEG Layer 3 audio coding technology licensed from Fraunhofer IIS and Thomson Remote control x 1 RRMCGA205AWSA AM loop antenna...

Page 2: ...e liable or in any way responsible for any damages or defects in the Product which were caused by repairs or attempted repairs performed by anyone other than an authorized servicer Nor shall Sharp be liable or in any way responsible for any incidental or consequential economic or property damage Some states do not allow the exclusion of incidental or consequential damages so the above exclusion ma...

Page 3: ...Periodically clean the transmitter on the remote control and the sensor on the unit with a soft cloth Exposing the sensor on the unit to strong light may interfere with operation Change the lighting or the direction of the unit if this occurs Keep the remote control away from moisture heat shock and vibrations System connections continued Make sure to unplug the AC power cord before making any con...

Page 4: ...on button on the main unit The unit turns on and playback of the last function will start iPod CD TUNER USB TAPE AUDIO IN iPod button on the remote control The unit turns on and iPod function is activated CD button on the remote control The unit turns on and CD function is activated TUNER button on the remote control The unit turns on and TUNER function is activated USB button on the remote contro...

Page 5: ...tons on the iPod unit The volume level is adjusted by pressing the VOL or button on the main unit or the remote control Adjusting the volume on the iPod unit gives no effect iPod operation The operations described below depend on the generation iPod you are using System on operation When the main unit is powered on the iPod unit will automatically power on when docked in the unit including TIMER f...

Page 6: ...e button in the pause mode press the button to start the desired track Fast forward reverse ____ Press and hold down in the playback mode Release the button to resume playback Display ____ iPod back light ON Press for more than 2 seconds to toggle the video out display between iPod or TV Repeat ____ Press to toggle repeat mode Shuffle ____ Press and hold down to toggle shuffle mode iPod Menu ____ ...

Page 7: ... random play Press and hold the PLAY MODE button until NORMAL appears and R disappears Notes If you press the button during random play you can move to the track selected next by the random operation On the other hand the button does not allow you to move to the previous track The beginning of the track being played will be located In random play the unit will select and play tracks automatically ...

Page 8: ...select the desired tracks 3 Press the MEMORY button to save the folder and track number 4 Repeat steps 2 3 for other folder tracks Up to 32 tracks can be programmed 5 Press the CD button to start playback Programmed play MP3 WMA 1 Press the CD button and load an MP3 WMA disc After disc is loaded disc info will be displayed 2 Press the FOLDER button and press the TUNING or button on the remote cont...

Page 9: ...ed in WMA files Copyright protected WMA files cannot be played back The following functions are the same as CD operations Page Direct track search 6 Repeat play 6 Random play 6 Programmed play 6 Note If USB memory device is not connected NO MEDIA will be shown on the display Listening to USB mass storage device MP3 player 1 Press the USB button on the remote control or FUNCTION button repeatedly o...

Page 10: ... station Manual tuning Press the TUNING or button repeatedly to tune in to the desired station Auto tuning When the TUNING or button is pressed for more than 0 5 seconds scanning will start automatically and the tuner will stop at the first receivable broadcast station CD USB TAPE FUNCTION VOL POWER ON STAND BY MINI COMPONENT SYSTEM CD SW440 POWER ON STAND BY Tuning 1 Perform steps 1 3 in Tuning 2...

Page 11: ... with a pen or a pencil 1 Press the ON STAND BY button to turn the power on 2 Press the FUNCTION button on main unit repeatedly or TAPE button on remote control to select TAPE function 3 Open the cassette door by pushing the area marked PUSH OPEN 4 Load a cassette into the cassette compartment 5 Press the TAPE button to start playback CD USB TAPE TAPE FUNCTION VOL POWER ON STAND BY MINI COMPONENT ...

Page 12: ...n once to advance the time by 1 minute 1 Clear all the programmed contents Refer to Factory reset clearing all memory on page 14 for details 2 Perform Setting the clock from step 1 onwards Setting the clock Remote control only CD USB TAPE AM 12 00 AM 0 00 0 00 Before setting timer Check that the clock is set to the correct time refer to page 11 If it is not set you cannot use the timer function Fo...

Page 13: ...ress and hold down the CLOCK TIMER button 2 Within 10 seconds press the or button to select ONCE SET or DAILY SET and press the MEMORY button 3 Within 10 seconds press the or button to select TIMER CALL and press the MEMORY button 1 Turn the power on and press and hold down the CLOCK TIMER button 2 Within 10 seconds press the or button to select ONCE SET or DAILY SET and press the MEMORY button 3 ...

Page 14: ... Enhancing your system FUNCTION AUDIOIN PHONES VOL POWER ON STAND BY MINI COMPONENT SYSTEM CD SW440 PUSH OPEN AUDIOIN PHONES Audio cable not supplied Portable audio player etc Listening to the playback sounds of portable audio player etc Headphones Symptom Possible cause The clock is not set to the correct time Did a power failure occur Reset the clock Refer page 11 When a button is pressed the un...

Page 15: ...h wiping straight out from the center along the radius In order to ensure proper operation of the CD player preventative maintenance cleaning of the laser pickup lens should be performed periodically Lens cleaners are commercially available Contact your local CD software dealer for options Periodically wipe the cabinet with a soft cloth and a diluted soap solution then with a dry cloth Caution Do ...

Page 16: ...ser pickup D A converter Multi bit D A converter Frequency response 20 20 000 Hz Dynamic range 90 dB 1 kHz Frequency response 50 14 000 Hz normal tape Signal noise ratio 50 dB playback Wow and flutter 0 35 WRMS General Amplifier CD player Cassette deck USB host interface Complies with USB 1 1 Full Speed 2 0 Mass Storage Class Support Bulk only and CBI protocol Support file MPEG 1 Layer 3 WMA Non D...

Reviews: