background image

37 

GB

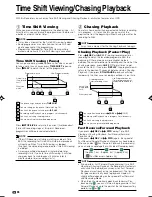
Time Shift Viewing

HDD

Time Shift Viewing/Chasing Playback

(Approx. 1.5x)

(Approx. 32x)

(Approx. 8x)

(       Fast Reverse is Approx. 2x)

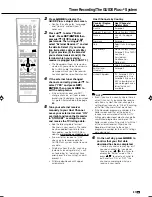
• When you select 

 Fast Forward

Playback (Forward only) you can
enjoy audio together with video
(Rapid playback).

• Press 

|

PLAY

 to return to the normal

playback speed.

4

Press 

STOP/LIVE

 to return to

the current (live) broadcast.

• Time Shift Viewing will be cancelled,

and the automatically recorded
content will be erased.

 NOTE

• If the pause state continues for approxi-

mately 15 minutes, playback is automati-
cally resumed in order to avoid having the
image burnt into the screen.

• Time shift viewing will stop in the following

cases.

TIME SHIFT

 or 


STOP/LIVE

 is pressed.

• The broadcast whose recording is

prohibited is received.

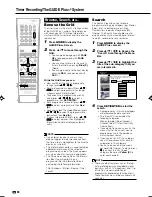
Chasing Playback

HDD

1

Press 

G

G

G

G

G


REV

 or 

K

K

K

K

K

(SKIP)

during recording.

• Playback starts from the beginning of

the programme being recorded.
(Chasing Playback)

• Press 

F

STILL/PAUSE

 to pause

playback (Still Playback).
To cancel Still Playback, press

F

STILL/PAUSE

 or 

|

PLAY

.

2

Press 

G

G

G

G

G


REV

 or 

J

J

J

J

J


FWD

during Chasing Playback.

• Each time you press the buttons, the

Fast Reverse/Forward Playback
speed changes as shown below.

(Approx. 1.5x)

(Approx. 32x)

(Approx. 8x)

(       Fast Reverse is Approx. 2x)

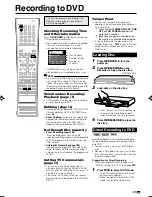
1

Press 

TIME SHIFT

 while

viewing a programme.

• Pause screen will be displayed in a

few seconds.

• Press 


STOP/LIVE

 to return to

current (live) broadcast.

2

Press 

|


PLAY

.

• Playback starts from the position you

paused.

• Press 

F

STILL/PAUSE

 to pause

playback (Still Playback).
To cancel Still Playback, press

F

STILL/PAUSE

 or 

|

PLAY

.

3

Press 

G

G

G

G

G


REV

 or 

J

J

J

J

J


FWD

during Time Shift Viewing.

• Each time you press the buttons, the

Fast Reverse/Forward Playback
speed changes as shown below.

Example:

 When 

J


FWD

 is pressed

once

 NOTE

• If scheduled recording of a programme

starts during Time Shift viewing, the Time
Shift viewing will stop and the broadcast
screen (live) of the channel being recorded
will appear.

• Time Shift viewing is not possible when

inputting DV. (DV-HR480S/DV-HR450S
only)

• There are broadcast for which Chasing

Playback viewing is not possible.

• There are also broadcast for which Time

Shift viewing is not possible due to
copyright protection.

• When playing back from the DVD drive,

Time Shift viewing is not possible.
When using a Play List (page 

88

), Time

Shift viewing is not possible.

• When you select 

 Fast Forward

Playback (Forward only) you can
enjoy audio together with video
(Rapid playback).

• Press 

|

|

|

|

|


PLAY

 to return to the normal

playback speed.

3

Press 

STOP/LIVE

 to return to

the live broadcast which is being
recorded.

Pause icon

(This will become a square icon during
Time Shift Viewing.)

Play icon

Fast Forward Playback 1.5x icon

Example:

 When 

J


FWD

 is pressed

once

Fast Forward Playback 1.5x icon

HR480S-036-044

05.3.23, 9:44 AM

37

Summary of Contents for DV-HR400S

Page 1: ...ECORDER STPLATTE ECORDER ARD DISC 2 The region number for this Recorder is 2 HR480S HR450S HR400S ENUNGSANLEITUNG ATION MANUAL ENGLISH DEUTSCH PAL ...

Page 2: ......

Page 3: ...the inside of the product Refer all servicing to qualified personnel Note This Recorder can be used only where the power supply is AC 220V 240V 50Hz It cannot be used elsewhere CAUTION USE OF CONTROLS OR ADJUSTMENTS OR PERFORMANCE OF PROCEDURES OTHER THAN THOSE SPECIFIED HEREIN MAY RESULT IN HAZARDOUS RADIATION EXPOSURE AS THE LASER BEAM USED IN THIS RECORDER IS HARMFUL TO THE EYES DO NOT ATTEMPT ...

Page 4: ...28 Changing Language Setting 28 Clock Setting 29 Clock Setting 29 Channel Setting 30 Channel Setting 30 Deleting Channels 31 Re naming Channels 31 Display Information 32 Channel Information 32 Checking Remaining Time of HDD and Number of Titles 32 Checking Remaining Time of DVD and Number of Titles 33 Switching Front Panel Display 34 Turning off the LCD Backlight 34 Preparation to Operate This Rec...

Page 5: ... TITLE 91 Erasing Unnecessary Scenes ERASE SCENE 92 Changing Thumbnail CHANGE THUMBNAIL 92 Making Sections in a Title DIVIDE CHAPTER 92 Combining Chapters Together COMBINE CHAPTERS 92 Disc Management 93 Inputting Changing Title Name CHANGE TITLE NAME 93 Disabling Title Edit and Erase TITLE PROTECT 94 Disabling DVD Disc Edit and Erase DVD Disc PROTECT 94 Erasing All Titles 95 Erasing by Selecting a...

Page 6: ...in the next week by channel or by genre The GUIDE Plus system also allows viewers to automatically set their recording selections quickly and easily The TV listings information displayed in the GUIDE Plus system is obtained directly from sources in the broadcasting industry This information is received and processed by Gemstar TV Guide and broad casted via so called Host Channels directly to the R...

Page 7: ...s which become unnecessary after editing can be batch erased by selecting them from the list of recordings thumbnails 5Edit undo function 6 If you mistakenly erase data during editing this function lets you restore it to its immediately preceding state just like Undo on a PC so you can edit worry free 6 Edit undo can only be used once It only works when UNDO is assigned to a coloured button yellow...

Page 8: ...hus prevent potential negative effects on the environment and human health which could otherwise arise due to inappropriate waste handling 2 In other Countries outside the EU If you wish to discard this product please contact your local authorities and ask for the correct method of disposal For Switzerland Used electrical or electronic equipment can be returned free of charge to the dealer even if...

Page 9: ... smoke Do not place the Recorder at a location which is unstable subject to heavy vibration or where there is a lot of dust or tobacco smoke Doing so may cause malfunction or accidents Set up the Recorder so it is hori zontal Do not stand the Recorder up vertically or place it upside down Doing so will cause malfunction Do not place objects on the Re corder Do not place any objects such as vases o...

Page 10: ...stable or subject to vibration Do not move the Recorder while the power is on Do not unplug the power cord from the AC outlet during recording or playback First turn power OFF and then unplug the power cord from the AC outlet Do not use at a location with abrupt temperature variation variation of more than 10 C per hour The Recorder will malfunction if used at a cold location 5 C or less or an ext...

Page 11: ...e a copy guard signal is contained in a source video that occurs partway through recording recording is paused at that point Recording resumes when the copy guard signal is no longer present while no recordings will be made for the part where the copy prevention signal is present In the unlikely event that there is some problem like loss of recorded video or audio content due to an HDD malfunction...

Page 12: ...ded only once can be recorded 2 In the real operation the Recorder does not always realise the maximum speed Discs for Playback Playback Only 3 This Recorder has been designed on the premise of playing back Audio CDs that comply with CD Compact Disc standards CDs containing a signal for the purpose of protecting copyrights copy control signal may not be able to be played back with this Recorder DV...

Page 13: ...discs cannot be played Discs on which data has not been recorded cannot be played back Discs may not be played back depending on the recorder used for recording The following Audio CD discs cannot be played Discs containing a signal for the purpose of protecting copyrights copy control signal may not be played back with this Recorder This Recorder has been designed on the premise of playing back A...

Page 14: ...still images are mixed in with music or movies you will be able to play only the still images You may not be able to play some of these discs at all This unit can recognize a maximum of 256 folders arranged in up to 8 hierarchical levels The maximum number of files recognized is 4 096 files Multi session discs cannot be played You may not be able to play some still images you have processed rotate...

Page 15: ...rding Time The recording mode that can be set varies according to the recording format Refer to the table below for the applicable recording mode Recordable time is based on the recording time when using a 4 7 GB disc Since recording capacity varies according to the recorded material there may be cases where there is much more disc space remaining on the disc when recording is completed Refer to p...

Page 16: ...ding finalisation VR mode recording Video mode recording finalisation About DVD 4 7 Using the Proper Disc Select the disc and recording format to be used according to the objective of the recording Select the disc and recording format by referring to the table below Unrecordable Material Æ Æ Æ Æ Æ This Recorder is equipped with a copy guard function that prevents recording of video software or bro...

Page 17: ...isation is required if a disc recorded in the VR mode cannot be played back with a DVD RW compatible player Discs formatted in the VR mode can be recorded and edited even after finalisation Finalisation takes from several minutes to about an hour Processing takes longer if there is considerable available space on the disc The following operations may cause malfunction Operating discs recorded or e...

Page 18: ...PEG Audio 1 2 only when the DIGITAL AUDIO Output COAXIAL jack is used for connection It does not support 7 1 channel MPEG Audio Ver 2 0 The Icons Used in This Operation Manual HDD Indicates the functions that can be performed for the hard disc VR MODE DVD RW VIDEO MODE DVD RW Indicates the functions that can be performed for DVD RW discs VR MODE Indicates that the function will operate when record...

Page 19: ... REPRESENTING LOSS OF PROFITS LOSS OF BUSINESS OR INDIRECT SPECIAL OR CONSEQUENTIAL DAMAGES IN CONNECTION WITH THE PROVISION OR USE OF ANY INFORMATION EQUIPMENT OR SERVICES RELATING TO THE GUIDE PLUS SYSTEM Manufactured under license from Dolby Laboratories Dolby and the double D symbol are trademarks of Dolby Laboratories DTS and DTS Digital Out are trademarks of Digital Theater Systems Inc Certa...

Page 20: ...cator p 23 8 Decoder indicator 9 Chapter indicator p 34 10 Information Display p 34 11 DVD Mode indicator p 35 12 Tamper Proof indicator p 39 13 Simple Recording Timer indicator p 40 5 COMPONENT Video Output jacks p 24 6 VIDEO Output jack p 24 7 AUDIO Output jacks p 98 8 S VIDEO Output jack p 24 9 G LINK jack p 23 10 DIGITAL AUDIO Output COAXIAL jack p 98 11 DIGITAL AUDIO Output OPTICAL terminal D...

Page 21: ...UT pp 68 72 73 27 DVD p 35 28 ORIGINAL PLAY LIST DVD MENU pp 65 76 82 29 SET ENTER pp 25 27 30 n RETURN p 27 31 PLAY pp 37 65 69 32 FWD pp 37 67 71 33 SLOW pp 67 34 REPLAY pp 67 72 35 SKIP SEARCH pp 67 72 36 CHAPTER MARK pp 40 69 37 REC PAUSE pp 40 42 38 ANGLE p 73 39 FUNCTION p 77 40 DIRECT REC TV p 44 41 RGB OFF pp 24 39 41 42 AUDIO pp 32 68 73 43 SUBTITLE p 73 44 DISPLAY BACKLIGHT p 34 45 ON SC...
Page 22: ...remote control NOTE Do not subject the remote control unit to shock water or excessive humidity The remote control unit may not function if the Recorder s remote sensor is in direct sunlight or any other strong light Incorrect use of batteries may cause them to leak or burst Read the battery warnings and use the batteries properly Do not mix old and new batteries or mix different brands Remove the...

Page 23: ...the TV and then press OPERATE of TV CONTROL If the TV turns on off setup was successful If not repeat the proce dure using another code Major Components NOTE If the batteries in the remote control unit are replaced the code settings must be re entered Some brands have more than one code listed above due to changes in the codes In such cases try another code to find the code that operates your TV T...

Page 24: ...than 5 seconds 2 Press OPERATE of this Recorder to see if you can turn it on off If you cannot go to step 3 To change the setting back to RC 1 press and hold OPERATE and 1 in the step 1 above Setting the Remote Con trol Code of the Recorder 3 Press OPERATE to turn off the Recorder 4 Press and hold CHANNEL and CHANNEL on the Recorder together for more than 5 seconds Each time this operation is perf...

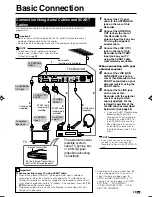
Page 25: ...sing the SCART cable commercially available When connecting with your external receiver 4 Connect the LINE 2 DE CODER EXT jack on the rear of this Recorder to the SCART output jack on your external receiver using the SCART cable 5 Connect the G LINK jack on the rear of this Recorder with the external receiver using G LINK cable supplied Fix the infrared transmitter of the G LINK cable as described...

Page 26: ...ent input jacks on your TV using a component video cable commercially available Important When using this connection If the option under START MENU OTHER SETTINGS ADJUST MENT VIDEO AUDIO SETTING CONNECTING TERMINAL LINE 1 OUT is changed to RGB no picture is displayed on the TV In this case hold down the RGB OFF button on the remote control under the cover for more than 2 seconds If you set the opt...

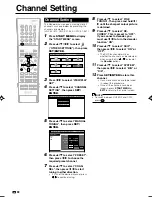
Page 27: ...r Initial Setting When the Recorder power is turned on for the first time after purchase the AUTO INSTALLATION screen is displayed You can use the AUTO INSTALLATION function for easy initial settings regarding On Screen Display language TV channel etc From the second time on the AUTO INSTALLATION screen will not appear AUTO INSTALLATION AUTO INSTALLATION STARTS AUTOMATICALLY PRESS ENTER KEY AUTOIN...

Page 28: ...T 1 4 2 ENTER ENTER ENTER RETURN 1 C H 0 2 AUTO TUNING HAS STARTED PLEASE WAIT AUTO INSTALLATION AUTO TUNING 8 2 0 1 2 SAT 1 4 2 ENTER ENTER PLEASE WAIT DOWNLOADING PR 25 AUTO INSTALLATION AUTO TUNING 8 2 0 1 2 SAT 1 4 2 PLEASE WAIT RECEIVING DATA PR12 AUTO INSTALLATION AUTO TUNING 8 2 0 1 2 SAT 1 4 2 SET THE CURRENT DATE AND TIME SELECT AUTO IN ADJUST AND SUMMER TIME IS AUTOMATICALLY ADJUSTED AUT...

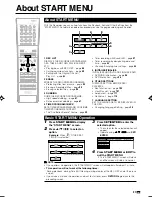
Page 29: ... HDD initialisation page 96 DVD finalisation page 96 6 OTHER SETTINGS DISPLAYS SETTING BEFORE REC PLAYBACK Rec function set page 104 View Play set page 107 Adjustment page 111 Control set page 115 7 LANGUAGE SETTING SET THE LANGUAGE TO BE DISPLAYED IN THE OSD Changing Language Setting page 28 Basic START MENU Operation 1 Press START MENU to display the START MENU screen 2 Press to select an option...

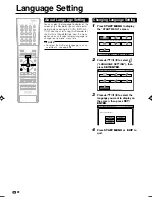
Page 30: ... Press to select LANGUAGE SETTING then press SET ENTER 3 Press to select the language you want to display on the screen then press SET ENTER 4 Press START MENU or EXIT to quit NOTE To select the DVD disc language such as subtitle etc see page 74 RETURN DISPLAYS THE RECORDED PROGRAM AS A TABLE AND THEN PLAY BACK EDIT ETC START MENU REC LIST 8 2 0 1 2 SAT 1 4 2 SELECT ENTER ENTER EXIT EXIT n START M...

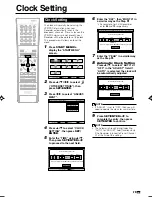
Page 31: ... EDIT ETC START MENU REC LIST 8 2 0 1 2 SAT 1 4 2 SELECT ENTER ENTER EXIT EXIT n SET THE CURRENT DATE AND TIME SELECT AUTO IN ADJUST AND SUMMER TIME IS AUTOMATICALLY ADJUSTED OTHER SETTINGS ADJUSTMENT CLOCK SETTING 8 2 0 1 2 SAT 1 4 2 ENTER ENTER TIME 14 28 24 12 2005 SAT AUTO DATE YEAR ADJUST SET SELECT OTHER SETTINGS ADJUSTMENT CLOCK SETTING 8 2 0 1 2 SAT 1 4 2 DAY MONTH SET THE CURRENT DATE AND...

Page 32: ...select ON or OFF The SKIP function determines whether the channel can be selected when using the CH instead of the Number buttons 11 Press to select SYSTEM then press to select B G or D K 12 Press SET ENTER to store this channel If any more channels are to be tuned in repeat this procedure Once all the channels have been tuned in press START MENU or EXIT to return to the normal screen 5 Press to s...

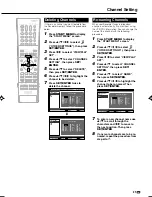
Page 33: ... named Then press SET ENTER 7 Press SET ENTER twice to delete the channel 7 To enter a new channel name use to scroll through the characters and to move to the next position Then press SET ENTER 8 If any more channels are to be re named repeat the procedure from step 6 to 7 CH1 ZDF RTL1 RTL2 SAT1 PRO7 WDR3 BR 3 NDR3 KAB CH02 E3 SAT3 S1 S2 S3 S4 ST099 OTHER SETTINGS VIEW PLAY SET CHANNEL SETTING MA...

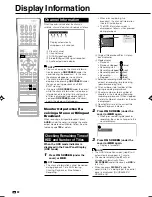
Page 34: ...ay automatically disappears in 5 seconds PR 2 ARD R L NICAM STEREO 12 4 5 3 0 0 0 0 5 1 0 0 2 0 0 0 HD OR IN AL D IG TI AT PE RE E TL 19h10m REMAIN 0 0 00 28 0 0 20 30 1 33 4 6 XP 1 2 3 4 5 6 7 DVD RW VR ORIGINAL REMAIN 0h10m 1 3 XP LIVE When pressed during live broadcast the channel information see left is displayed The HDD information screen is displayed as follows when pressed during playback 1...

Page 35: ...layed back Playback mode Title number currently recorded Recording mode 5 Current chapter number Total number of chapters Total number of chapters Stop mode Chapter number currently played back Playback mode Chapter number currently recorded Recording mode 6 Counter Total time of the current title 7 Repeat Playback indicator Display Information DVD RW OR VR IN AL IG TI AT PE RE E TL REMAIN 0h49m 0...

Page 36: ...over Remaining time display when watching TV Current title number and chapter number during playback Channel currently recorded during recording 3 Press DISPLAY under the cover again The screen returns to the display in step 1 Turning off the LCD Backlight When resetting recording programmed broadcasts and other times when you do not care to have the backlight on you can turn it off 1 Press BACKLI...

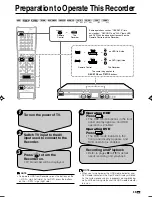
Page 37: ...e Recorder Press to turn the Recorder on TV broadcast will be displayed Operating HDD Press The HDD mode indicator in the front panel display appears and HDD operation is enabled Operating DVD Press The DVD mode indicator in the front panel display appears and DVD operation is enabled Recording and Playback Refer to pages 38 to 79 for details about recording and playback NOTE When you turn on powe...

Page 38: ...programmes may not allow you to time shift view due to copyright of the programmes Programmes recorded for Time Shift Viewing will be erased automatically if Time Shift Viewing is cancelled Time Shift Viewing Pause You can pause during sudden phone call or when you want to take a note In such cases press TIME SHIFT to pause Press PLAY to watch the rest of the programme NOTE If you perform Fast For...

Page 39: ...g a programme Pause screen will be displayed in a few seconds Press STOP LIVE to return to current live broadcast 2 Press PLAY Playback starts from the position you paused Press FSTILL PAUSE to pause playback Still Playback To cancel Still Playback press FSTILL PAUSE or PLAY 3 Press G G G G G REV or J J J J J FWD during Time Shift Viewing Each time you press the buttons the Fast Reverse Forward Pl...

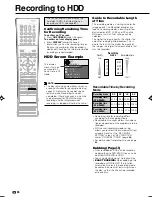
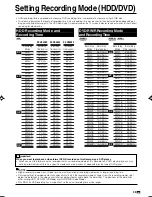
Page 40: ...n which the value displayed for REMAIN during recording and that displayed when recording is stopped will not be the same Recordable Time by Recording Mode HD OR IN AL D IG REMAIN 20h0m 0 0 00 00 0 0 20 30 7 1 8 3 XP This display means that you can record 20 hours more in XP mode Recording mode Recording time DV HR480S Recording time DV HR450S Recording time DV HR400S XP 61 hr 40 hr 20 hr LP 208 h...

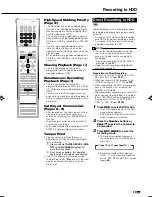
Page 41: ...g Priority Page 59 This Recorder has a high speed dubbing function The High Speed Dubbing Priority function can be used when dubbing from HDD to video format DVD This setting must be specified in advance when performing high speed dubbing from HDD to an DVD R or video format DVD RW disc If you set high speed dubbing priority there will be restrictions such as the inability to edit at the frame lev...

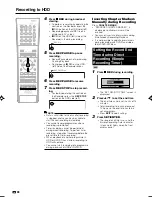
Page 42: ...ring direct recording To perform timer recording stop direct recording before the preset time for timer recording When playback of another programme in HDD or DVD CD has started recording to HDD will continue You cannot start recording of a programme during playback of HDD or DVD CD Inserting Chapter Markers Manually during Recording Press CHAPTER MARK RECORDED CHAPTER MARKER is displayed and chap...

Page 43: ...rcials by using the ERASE SCENE function after the recording Cannot cut TV commercials automatically You cannot cut scenes when you record programmes by Video mode to DVD RW or DVD R Recording to DVD DVD RW OR VR IN AL IG REMAIN 0h30m 0 0 0 0 0 0 2 5 3 8 XP 0 0 0 2 0 3 0 Tamper Proof You can set Tamper Proof to prevent operations by mistake during recording or timer recording 1 Press and hold TAMP...

Page 44: ...ecording You cannot record programmes which prohibit recording Recording either stops or pauses automati cally in the following cases Programme which prohibits recording is on air Unable to continue recording for some reason Timer recording cannot be performed during direct recording To perform timer recording stop direct recording before the preset time for timer recording Digital broadcast can o...

Page 45: ...1 360 Min MN2 345 Min MN3 330 Min MN4 315 Min MN5 300 Min MN6 285 Min MN7 270 Min MN8 255 Min MN9 240 Min MN10 230 Min MN11 220 Min MN12 210 Min MN13 200 Min MN14 190 Min MN15 180 Min MN16 170 Min MN17 160 Min MN18 150 Min MN19 140 Min MN20 130 Min MN21 120 Min MN22 110 Min MN23 105 Min MN24 100 Min MN25 95 Min MN26 90 Min MN27 85 Min MN28 80 Min MN29 75 Min MN30 70 Min MN31 65 Min MN32 60 Min Rec...

Page 46: ...ortant This function is available only when connecting to your TV that has AV Link function using SCART cable This may not function properly with some equipments Refer to operation manual of each external equipment for the details You can record the TV programme you are watching with easy operation 1 Press DVD or HDD to select the recording disc 2 Press DIRECT REC TV under the cover to start recor...

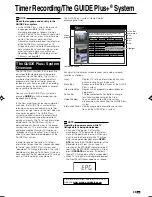
Page 47: ... current programme while consulting the GUIDE Plus system Information Panels Display programme promotions or instruc tions on the GUIDE Plus system The GUIDE Plus system Home Screen displaying the Grid The Agents Neighbours The Agents The Agents Neighbours Weakest Link Kojak Fatal Flaw Heartbeat Heartbeat five News 17 30 17 00 Wed 1 ZDF Reisen Weltkulturerbe Stätten Führt die Stätten des Natur und...

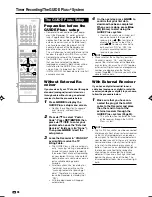
Page 48: ...d the glass screen of the box The infrared detector looks like a small red light bulb Complete the connection of your equip ment the Recorder TV aerial external tuner if applicable See page 23 for basic connection Please note that if you use an external receiver such as Satellite tuner you have to connect the plug of G LINK cable to the back of the Recorder and place the other end in front of the ...

Page 49: ... Setup See page 48 The Recorder will now try to commu nicate with your external receiver via the G LINK cable The display message will ask you if the receiver has changed to a specified channel 6 On the next day press GUIDE to confirm that your first data download has been completed If certain channels are missing or if you see channels that you do not receive press a few times to display the Edit...

Page 50: ...st channels We recommend that you select the host channel that is available through the internal tuner NOTE Make sure that your Host Channel is always turned ON and the correct source and programme number is displayed in the Editor screen Otherwise you will not be able to receive data When a timer recording is scheduled during the download time of the TV listings data the data may not be downloade...

Page 51: ...to be lit red After the STANDBY indicator is lit red press OPERATE but once more The download of TV listings data will be suspended This is the most convenient feature for Timer Recording that the GUIDE Plus System accommodates The One Button Record feature is available anytime you can highlight a programme tile This can be in the Grid after a search for a certain category or in your recommendatio...

Page 52: ...o highlight the title of the sub category that you are interested in 4 Press SET ENTER to start the search All programmes in this sub category are displayed by date and time The Search Area includes the following categories Movies purple Sport green Children blue Others teal My Choice teal If you do not receive any results this means that for the current day no programmes are in the database match...

Page 53: ...R to enter it To save the entries and finish press Green B The steps 4 6 can be repeated to add plural channels categories keywords To use special characters press Yellow C The SHOWVIEW system allows you to programme your Recorder for timer record ing simply by inputting the SHOWVIEW number The SHOWVIEW numbers are listed in most newspapers television guides and local CATV listings Simply by input...

Page 54: ... be changed during Timer Standby mode To change the channel set Timer Standby to off 6 Press to highlight the right recording tile of the scheduled event Mode Freq and Dest Then press Red A to select Mode Rec Mode With each press the selected option shifts XP SP LP EP MN32 MN31 MN1 4 Press Number buttons to enter the SHOWVIEW programming number NOTE During the Timer Standby mode you cannot edit or...

Page 55: ...imes you might notice that the left programme tile displays the name of the programme and sometimes only date and time The same applies for the synopsis While One Button Recordings are always linked to the TV listings information SHOWVIEW recordings only match if they are in the same time frame next seven days and Manual recordings are not linked to the TV listings data You cannot set a timer prog...

Page 56: ...me TV stations which adjusts the start and stop time of your Recorder s recording This ensures that if there is a change in broadcast time for your programme the Recorder will still record the whole programme It is essential that the start time as it appears in the TV listing is used to programme the Recorder as this informa tion is used to identify the VPS PDC signal corresponding to your program...

Page 57: ...o be cancelled then press Red A 3 Press GUIDE to exit Record Schedule Mode Freq Dest P 00 1 Sep 17 13 Grid Search Schedule SHOWVIEW Manual Home My TV Schedule displays programmes you ve Set to Record Press to use Press the red button for ShowView recording the green button for manual recording to view My TV and to view Info SP Once HDD 1 Sep 16 20 17 00 LP Once DVD 1 Sep 18 00 19 00 RTL ZDF What y...

Page 58: ...uch settings later if for example a new channel becomes available you are changing from cable to satellite or you are moving You can do so from the Editor Area which is the central location for you to manage your channels Every change in the Editor Area leads to a change in the Grid The GUIDE Plus Home screen In the Editor area you can Turn a channel ON OFF If you turn it ON you can use it in the ...

Page 59: ...options on the screen For example Changing the Postal Code in your Recorder 1 Press GUIDE to display the GUIDE Plus screen 2 Press to select Setup then press SET ENTER twice NOTE It is very important that you enter correct settings for the country and post code for your current domicile in order to receive TV listings correctly Some changes e g country postal code might require a new download of T...

Page 60: ...abled Programme When dubbing titles including Copy Once enabled programme on HDD to DVD RW use DVD RW VR mode Ver 1 1 CPRM compatible disc or Ver 1 2 CPRM compatible disc Copy Once enabled programme recorded to HDD will move recorded programme will be erased after the move to DVD RW Copy Once enabled programme can can not be dubbed depending on dubbing format or dubbing direction See the table bel...

Page 61: ...o mode During High Speed Dubbing you cannot monitor the programme being dubbed on the TV screen You can only watch live broadcast Do not interrupt the High Speed Dubbing If you stop in the middle of process the recorded title might be erased You cannot High Speed Dub a Playlist to a Video format disc Setting High Speed Dubbing Priority To perform High Speed Dubbing from HDD to DVD you should in ad...

Page 62: ...r markers are copied as follows NOTE You cannot operate other functions during dubbing Timer programming will not start during dubbing You cannot record to HDD or playback titles on HDD during dubbing Even if you select High Speed Dubbing you may not be able to increase the speed of dubbing from 1x depending on titles you want to dub and types of disc When title on HDD that includes Copy Once enab...

Page 63: ... AND ENTER THE D BUTTON m 10 00 SAT 5 1 2 0 6 ARD 1 PR 1 SP TOTAL TIME FOR SELEC 1h00 DVD REMAIN TIME 1h10m SP SP 0 1 0 1 7 2 2 DUBBING FRI SELECT REC MODE HDD ORIGINAL s DVD REC MODE 32 REFERENCE VALUE FOR THE CURRENT DISC XP MODE 32 SP MODE 21 LP MODE 9 EP MODE 1 MN MANUAL EXACT DUBBING SET MODE 2 SP TOTAL TIME FOR SELEC 1h00 DVD REMAIN TIME 1h10m Important When dubbing from the HDD to DVD inser...

Page 64: ...ES if you let the Recorder perform AUTO FINALISE after the dubbing is completed Otherwise select NO Then press SET ENTER 2 2 2 2 2 Press SET ENTER at the confirmation screen Playback starts from the selected track Selecting Exact Dubbing Select Exact Dubbing when there are multiple titles up to 10 you want to dub and you know you cannot fit all into one disc The Recorder will select the appropriat...

Page 65: ...cordable DVD Erase unnecessary programmes from HDD to create neces sary capacity to record You cannot dub during recording playback Stop the record ing playback Copy Once enabled title programme or title with signal that prohibits copying recorded to DVD cannot be dubbed to HDD This Recorder can use DVD RW and DVD R for performing dubbing from DVD to HDD DVD RW DVD R and DVD RAM cannot be used Whe...

Page 66: ...unnecessary timer programmes Timer recording does not work during dubbing Stop dub bing before starting a new timer recording Stop playing back the DVD more than 3 minutes before timer recording starts If you don t stop playback until timer recording start time timer recording will not start When ALTERNATIVE REC SET has been set the alternative recording is performed to the HDD Timer recording doe...

Page 67: ...R 4 XP PR 5 XP PR 2 LP PR 1 EP 0 6 m WED 0 6 m SAT 0 3 m SAT 0 3 m THU 0 9 m THU 0 2 1 m WED 25 5 21 5 30 4 28 4 28 4 20 4 NEW NEW NEXT 6 7 TITLES FROM NEW TITLE REC DATE TIME X P S P X P X P L P E P MODE 0 1 0 1 7 2 2 REC LIST HDD ORIGINAL FRI ENTER SELECT THUMBNAIL SORT FUNCTION MENU ENTER EXIT EXIT RETURN m 1 WED 0 5 5 2 0 0 0 6 ZDF 2 PR 2 XP 20h00m HDD REMAIN XP XP TITLE LIST 2 Press REC LIST ...

Page 68: ...dure below 1Select the title to play back from Rec List and press Blue D 2Press to select PLAYBACK then SET ENTER 3Press to select FROM BEGINNING then SET ENTER Icons Displayed in Title Info Field of REC LIST Playback by Selecting Title Number Direct Playback HDD You can start playback from the title you want to see 1 Press HDD to select HDD mode The HDD mode indicator in the front panel display a...

Page 69: ...e previous chapter track This function does not work during Time Shift Viewing Approx 1 5x Fast Reverse is Approx 2x Approx 32x Approx 8x Approx 1 2x Approx 1 16x Approx 1 8x Slow Playback This lets you playback video at slow speed 1 Press SLOW during playback The slow playback speed will cycle as follows each time you press the button 2 Press PLAY to return to normal playback You cannot perform s...

Page 70: ...the table on page 109 for details NOTE When you play a programme recorded in stereo or monaural and if you are listening to the BIT STREAM sound via the digital output jack you cannot select the audio channel Set DGTL AUDIO OUT SET to PCM see page 112 or if you want to change the audio channel listen via the analogue output jacks Repeat Playback of a Title or Chapter Repeat Play back 1 Play back t...

Page 71: ... play list and you press ORIGINAL PLAY LIST the screen will switch to the play list page 88 4 Press to select the title or chapter you wish to view 5 Press SET ENTER or PLAY Playback will begin from the selected title chapter PLAY button on the DVD right side of Recorder is lit green during playback 6 To stop playback press STOP LIVE OPEN CLOSE CHANGED TO DVD CD MODE 1 2 0 1 0 1 7 2 2 REC LIST DVD...

Page 72: ... disc In such a case open the disc tray turn the power off or switch to HDD DVD RW Video format DVD R Playback Playback from begin ning 1 Press DVD to select DVD mode The DVD mode indicator in the front panel display appears HDD mode is selected automatically when the power is turned on 2 Load a disc recorded in Video mode 3 Press PLAY Playback begins from title 1 Playback by Selecting Title To pl...

Page 73: ...ble video CD Playback begins from track 1 when JFWD is pressed before the menu is displayed after you load a disc Playback will follow the track order like an audio CD If you want to turn the PBC to ON when playing back the CD with PBC off press STOP LIVE twice and then press PLAY to display the menu Other Types of Playback VR MODE DVD RW VIDEO MODE DVD RW DVD R DVD VIDEO VIDEO CD AUDIO CD This se...

Page 74: ... reach the scene you want to start Repeat Playback The start point of the part A will be memorized Press Lto go to the start of the next chapter Press Konce to return to the start of current chapter track If you press it again within about 5 seconds it will skip to the beginning of the previous chapter track This function does not work during Time Shift Viewing Slow Playback Slow Playback function...

Page 75: ...n also select OFF Switching Angle If multiple angles are recorded you can switch between them Press ANGLE under the cover during playback The display indicates the angle number currently being played back Each time you press this button the angle switches is displayed if a disc is recorded with only one angle To return to the previous angle press ANGLE under the cover a few times to select the ori...

Page 76: ...ed 4 Press to select the subtitle language 5 Press SET ENTER Switching between functions You can switch subtitle angle and audio at the Function Control screen page 77 Operation for each function varies depend ing on the disc See the manual for the disc Fast Forward Reverse You cannot perform Fast Forward Fast Reverse over a boundary between titles At the end or beginning of the title Fast Forward...

Page 77: ...k by pressing INPUT Dolby Virtual Surround does not operate 3 Press to select the folder you want to play then press SET ENTER The file music title in the folder is displayed on the file selection screen Press RETURN to return to the folder selection screen If you press PLAY after selecting the folder the playback screen is displayed and the files in that folder will be played from the beginning r...

Page 78: ... JPEG play stops and the programmed recording is ex ecuted Playing back still images in a selected folder 1 Load the disc containing still images and press DVD MENU or DVD TOP MENU The folder selection screen appears 2 Use to select the folder whose still images are to be played and press SET ENTER The still images inside the selected folder are displayed Press RETURN if you wish to return to the ...

Page 79: ... on how to operate with the remote control buttons 4 Bit rate display Displays the data rate of the video appearing on the TV screen 3 Press to set then press SET ENTER Operation may vary depending on the setting item Operate by following the operation guide instructions on the screen 4 Press RETURN or FUNCTION under the cover to close the Function Control screen NOTE If is displayed for an option...

Page 80: ...itle To skip to the start of a selected title press Number buttons to enter the title number when this option is highlighted Chapter Number Direct Chapter Skip Shows the chapter number being played back You can skip to the start of the chapter To skip to the start of a selected chapter press Number buttons to enter the chapter number when this option is highlighted Playback Elapsed Time Direct Tim...

Page 81: ...r Programme Recorded on HDD while Record ing to HDD 1 Press REC LIST during record ing The REC LIST list of recorded programmes is displayed 2 Press to select programme you want to watch then press SET ENTER For details on REC LIST operation see page 65 3 Press STOP LIVE to return to the live broadcast which is being recorded Press REC STOP to watch normal playback NOTE Recording to HDD continues ...

Page 82: ... Priority setting for 3 Press Blue D The FUNCTION MENU is displayed 4 Press to select HI SP DUB PRIORITY then press SET ENTER 5 Press to select YES then press SET ENTER Select NO if you do not wish to cancel High Speed Dubbing Priority setting 6 Press EXIT to quit FUNCTION MENU The Following functions can be used in the Function Menu For details of each operation see the relevant pages PLAYBACK Pa...

Page 83: ...ADD SCENE page 89 Changing the Title Sequence MOVE TITLE page 91 Erasing Unnecessary Scenes ERASE SCENE page 92 Changing Thumbnail CHANGE THUMBNAIL page 92 Making Sections in a Title DIVIDE CHAPTER page 92 Combining Chapters Together COMBINE CHAPTERS page 92 NOTE Editing cannot be done in the following cases Play Lists cannot be created for discs recorded in Video mode Play Lists cannot be created...

Page 84: ...TTING set to YES and you want to edit that title in frame units cancel HI SP DUB SETTING page 80 You cannot set HI SP DUB SETTING to the title again once you cancel Editing HDD DVD 0 1 0 1 7 2 2 EDITING HDD ORIGINAL FRI ENTER SET START POINT EXIT EXIT RETURN PLAYBACK PLAY m 1 SAT 0 5 1 2 0 0 0 6 XP HDD REMAIN ARD 1 PR 1 SP 20h00m SP ERASE SCENE CHANGE THUMBNAIL DIVIDE CHAPTER COMBINE CHAPTERS SPEC...

Page 85: ...ress SET ENTER 6 Press to select ERASE SCENE then press SET ENTER The selected title is paused 7 Press PLAY to start playback Find the scene to be erased using JFWD GREV FSTILL PAUSE K L or SLOW 8 Press SET ENTER when you reach the scene to be erased The erase start point is set Title playback continues To edit frame by frame press FSTILL PAUSE at the erase start point Then press or for Frame Adva...

Page 86: ...t mode Editing an Original Title HDD DVD Searching for the Start Point and End Point Scenes The following playback operations are available when searching for the start point and end point scenes Playback If you press PLAY the currently paused title will be played back Skipping to the start of a chapter If the scene to be selected is in another title or chapter first search for the title or chapte...

Page 87: ...I ENTER SELECT ENTER EXIT EXIT RETURN PLAYBACK ERASE EDIT HI SP DUB PRIORITY CHANGE TITLE NAME TITLE PROTECT SET 20h00m HDD REMAIN XP m 1 SAT 0 5 1 2 0 0 0 6 ARD 1 PR 1 SP SP YES NO EDIT THIS TITLE 5 1 0 1 7 2 2 EDITING HDD ORIGINAL FRI m 1 SAT 0 5 1 2 0 0 0 6 ARD 1 PR 1 SP SP ERASE SCENE CHANGE THUMBNAIL DIVIDE CHAPTER COMBINE CHAPTERS 1 01 1 00 05 01 20h00m HDD REMAIN XP SPECIFY SCREEN TO CHANGE...

Page 88: ...HIS TITLE 1 2 6 5 4 3 0 1 0 1 7 2 2 REC LIST HDD ORIGINAL FRI NEW NEW m 1 SAT 0 5 1 2 0 0 0 6 ARD 1 PR 1 SP 20h00m HDD REMAIN XP SP 5 Press to select YES then press SET ENTER 6 Press to select DIVIDE CHAPTER then press SET ENTER 7 Press PLAY to start playback Find the scene to divide the title using JFWD GREV FSTILL PAUSE K L or SLOW on the remote control 8 Press SET ENTER at the point where you w...

Page 89: ...it 3 Press Blue D FUNCTION MENU 4 Press to select EDIT then press SET ENTER 5 Press to select YES then press SET ENTER 6 Press to select COMBINE CHAPTERS then press SET ENTER 7 1 1 1 1 1 Using and SET ENTER select two or more consecutive chapters which you want to combine together To cancel press EXIT 2 2 2 2 2 Press Blue D to complete the procedure If you want to combine chapters more repeat Step...

Page 90: ...hen there is no title yet a NEW title frame with no image is displayed To create a new Play List later select the NEW title frame 3 Press to select NEW and press SET ENTER 4 1 1 1 1 1 Press to select COPY TITLE CHAPTER 2 2 2 2 2 Press SET ENTER 5 1 1 1 1 1 Press to select title to copy 2 2 2 2 2 Press SET ENTER The selected title chapter becomes a Play List title Repeat 1 and 2 to include more tit...

Page 91: ...ted scene cannot be added if adding it will make the title longer than 12 hours Before Starting Editing Switch to the drive HDD or DVD to be edited 1 Select REC LIST in START MENU screen then press SET ENTER To select a title in the title list press Red A 2 1 1 1 1 1 Press ORIGINAL PLAY LIST to switch to PLAY LIST screen 2 2 2 2 2 Press to select title to edit 3 3 3 3 3 Press Blue D FUNCTION MENU ...

Page 92: ...ecording may not function Editing a Play List HDD DVD 5 Adding a Title or Chap ter 1 1 1 1 1 Select ADD TITLE CHAPTER then press SET ENTER 2 2 2 2 2 Select a title chapter to add using then press SET ENTER Go to Step 9 Specifying and Adding a Scene Select SPECIFY SCENE TO ADD then press SET ENTER Go to Step 6 6 Press to select title chapter to edit then press SET ENTER The selected title chapter p...

Page 93: ... 4 2 3 0 1 0 1 7 2 2 EDITING HDD PLAYLIST FRI ENTER SELECT ENTER EXIT EXIT RETURN 6 UNDO 7 Press SET ENTER If a point prior to the selected title is selected as the destination the title will move to the point immediately prior to the selected title Example If Title 3 is selected and the destination cursor is set to Title 1 Title 3 is moved to the spot in front of Title 1 If a point after the sele...

Page 94: ...d for chapter division of originals Steps 3 10 on page 86 Combining Chapters Together COMBINE CHAPTERS HDD VR MODE DVD RW This lets you combine up to 10 adjacent chapters into a single chapter 1 Select REC LIST in START MENU then press SET ENTER The Thumbnail Title List screen appears 2 Press ORIGINAL PLAY LIST to display PLAY LIST screen 3 Combine chapters using the same operation used for chapte...

Page 95: ...elect CAPS or small then press SET ENTER 9 Input title letters by repeating Steps 7 and 8 Press Red A BACK SPACE to erase text to the left of the cursor a character at a time Press Green B BACK to move the cursor back one space Press Yellow C FORWARD to move the cursor forward one space Press Blue D SPACE to input a space The maximum number of characters you can input is 64 DISPLAYS THE RECORDED P...

Page 96: ...ABLE ERASING AND EDITING ENABLE ERASING AND EDITING m 1 SAT 0 5 1 2 0 0 0 6 ARD 1 PR 1 SP SP 20h00m HDD REMAIN XP To Cancel Title Protect 1 Select the title protected in Step 2 above and follow the Steps 3 and 4 above 2 Select NO in the Step 5 above then press SET ENTER NOTE If DISC PROTECT is set for a DVD RW VR mode disc protection cannot be cancelled for individual titles Cancel DISC PROTECT 3 ...

Page 97: ...asing by Selecting a Title or Chapter HDD VR MODE DVD RW VIDEO MODE DVD RW DVD R Allows you to select titles to erase and erase them in a batch When erasing original titles If original titles are erased those titles will also be erased from play lists When erasing play lists Even if play lists are erased the original titles will not be erased NOTE Up to a maximum of 20 titles chapters can be selec...

Page 98: ...any important recordings to DVD RW R disc s before initialising the HDD Initialisation Before recording to DVD RW initialise the disc in VR mode or Video mode You can also initialise the HDD Initialise the HDD only after dubbing important recordings onto DVD RW R disc s Finalisation Finalisation is done so that a recorded DVD RW R disc can be played back with other recorders DVD FINALISE Set this ...

Page 99: ...ARD DISC IN VR MODE YOU CAN ENJOY A VARIETY OF EDITING FUNCTIONS ON THIS UNIT AFTER RECORDING INITIALISE 8 2 0 1 2 SAT 1 4 2 DO NOT RESET OR TURN OFF THE POWER WHILE INITIALISING IT MAY CAUSE PROBLEMS INITIALISING INITIALISING COMPLETED ENTER ENTER INITIALISE DVD INITIALISE VR DVD INITIALISE VIDEO INITIALISE HARD DISC 8 2 0 1 2 SAT 1 4 2 INITIALISE DVD INITIALISE VR DVD INITIALISE VIDEO INITIALISE...

Page 100: ...o Left White Audio Right Red The Recorder Dolby Digital DTS MPEG Audio processor or amplifier DV HR480S DV HR450S only Optical digital cable commercially available or Coaxial digital cable commercially available DIGITAL AUDIO Output COAXIAL jack To DIGITAL AUDIO Output OPTICAL terminal To optical digital input terminal To coaxial digital input jack To DIGITAL AUDIO Output COAXIAL jack The Recorder...

Page 101: ...y available DIGITAL AUDIO Output COAXIAL jack To coaxial digital input jack To DIGITAL AUDIO Output COAXIAL jack DV HR480S DV HR450S only Important When using this connection set the applicable type of signal Dolby Digital or MPEG in DGTL AUDIO OUT SET to PCM see page 112 For DTS PCM is not applicable Digital Connection to an MD Recorder to Record a CD It is only the audio equipment with digital i...

Page 102: ... signals can be processed In general overdubbed audio is recorded in Stereo 2 This Recorder allows listening or recording of either Stereo 1 or Stereo 2 audio if the input audio is in the 12 bit audio mode This Recorder is unable to process 44 1 kHz input audio signals Notice about Connection To connect the Recorder with a digital camcorder set digital camcorder POWER to PLAY Video side and connec...

Page 103: ...VR MODE DVD RW VIDEO MODE DVD RW DVD R 2 1 1 1 1 1 Press to select DV LINK SETTING and then press SET ENTER 2 2 2 2 2 Press to select YES and then press SET ENTER 3 1 1 1 1 1 Press to select DV IN AUDIO SETTING and then press SET ENTER 2 2 2 2 2 Press to select the desired type of audio and then press SET ENTER 4 1 1 1 1 1 Press to select DV CHAPTER SETTING and then press SET ENTER 2 2 2 2 2 Press...

Page 104: ...DV IN TV broadcast L1 IN 1 The DV control panel is displayed when DV LINK SETTING is set to YES When the DV input screen is se lected DV appears on the Recorder s front panel display Recording from a Digital Camcorder DV HR480S DV HR450S only 3 Start playback on the digital camcorder When DV LINK SETTING is set to YES the on screen control panel allows you to operate the camcorder To specify a fun...

Page 105: ...er there will be a slight difference in image quality between the video viewed from the external device directly on the TV and video viewed as external input to the Recorder Recording from External Equipment To VIDEO AUDIO input jacks Yellow Video Red Right White Left To S video output jack To video audio output jack To S VIDEO input jack Camcorder The Recorder Video audio cable provided with camc...

Page 106: ...igher video resolution or extended recording time on each DVD DVDs mastered using Dolby Digital Stereo Creator will play back on all DVD Video players EXTERNAL IN AUDIO EXTERNAL INPUT AUDIO SETTING This selects audio to be input from an external device Be sure to always select BILINGUAL when recording bilingual sound If you select STEREO when recording the audio for the left channel L CH and right...

Page 107: ...IALISE DVD AUTO INITIALISING SETTING This sets the Recorder so it automatically initialises any unused DVD RW discs which are loaded into the Recorder You can initialise in either VR mode or Video mode EXACT REC SETTING EXACT RECORDING SETTING This function works when timer recording GUIDE Plus Timer Programme onto DVD RW R If disc capacity runs low and the programme cannot be recorded to the end ...

Page 108: ...C PLAYBACK REC MODE SETTING AUDIO REC TYPE SET EXTERNAL IN AUDIO BILINGUAL SETTING AUTO CHAPTER SETTING HI SP DUB SETTING ALTERNATIVE REC SET DVD AUTO INITIALISE EXACT REC SETTING ADJUSTMENT VIEW PLAY SET CONTROL SET REC FUNCTION OTHER SETTINGS REC FUNCTION 8 2 0 1 2 SAT 1 4 2 SELECT EXTERNAL AUDIO MODE WHEN RECORDING FROM THE EQUIPMENT CONNECTED TO EXTERNAL INPUT 1 2 3 STEREO BILINGUAL ENTER ENTE...

Page 109: ...Spanish ET Estonian EU Basque FA Persian FI Finnish FJ Fiji FO Faroese FR French FY Frisian GA Irish GD Scots Gaelic GL Galician GN Guarani GU Gujarati HA Hausa HI Hindi HR Croatian HU Hungarian HY Armenian IA Interlingua IE Interlingue IK Inupiak IN Indonesian IS Icelandic IT Italian IW Hebrew JA Japanese JI Yiddish JW Javanese KA Georgian KK Kazakh KL Greenlandic KM Cambodian KN Kannada KO Korea...

Page 110: ... channel NICAM This recorder can receive and record NICAM or A2 broadcasts NICAM broadcasts will be received when AUTO is selected in the NICAM setting Depending on the received programme some NICAM or A2 broadcasts may not be in stereo PROGRESSIVE OUT SET PROGRESSIVE OUTPUT SETTING If this is set as YES conventional interlaced scan 625i image is converted into progressive scan 625p when DVD is pl...

Page 111: ...AL R STEREO BILINGUAL L BILINGUAL R STEREO BILINGUAL L BILINGUAL R L L L R R R L L L R R R L L L R R R L L R R L R L VR MODE VIDEO MODE R L R MONO MONO MONO MONO MONO MONO MONO MONO MONO MONO MONO MONO EXTERNAL IN AUDIO RECORDING AUDIO When making LPCM recording of bilingual sound only the audio selected in BILINGUAL SETTING is recorded When recording audio in the LPCM format with the recording mo...

Page 112: ...W PLAY SET DVD PLAYBACK SETTING OFF GERMANY PARENTAL CNTRL LEVEL DISC LANGAUGE ANGLE MARK DISPLAY ENTER ENTER SET PARENTAL CONTROL FOR DVD VIDEO SET PARENTAL CONTROL LEVEL SET THE COUNTRY CODE 8 2 0 1 2 SAT 1 4 2 EXIT EXIT RETURN SELECT 6 Press to select the desired parental control level then press SET ENTER 7 Press to select the country code then press SET ENTER 8 Press EXIT to exit from Parenta...

Page 113: ...ratio This function works if the disc is labeled for 4 3PS L1 OUT This sets the type of video signal output from L1 TV according to the specification of connected TV NOTE To view an RGB output video press the TV DVD button on the remote control and switch to DVD mode When RGB is selected for L1 OUT setting progressive output does not work L2 This sets the type of video signal input from L2 DECODER...

Page 114: ...to main audio Lch sub audio Rch or a mix of both Lch Rch with your amplifier decoder dts Setting as BITSTREAM outputs DTS signals When your amplifier decoder is compatible with DTS set to BITSTREAM Setting as OFF outputs NO DTS signals When your amplifier decoder is NOT compatible with DTS set to OFF MPEG To play back multi channel audio with an amplifier with decoder select BITSTREAM To play back...

Page 115: ...s you specify position to add a chapter for DV input recording ADD A CHAPTER AT THE TURN OF A NEW RECORDING Selecting this automatically adds a chapter at the turn of a recording ADD A CHAPTER AT THE TURN OF A RECORDING DATE Selecting this automatically adds a chapter at the turn of a recording date ADJUST TO THE AUTO CHAPTER Selecting this adds chapters at the interval set in the AUTO CHAPTER SET...

Page 116: ...ETURN ENTER EXIT EXIT n DISPLAYS SETTINGS BEFORE REC PLAYBACK ADJUSTMENT VIEW PLAY SET CONTROL SET REC FUNCTION CLOCK SETTING AUTO INSTALLATION VIDEO AUDIO SETTING DV SETTING BLUE SCREEN SETTING OTHER SETTINGS ADJUSTMENT 8 2 0 1 2 SAT 1 4 2 ENTER ENTER EXIT EXIT RETURN SELECT OTHER SETTINGS ADJUSTMENT VIDEO AUDIO SETTING TV MODE SETTING CONNECTING TERMINAL DGTL AUDIO OUT SET DVD AUDIO OUT LEVEL EN...

Page 117: ...et this for example when the light disturbs your sleep SYSTEM RESET This resets all the settings of this Recorder All the settings except the password are set back to the factory default Data of Timer Recording and GUIDE Plus are erased Recorded titles on HDD are not erased YES NO CONTROL SET NO YES RESET NOT RESET Important You cannot undo this operation NOTE If you cannot get a proper screen ima...

Page 118: ...ER RETURN EXIT EXIT OTHER SETTINGS CONTROL SET LCD BACKLIGHT SET 8 2 0 1 2 SAT 1 4 2 SELECT YES NO 5 Press EXIT to exit to normal screen START MENU OTHER SETTINGS 8 2 0 1 2 SAT 1 4 2 SELECT ENTER RETURN ENTER EXIT EXIT n DISPLAYS SETTINGS BEFORE REC PLAYBACK CONTROL SET VIEW PLAY SET ADJUSTMENT REC FUNCTION AUTOPOWEROFFSET LCD BACKLIGHT SET SYSTEM RESET VERSION OTHER SETTINGS ADJUST 8 2 0 1 2 SAT ...

Page 119: ...there is a power failure for more than about 1 hour the settings will be lost Make sure that you turn off the Recorder before unplugging the power cord With the power on when there is a power interruption or the power cord is unplugged from the power outlet and power is cut off the TV listings data or the programming information may be cleared and all settings returned to the factory preset values...

Page 120: ...rate incorrectly when using the remote control of this Recorder Use such TV away from this Recorder Recording may stop temporarily at parts where recording is impossible due to scratches or disc fouling etc When recording starts again the starting part will be recorded as another title If the disc is in a condition where recording is impossible it is ejected When the recording is interrupted you m...

Page 121: ...ing to DVD Have you set a DVD video disc that has an automatic playback function Was there a power failure while standing by for timer recording Is the HDD or DVD full Erase unnecessary titles from the list Were you performing dubbing If you use the Recorder at a location with low temperature the HDD may enter the preparation state Set and leave power ON for a while before timer recording is perfo...

Page 122: ...roadcast display data will be cleared Has the clock been set Page 29 This is natural as the dubbing speed increases during High Speed Dubbing It is not due to a malfunction Has the G LINK cable been connected correctly Is the infrared sender pointing towards the infrared receptor of external receiver Pages 23 and 46 Was your setting for your external receiver correct Pages 46 and 57 Wait overnight...

Page 123: ...ker exceeds the recordable upper limit Number of titles HDD 199 DVD 99 Number of chapters HDD 999 DVD 999 Occurs if you load a disc which cannot be recorded to with this Recorder or a disc which is scratched or dirty Occurs if you attempt operation when a tape has not been loaded in the digital camcorder linked via DV connection Occurs if the disc is scratched or dirty etc Occurs if there is no em...

Page 124: ... Initialise the HDD once If initialisation does not solve the problem please contact the nearest service centre approved by Sharp as soon as possible You can only view live broadcasts Error message Possible Error Suggested Solution Messages during Special Playback HDD CONDITION HAS DETERIO RATED CANNOT OPERATE PREPARING HDD CANNOT OPER ATE Occurs if you perform operation like special playback when...

Page 125: ...R disc Error message Possible Error Suggested Solution Messages during Editing CANNOT MAKE ANY MORE SELEC TIONS CANNOT SPECIFY THIS POSITION CHAPTER IS FULL CANNOT OPERATE CANNOT COMBINE THESE CHAP TERS Occurs if you attempt to select more than 20 titles chapters when you perform Erase Selected Title Occurs if you attempt to designate a range shorter than 3 seconds and edit Occurs if the editing r...

Page 126: ...s This lets you select things like the subtitle language or overdub audio using a menu stored on the DVD video disc A sound system developed by Dolby Laboratories Inc that gives movie theatre ambi ence to audio output when the product is connected to a Dolby Digital processor or amplifier Setting that increases the average volume of Dolby Digital audio when playing a DVD This lets you enjoy Surrou...

Page 127: ...to about 1 10 without impairing the original sound quality This is a feature of DVD video discs In some discs the same picture is shot from different angles and these are stored in a single disc so you can enjoy playback from different angles This function can be enjoyed if the disc is recorded with multiple angles This is a feature of DVD video discs This function makes it possible to record mult...

Page 128: ...d using other types of playback In a DVD video disc this is the menu for selecting things like the chapter to be played back and the subtitle language In some DVD video discs the title menu may be called the Top Menu These numbers are recorded on DVD discs When a disc contains two or more movies these movies are numbered as title 1 title 2 etc These numbers are assigned to the tracks which are rec...

Page 129: ...ual 32 levels between XP and EP Playback Playable discs DVD Video DVD RW R DVD RW R DVD RAM Audio CD CD DA Video CD CD RW R CD DA Video CD format MP3 file format WMA file format JPEG file format Tuner Channel coverage PAL B G PAL D K VHF 2 12 UHF 21 69 CATV S1 S41 Specifications Timer Programmes 16 programmes 1 month Clock Quartz clock 24 hour digital display Memory backup Approx 1 hour Input Outp...

Page 130: ......

Page 131: ......

Reviews: