background image

hazards involved. Children shall not play with the 

appliance. Cleaning and user maintenance shall 

not be done by children without supervision. 

•  Only use your machine for laundry that is labelled 

as suitable for washing by the manufacturer. 

• 

Before operating the washing machine, 

remove the 4 transit bolts and rubber spacers 

from the rear of the machine. If the bolts are 

not removed they may cause heavy vibration, 

noise and malfunction of the machine and 

cause the guarantee to be void. 

• 

Your warranty does not cover damage caused by 

external factors such as fire, flooding and other 

sources of damage. 

•  Please do not throw away this user manual; keep 

it for future reference and pass it onto the next 

owner. 

NOTE: 

Specifications for the machine may vary 

depending on the product purchased.


1.3 

Packaging and Environment

Removal of packaging materials

Packaging materials protect your machine from any 

damage that might occur during transportation. The 

packaging materials are environmentally friendly 

as they are recyclable. Use of recycled material 

reduces raw material consumption and decreases 

waste production. 

EN - 7

Summary of Contents for ES-NFB7141WD-FR

Page 1: ...Home Appliances User Manual a ES NFB7141WD FR ...

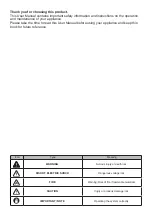
Page 2: ...ION Injury or property damage risk IMPORTANT NOTE Operating the system correctly Thank you for choosing this product This User Manual contains important safety information and instructions on the operation and maintenance of your appliance Please take the time to read this User Manual before using your appliance and keep this book for future reference ...

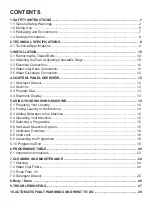
Page 3: ...wer 12 4 2 Sections 13 4 3 Program Dial 13 4 4 Electronic Display 13 5 USING YOUR WASHING MACHINE 14 5 1 Preparing Your Laundry 14 5 2 Putting Laundry in the Machine 14 5 3 Adding Detergent to the Machine 15 5 4 Operating Your Machine 15 5 5 Selecting a Programme 15 5 6 Half Load Detection System 15 5 7 Additional Functions 16 5 8 Child Lock 18 5 9 Cancelling the Programme 19 5 10 Programme End 19...

Page 4: ...ack of experience and knowledge unless they have been given supervision or instruction concerning use of the appliance by a person responsible for their safety Children of less than 3 years should be kept away unless continuously supervised Call the nearest authorized service centre for a replacement if the power cord malfunctions Use only the new water inlet hose coming with your machine when mak...

Page 5: ...ed within For this reason it is important to pay particular attention to any figures whilst reading the operating manual 1 1 General Safety Warnings The necessary ambient temperature for operation of your Washing Machine is 15 25 C Where the temperature is below 0 C hoses may split or the electronic card may not operate correctly Please ensure that garments loaded into your Washing Machine are fre...

Page 6: ... machine could be hazardous to children Do not allow children to play with the packaging or small parts from the Washing Machine Keep the packaging materials in a place where children cannot reach them or dispose of them appropriately Use pre wash programs only for very dirty laundry Never open the detergent drawer while the machine is running In the event of a breakdown unplug the machine from th...

Page 7: ...njuries RISK OF BURNS Do not touch the drain hose or any discharged water while your Washing Machine is running The high temperatures involved pose a burn risk RISK OF DEATH FROM ELECTRICAL CURRENT Do not connect your Washing Machine to the mains electricity supply using an extension lead Do not insert a damaged plug into a socket Never remove the plug from the socket by pulling the cord Always ho...

Page 8: ...r your machine The sulphur content of paint removers may cause corrosion Never use paint removing materials in your machine Never use products that contain solvents in your machine Please ensure that garments loaded into your Washing Machine are free from foreign objects such as nails needles lighters and coins Risk of fire and explosion Risk of falling and injury Do not climb on your Washing Mach...

Page 9: ...h of children 1 2 During Use Keep pets away from your machine Please check the packaging of your machine before installation and the outer surface of the machine once the packaging has been removed Do not operate the machine if it appears damaged or if the packaging has been opened Your machine must only be installed by an authorised service agent Installation by anyone other than an authorised ag...

Page 10: ...use the guarantee to be void Your warranty does not cover damage caused by external factors such as fire flooding and other sources of damage Please do not throw away this user manual keep it for future reference and pass it onto the next owner NOTE Specifications for the machine may vary depending on the product purchased 1 3 Packaging and Environment Removal of packaging materials Packaging mate...

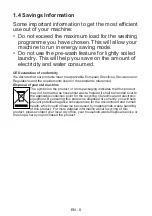
Page 11: ... listed in the standards referenced Disposal of your old machine The symbol on the product or on its packaging indicates that this product may not be treated as household waste Instead it shall be handed over to the applicable collection point for the recycling of electrical and electronic equipment By ensuring this product is disposed of correctly you will help prevent potential negative conseque...

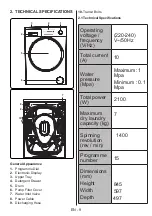
Page 12: ...er 7 Water Inlet Valve 8 Power Cable 9 Discharging Hose 10 Transit Bolts 2 1 Technical Specifications Operating voltage frequency V Hz 220 240 V 50Hz Total current A 10 Water pressure Mpa Maximum 1 Mpa Minimum 0 1 Mpa Total power W Maximum dry laundry capacity kg 7 Spinning revolution rev min Programme number 15 Dimensions mm Height Width Depth 845 597 2100 497 1400 ...

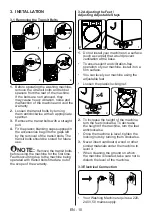
Page 13: ...he machine being operated with transit bolts fitted are out of the scope of the warranty 3 2 Adjusting the Feet Adjusting Adjustable Stays 1 1 Do not install your machine on a surface such as carpet that would prevent ventilation at the base To ensure silent and vibration free operation of your machine install it on a firm surface You can level your machine using the adjustable feet Loosen the pla...

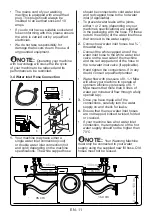
Page 14: ...supplied in the packaging with the hose Fit these nuts to the end s of the water inlet hose that connect to the water supply 2 Connect new water inlet hoses to a threaded tap Connect the white capped end of the water inlet hose to the white water inlet valve on the rear side of the machine and the red capped end of the hose to the red water inlet valve if applicable Hand tighten the connections If...

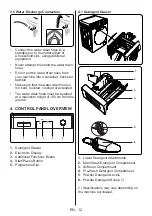
Page 15: ... bent buckled crushed or extended The water drain hose must be installed at a maximum height of 100 cm from the ground 4 CONTROL PANEL OVERVIEW 5 1 2 3 4 1 Detergent Drawer 2 Electronic Display 3 Additional Functions Button 4 Start Pause Button 5 Programme Dial 4 1 Detergent Drawer 1 2 3 4 5 6 1 Liquid Detergent Attachments 2 Main Wash Detergent Compartment 3 Softener Compartment 4 Pre Wash Deterg...

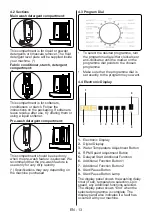
Page 16: ... on the machine purchased 4 3 Program Dial To select the desired programme turn the programme dial either clockwise or anti clockwise until the marker on the programme dial points to the chosen programme Make sure that the programme dial is set exactly to the programme you want 4 4 Electronic Display 1 8 2 3 4 6 5 7 9 1 Electronic Display 2 Digital Display 3 Water Temperature Adjustment Button 4 R...

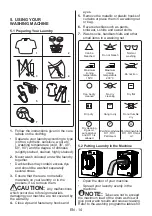
Page 17: ... 4 Close zips and fasten any hooks and eyes 5 Remove the metallic or plastic hooks of curtains or place them in a washing net or bag 6 Reverse textiles such as pants knitwear t shirts and sweat shirts 7 Wash socks handkerchiefs and other small items in a washing net Maximum ironing temperature 150 C Can be dry cleaned Drip dry Dry cleaning in gas oil pure alcohol and R113 is allowed Maximum ironin...

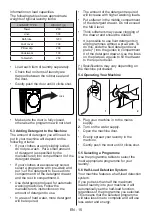
Page 18: ...n areas of hard water more detergent will be required The amount of the detergent required will increase with higher washing loads Put softener in the middle compartment of the detergent drawer Do not exceed the MAX level Thick softeners may cause clogging of the drawer and should be diluted It is possible to use fluid detergents in all programmes without a pre wash To do this slide the fluid dete...

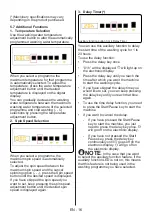
Page 19: ...e spin speed adjustment button until the desired spin speed is displayed again 3 Delay Timer Auxiliary function button 3 or 4 Delay Timer You can use this auxiliary function to delay the start time of the washing cycle for 1 to 23 hours To use the delay function Press the delay key once 01h will be displayed will light up on the electronic display Press the delay key until you reach the time after...

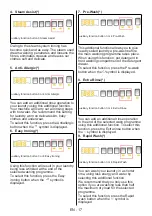
Page 20: ...ess the Easy ironing button when the symbol is displayed 7 Pre Wash Auxiliary function button 3 or 4 Pre Wash This additional function allows you to give heavily soiled laundry a pre wash before the main washing programme takes place When using this function put detergent in front washing compartment of the detergent drawer To select this function press the Pre wash button when the symbol is displ...

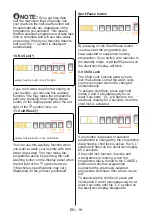
Page 21: ...ary depending on the product purchased Start Pause button By pressing on the Start Pause button you may start the programme you have selected or suspend a running programme If you switch your machine to the standby mode the Start Pause led on the electronic display will blink 5 8 Child Lock The Child Lock function allows you to lock the buttons so that the wash cycle you have chosen cannot be chan...

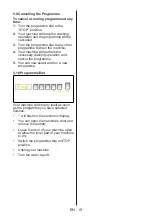
Page 22: ...achine will perform the necessary draining operation and cancel the programme 5 You can now select and run a new programme 5 10 Programme End Your machine will stop by itself as soon as the programme you have selected finishes will flash on the electronic display You can open the machine s door and remove the laundry Leave the door of your machine open to allow the inner part of your machine to dr...

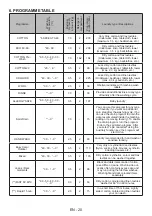
Page 23: ...Baby laundry Spin Drain C 7 0 15 You can use this program for any type of laundry if you want an additional spin step after the washing cycle You can use the drain program to drain the water accumulated inside the machine adding or removing laundry To enable the drain program turn the program knob to the spin drain program After you select spin cancelled using the auxiliary function key the progra...

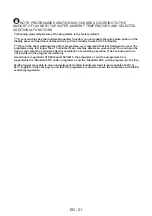
Page 24: ... detergent is used The programme may last longer than 15 minutes if your machine detects an uneven load You can open the door of your machine 2 minutes after the completion of a washing operation The 2 minute period is not included in the programme duration According to regulation 1015 2010 and 1061 2010 the programme 1 and the programme 2 are respectively the Standard 60 C cotton programme and th...

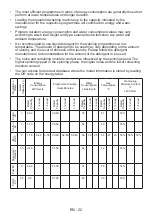
Page 25: ...ations for the amount of the detergent to be used The noise and remaining moisture content are influenced by the spinning speed The higher spinning speed in the spinning phase the higher noise and the lower remaining moisture content You can access the product database where the model information is stored by reading the QR code on the energy label Programme Name Rated Capacity kg Energy Consumpti...

Page 26: ...scale removers manufactured specifically for washing machines only Never force the door open when your Washing Machine is running You can open the door of your machine 2 minutes after the completion of a washing operation Never force the door open when your Washing Machine is running The door will open immediately after the washing cycle has ended The installation and repairing procedures should a...

Page 27: ...ough your water supply is on and the tap is open We recommend that you clean your water inlet filters every 2 months Unscrew the water inlet hose s from the Washing Machine To remove the water inlet filter from the water inlet valve use a pair of long nosed pliers to gently pull on the plastic bar in the filter A second water inlet filter is located in the tap end of the water inlet hose To remove...

Page 28: ...u may have to empty the water collection container a few times 3 Remove any foreign materials from the filter with a soft brush 4 After cleaning re fit the filter by inserting it and turning clockwise 5 When closing the pump cover ensure that the mountings inside the cover meet the holes on the front panel side 6 Close the filter cover WARNING The water in the pump may be hot wait until it has coo...

Page 29: ...n in the picture below and thoroughly clean the remaining detergent residues Replace the apparatus Make sure that no residual material remains inside the siphon Specifications may vary depending on the machine purchased 8 Body Drum 1 2 1 Body Use a mild non abrasive cleaning agent or soap and water to clean the external casing Wipe dry with a soft cloth 2 Drum Do not leave metallic objects such as...

Page 30: ... Clean the pump filter Laundry is too tighly packed together in the drum Spread your laundry in the machine evenly Your machine vibrates The feet have not been adjusted Adjust the feet Transit bolts fitted for transportation have not been removed Remove the transit bolts from the machine Small load in the drum This will not prevent operation of your machine Your machine is overloaded with laundry ...

Page 31: ...pter regarding maintenance and cleaning of your machine See the chapter regarding installation of your machine 10 AUTOMATIC FAULT WARNINGS AND WHAT TO DO Your Washing Machine is equipped with a built in fault detection system indicated by a combination of flashing wash operation lights The most common failure codes are shown below TROUBLE CODE POSSIBLE FAULT WHAT TO DO E01 The door of your machine...

Page 32: ... ...

Page 33: ... ...

Page 34: ... ...

Page 35: ...The minimum period which must supply the spare parts for the household washing machine is 10 years ...

Page 36: ...Visit Our Website sharphomeappliances com Service Support 52321680 ...

Reviews: