background image

1 – 7

UX-178C/188C/108C/118C
FO-175LU/375C

[5] Quick reference guide

INSTALLATION

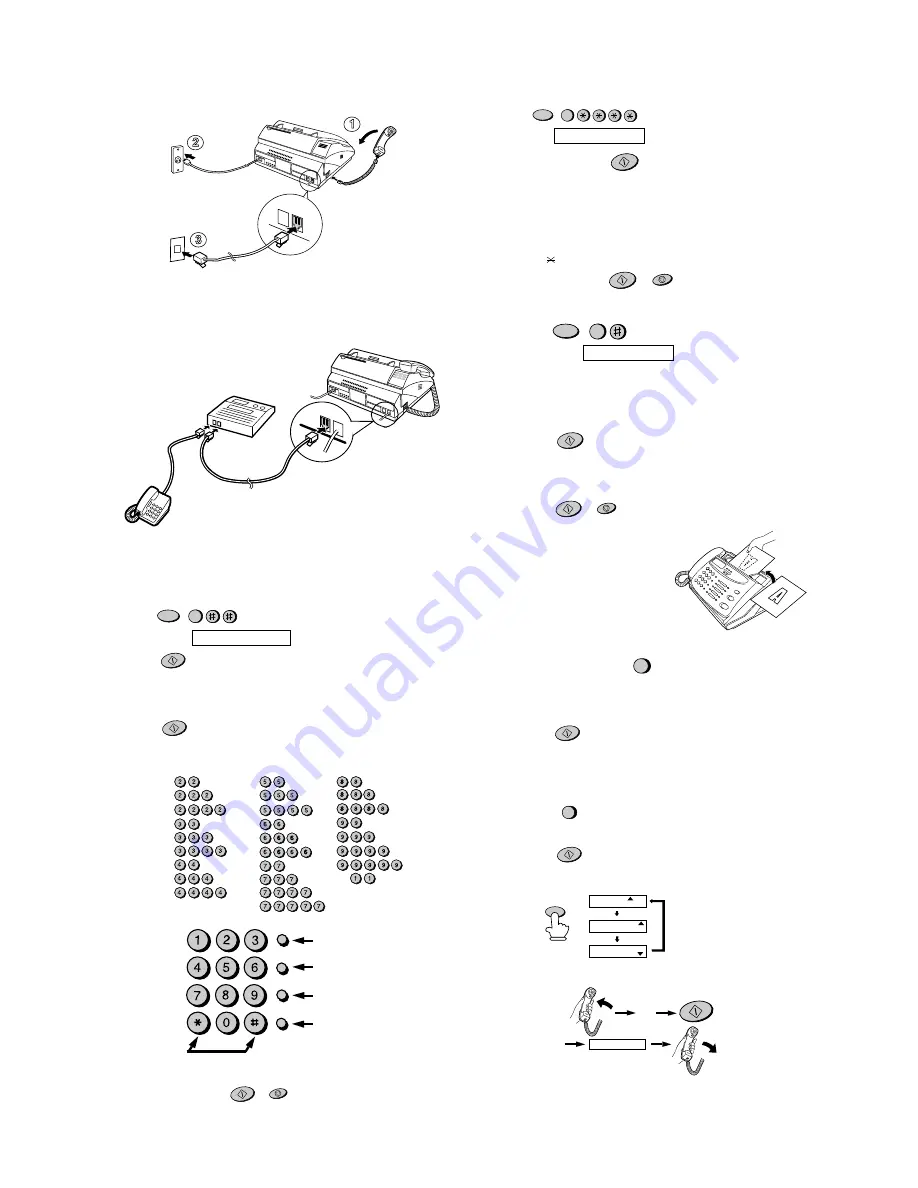
1. Connect the handset as shown.

2. Plug the power cord into a grounded, 120 V outlet.

3. Plug one end of the telephone line into the "TEL. LINE" jack on the rear of the

fax, and the other end into your telephone wall jack.

Connecting an answering machine and/or extension telephone

1. Remove the seal covering the "TEL. SET" jack on the rear of the fax. Connect

an extension telephone or answering machine to the "TEL. SET" jack.

2. If desired, connect an extension phone to the answering machine.

ENTERING YOUR NAME AND NUMBER

1. Press: 

FUNCTION

3

Display shows:   OWN NUMBER SET

2. Press:

3. Enter your fax number (max. of 20 digits) by pressing the number keys.

If you make a mistake, press the HOLD/SEARCH key to move the cursor
back to the mistake, then enter the correct number or letter.

4. Press:

5. Enter your name by pressing the appropriate number keys as shown below.

To enter two letters in succession that require the same key, press the SPEAKER

key after entering the first letter.

TEL.
SET

TEL.
LINE

A =

B =

C =

D =

E =

F =

G =

H =

I =

J =

K =

L =

M =

N =

O =

P =

Q =

R =

S =

T =

U =

V =

W =

X =

Y =

Z =

SPACE =

Press either key one or more times to select
and enter a symbol.

6. When finished, press:

SETTING THE DATE AND TIME

Press:

Display:   DATE & TIME SET

Press the START key:

Enter two digits for the Month (01 through 12).

Enter two digits for the Day (01 through 31).

Enter four digits for the Year (EX: 1998).

Enter two digits for the Hour (01 through 12).

Enter two digits for the Minute (00 through 59).

Press the " " key for A.M. or the "#" key for P.M.

When finished, press:

STORING AND CLEARING NUMBERS FOR AUTO DIALING

1. Press:

Display shows:   FAX/TEL # MODE

2. Press "1" to store a number or "2" to clear a number.

3. Enter a 2-digit Speed Dial number (from "01" to "10" for Rapid Key Dialing, or

11 to 30 for Speed Dialing). (If you are clearing a number, go to Step 7.)

4. Enter the full telephone/fax number.

5. Press:

6. Enter the name of the location by pressing number keys (max. of 20 charac-

ters). (Refer to the letter entry table in 

ENTERING YOUR NAME AND

NUMBER

.)

7. Press:

SENDING DOCUMENTS

START

START

START

STOP

START

FUNCTION

3

START

STOP

START

Place your document (up to 10
pages) face down in the docu-
ment feeder.

Normal Dialing
1. Lift the handset or press

2. Dial the fax number.

3. Wait for the reception tone (if a person answers, ask them to press their Start

key).

4. Press:  

START

Rapid Key Dialing
Press the appropriate Rapid Key. Transmission will begin automatically.

Speed Dialing

1. Press:

2. Enter 2-digit Speed Dial number.

3. Press:

RECEIVING DOCUMENTS

Press:

FAX mode: The fax automatically answers on four rings and receives the incoming
document.

TEL mode:

A.M. mode: Select this mode when an answering machine is connected to the fax
and the answering machine is turned on.

SPEAKER

SPEED DIAL

START

FAX

TEL

A.M.

FAX

TEL

A.M.

FAX

TEL

A.M.

FEB  1  1998

FEB  1  1998

FEB  1  1998

RECEPTION 
          MODE

STOP

START

FUNCTION

3

TEL.
SET

TEL.
LINE

1

3

2

SPEED DIAL

REDIAL

HOLD/SEARCH

SPEAKER

ABC

DEF

JKL

MNO

GHI

TUV

WXYZ

PQRS

Deletes highlighted
letter

Upper/lower case
shift key

Moves cuesor to the
left

Moves cuesor to the
right

Fax
tone

START

RECEIVING

Summary of Contents for FO-175

Page 1: ...uit description of power supply PWB 5 11 5 Circuit description of CIS unit 5 11 CHAPTER 6 CIRCUIT SCHEMATICS AND PARTS LAYOUT 1 Control PWB circuit 6 1 2 TEL LIU PWB circuit 6 9 3 Power supply PWB circuit 6 11 4 Operation panel PWB circuit 6 13 CHAPTER 7 OPERATION FLOWCHART 1 Protocol 7 1 2 Power on sequence 7 2 CHAPTER 8 OTHERS 1 Service tools 8 1 2 IC signal name 8 3 PARTS GUIDE CONTENTS FACSIMI...

Page 2: ...sto valmistajan ohjeiden mukaisesti French ATTENTION Il y a danger d explosion s il y a remplacement incorrect de la batterie Remplacer uniquement avec une batterie du même type ou d un type recommandé par le constructeur Mettre au rébut les batteries usagées conformément aux instructions du fabricant Swedish VARNING Explosionsfare vid felaktigt batteribyte Använd samma batterityp eller en ekvival...

Page 3: ...er Compression scheme MH MR Sharp Scanning method Sheet feeder CIS Contact Image Sensor Effective recording width 210 mm 8 3 max Input document size Automatic feeding Width 148 to 216 mm 5 8 to 8 5 Length 140 to 279 mm 5 5 to 11 Manual feeding Width 148 to 216 mm 5 8 to 8 5 Length 140 to 600 mm 5 5 to 23 6 Effective scanning width 210 mm 8 3 max Contrast control Automatic Dark selectable Copy func...

Page 4: ...d or the volume of the ringer at all other times 7 STOP key Press this key to stop operations before they are completed 8 Number keys Use these keys to dial numbers and enter number and letters during number name storing procedures 9 SPEED DIAL key Press this key to dial a 2 digit Speed Dial number 10 REDIAL key Press this key to automatically redial the last number dialed 11 SPEAKER key Press thi...

Page 5: ...to prevent possible double feeds Normal size width 148 216 mm length 140 279 mm 5 Automatic Document Feeder Capacity Number of pages that can be placed into the feeder at anytime is as follows Normal size max ADF 10 sheets Special size single sheet only manual feed NOTES When you need to send or copy more pages than the feeder limit place additional pages in feeder when last page in feeder is bein...

Page 6: ...If the machine is moved from a cold to a warm place If the machine is moved from a cold to a warm place it is possible that the reading glass may fog up preventing proper scanning of documents for transmission To remove the fog turn on the power and wait approxi mately 2 hours before using the machine TELEPHONE JACK A standard RJ11C telephone jack must be located near the machine This is the telep...

Page 7: ...er into the paper inlet Continue to push the paper through the inlet until it comes out of the opening in the front of the fax 6Close the operation panel making sure it clicks into place 7UX 108 118 FO 175 A short length of the fax paper will feed out Grasp the paper by the edge and pull upward to tear it off UX 178 UX 188 FO 375 A short length of the fax paper will feed out and be cut off If this...

Page 8: ...cutter 3Cut off the wrinkled part of the paper 4Reload the paper Jammed fax paper is often caused by improper loading Be sure to carefully follow the instructions for paper loading given in Load ing the Fax Paper in page 1 5 5If the display still shows PAPER JAMMED UX 178 188 FO 375 only If the display still shows PAPER JAMMED after you press theSTART key in Step 2 above the cutter is still engage...

Page 9: ...12 Enter two digits for the Minute 00 through 59 Press the key for A M or the key for P M When finished press STORING AND CLEARING NUMBERS FOR AUTO DIALING 1 Press Display shows FAX TEL MODE 2 Press 1 to store a number or 2 to clear a number 3 Enter a 2 digit Speed Dial number from 01 to 10 for Rapid Key Dialing or 11 to 30 for Speed Dialing If you are clearing a number go to Step 7 4 Enter the fu...

Reviews: