1 – 5
FO-71TH/UX-61TH/GQ-56TH/FO-51TH
UX-41TH/GQ-31TH/UX-21TH/FO-11TH/GQ-11TH
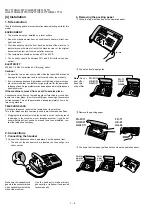
3. Connecting the power cord
1
Plug the power cord into a 220 - 240 V, 50/60 Hz, earthed AC (2-
prong) outlet.
•
When disconnecting the fax, unplug the telephone line cord before
unplugging the power cord.
•
Caution:
Do not plug the power cord into any other kind of outlet. This will
damage the machine and is not covered under the warranty.
•
The machine does not have a power on/off switch, so the power is
turned on and off by simply plugging in or unplugging the power
cord.
TEL.
SET
TEL.
LINE
4. Connecting the telephone line cord
1
Insert one end of the line cord into the socket on the back of the
machine marked TEL. LINE. Insert the other end into a wall telephone
socket.
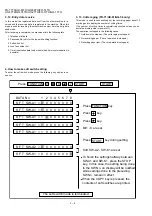
Dial mode: The fax machine is set for tone dialing. If you are on a pulse
dial line, you must set the fax machine for pulse dialing. Press the keys
on the operation panel as follows:
1. Press once and once.
2. Press 4 times.
3. Select the dial mode:
TONE: PULSE:
4. Press to exit.
1
2
OPTION SETTING
Display:
DIAL MODE
FUNCTION
4
STOP
5. Moving your fax and reconnecting
If it is necessary to move your fax to a new location, first disconnect
the telephone line cord before disconnecting the power cord. When
reconnecting, it is necessary to connect the power cord before con-
necting the telephone line cord.
6. Attaching the original document support
Attach the original document support as shown below.
3. Loading the thermal paper (FO-20PR)
•
Your fax machine prints incoming faxes on a special kind of paper
called fax paper.
•
The fax machine’s print head creates text and images by apply-
ing heat to the thermal paper.
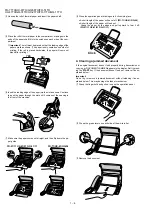
1
Grasp the finger hold as shown and pull up to open the operation
panel.
2
Flip up the front paper guide.
FO-51/11
UX-41/21
GQ-31/11
FO-71
UX-61
GQ-56
Press the knob to
mark sure the front
side of the metal
guide is down.
3
If you are loading paper that is 210 mm in width, place the paper roll
shims on each side of the paper compartment. (Note that Sharp rec-
ommended paper, including the initial roll, is 216 mm in width.)
•
The ribbed side of the shims should face in (toward each other).


