1 – 5
FO-77U
UX-66U
4
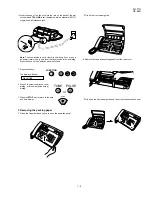
Insert one end of the line cord into the jack on the back of the ma-
chine marked TEL. LINE. Insert the other end into a standard (RJ11C)
single-line wall telephone jack.
2
Flip up the front paper guide.
3
Remove the tape and packing paper from the cutter unit.
TEL.
LINE
Note: The fax machine is set for touch-tone dialing. If you are on a
pulse dial (rotary) line, you must set the fax machine for pulse dialing.
Press the keys on the operation panel as follows:
3. Press the STOP key to return to the date
and time display.
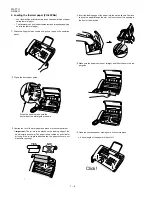
3. Removing the packing paper
1
Grasp the finger hold and pull up to open the operation panel.
DIAL MODE
FUNCTION
4
2. Press 1 to select tone (touch-tone)
dialing, or 2 to select pulse (rotary)
dialing.
1
2
or
TONE
PULSE
STOP
1. Press these keys:
The display will show:
4
Flip down the front paper guide and then close the operation panel.
Summary of Contents for FO-77
Page 65: ...FO 77U UX 66U Control PWB parts layout Top side 6 7 ...
Page 66: ...FO 77U UX 66U Control PWB parts layout Bottom side 6 8 ...
Page 69: ...FO 77U UX 66U TEL LIU PWB parts layout Top side 6 11 ...
Page 70: ...FO 77U UX 66U 6 12 TEL LIU PWB parts layout Bottom side ...
Page 72: ...FO 77U UX 66U Power supply PWB parts layout 6 14 RDENT2142XHZZ F2 ...
Page 97: ...FO 77U UX 66U 14 M E M O ...


