background image

20

FU-40SE-TA

TROUBLESHOOTING GUIDE

Always use the specified parts as shown page 26, 27  when replacing them.
Service of the PWB ass'y
The electrical circuit is composed of the Display PWB, Switch PWB ass'y, Relay PWB ass'y and the Power supply
PWB ass'y.

No.

1

2

3

4

5

6

7

Trouble

Not displayed.
(Power supply lamp)

Malfunction of the keys
(You cannot activate the
keys.)

The fan motor does not 
rotate.

The silent lamp is flashing.

Noise is heard.

The unit cannot be 
operated on the remote 
control.

Dust collection 
performance is bad.

The temperature fuse is blown.

Improper wiring.

It is unusually heavy when fan motor is 
turned by hand.  
(The motor is defective and current fuse 
broken.)

Disconnection of current fuse on a power 
PWB. 
(Those with the possibility with poor Motor.)

The fan feels extremely heavy when you 
rotate it manually.(The motor is broken 
and the PWB current fuse is blown.)

The PWB is defective.

The power supply cord is broken.

The PWB is defective.

The PWB is defective.

Improper wiring.

The motor is defective.

The motor is defective.

The fan motor does not rotate.

The motor harness is not inserted to the 
motor properly.

The motor harness is not inserted to the 
PWB properly.

The motor is defective.

The motor is not installed properly.

The shape of the fan is not suitable.

The fan is not installed properly.

The unit is used near the inverted lighting.

The lighting equipment is old and blinking.

The unit is used in direct sunlight.

The remote control is defective.

The PWB is defective.

The batterys are not mounted on the 
remote control.

The batterys of the remote control is dead.

The replacement time of filter had passed.

The pre-filter is clogged.

There is an obstacle near the exhaust and 
suction openings.

The unit is not assembled properly.

The key remains pressed down.

Check the connector insertion, 
or repair or replace the connector.

Replace the motor and the PWB.

Check the motor. (Fan motor is 
turned by hand as mentioned above, 
and it is replace the motor and 
PWB of Motor when heavy).

Replace the motor and the PWB.

Replace it.

Replace it.

Replace it.

Repair or replace it.

Repair.

Replace it.

The check of connector insertion,
repair, replace.

Replace the motor.

Replace it.

Check the insertion.

Check the insertion.

Replace it.

Repair.

Replace it.

Repair or replace it.

The fan is not installed properly.

Repair or replace it.

A cluster has the sound of " tick ", " tick ", 
" tick ". This is sound that is emitted when the 
unit is generating cluster ions. 
And this is not a trouble.

If the sound is irritating, such as 
when sleeping, etc., set the cluster 
ion mode to OFF.

Change the installation position.

Replace the lighting equipment.

Change the installation position.

Replace it.

Replace it.

Mount the batterys.

Replace it.

Replace the batterys.

Clean it.

Change the installation position.

Replace the temperature fuse ass'y
and the defective parts (motor).

Possible cause and symptom

Solution

Summary of Contents for FU-40SE-TA

Page 1: ...ginal condition and only parts identical to those specified should be used FU 40SE TA MODEL Page SAFETY PRECAUTIONS 2 FOR EFFECTIVELY USING THIS PRODUCT 4 SPECIFICATIONS 4 NAMES OF PARTS 5 INSTALLATION 6 OPERATION 8 WIRING DIAGRAM 10 TROUBLESHOOTING GUIDE 20 REPLACEMENT OF MAIN PARTS 22 CARE AND MAINTENANCE 25 USE RESIN TABLE 26 PARTS LIST 26 TABLE OF CONTENTS Tabletop wall mounting type ...

Page 2: ...o not spray insecticides on the unit Cracking electrical shock and or fire may occur as a result Do not operate the unit when using indoor smoke generating insecticides Chemical ingredients may accumulate within the unit and then discharge from the exhaust port when the unit operates Discharge of such chemicals may be unhealthy to your body Do not allow the unit to intake flammable gases sparks fr...

Page 3: ...ng equip ment The remote control may become inoperative In this case move away from such lighting equipment or change direction Location exposed to direct sunlight The unit may not received signals from the remote control The unit may not respond to the signals of the remote control if the ends of fluorescent lighting become black or lights flicker due the depletion of service life however this is...

Page 4: ...Control panel ON OFF Indication lamp Operation mode ON OFF Tobacco Pollen AUTO Air flow indication Max High Median Silent Air pollution level It displays Clean sign When clean Green Dirt condition Min Orange Dirt condition Max Red OFF TIMER operation A green lamp lights up at the time of off timer operation 1 hours 2 hours 8 hours Filter exchange lamp Total operation time lights up in 21600 hours ...

Page 5: ...the polluted state is the environment which the sensor bases the pollution rate on In this case switch manually to desirable operation as effective operation can t be done in auto operation To reset the base pollution rate of the clean sign lamp remove and insert the power plug again the room air becomes clean Silent Median High Max It can t remove the noxious substances carbon monoxide etc of cig...

Page 6: ...erboard etc The unit may fall and can be very dangerous When mounting the air purifier to the wall the mounted wall will become dirty as time passes To prevent this place a vinyl sheet etc around the unit A wall side to install is to choose the place to have the strength done firmly In the case of a wall or concrete wall with little strength request installation to a specialist such as an electric...

Page 7: ...pull the unit towards you and then pull down 6 Check the installation Check to make sure that the tabs on mount ing bracket 2 are securely mounted to the tabs on mounting bracket 1 Check that the power cord is not pinched REMOVING THE UNIT Pull the bottom of the unit towards you and then lift NOTES When removing the unit use a firm stand Disconnect the power cord before removing the unit Cushions ...

Page 8: ...s then the unit will return to the AUTO mode 10 minutes High fan level AUTO mode operation Pollen mode operation The unit will operate in High for 10 minutes then the unit will alternately operate between Median and High 10 minutes High fan level 20 minutes Median level 20 minutes High fan level For the first 30 seconds after the power plug is inserted into the wall outlet the unit will check the ...

Page 9: ...hours 8 hours Cancel The remaining time is indi cated by the lamp as time passes The unit will stop operation when the timer is up Cluster ion select button AUTO cluster ion button The unit will switch between the Clean mode and Refresh mode automatically depending on the amount of pollution in the air detected by dust and odor sensor Clean button The unit will constantly operate in the Clean mode...

Page 10: ...ENSOR HARNESS FW VZA024KKEZ MOTOR HARNESS FW VZA031KKEZ HIGH VOLTAGE UNIT CKITTA006KKKZ CMOT A002KKEZ FAN MOTOR WH A POWER SUPPLY PWB ASS Y CN C CN D CN B CN A TEMPERATURE FUSE FOR MOTOR SERVICE PARTS PWB ASS Y CPWB A013KKKZ POWER SUPLY PWB SWITCH PWB AC 230V HIGH VOLTAGE HARNESS FW VZA027KKEZ POWER SUPPLY CORD CACC A005KKEZ CONTROL PWB RELAY PWB ...

Page 11: ...11 FU 40SE TA Control circuit diagram R74 J60 DON T TOUCH LED15 BLUE RED ...

Page 12: ...ower supply clock generation circuit The voltage between the input terminal to DB1 and its output terminal GND is divided by the resistor R21 R22 and R23 and input into the digital transistor Q21 Then it is converted into the DC square wave signal that has the same frequency with the AC power supply and input into the pin 31 on the microcomputer LSI1 via the resistor R25 and the ceramosonic capaci...

Page 13: ... CN F is input into the pin 30 of the microcomputer A D conversion terminal via R62 and C63 Principle of dust sensor Using the pulse signal input from the microcomputer the infrared LED inside the dust sensor emits light When the light is reflected by the dust that passes through the sensor it is detected by the internal photo acceptance unit and smoothed and amplified and then output from the ter...

Page 14: ...erence value If the current level is dirtier than the reference value and the contamination level does not change Natural change only the reference value remains the same the value in the cleanest condition at eight minute intervals is adopted as a new reference value 11 Buzzer drive circuit The H L signals output from the pin 34 of the microcomputer LSI1 drive the digital transistor Q51 and sound...

Page 15: ...r the output signal from the pin 40 of the microcomputer LSI 1 turns on and off Q121 and Q124 which turns on and off RY1 and switches connection In clean mode H is output from the pin 40 of the microcomputer LSI 1 and RY1 is turned off In cluster automatic operation It enters the clean mode when the clean sign indicates the air is contaminated orange or red In refresh mode It outputs L from the pi...

Page 16: ...t While holding it down press the OFF timer on the remote control within 5 seconds Confirmation of EEPROM These 8 LEDs display data of EEPROM on the control PWB 8 bits in hexadecimal Check the EEPROM check sum NG if LEDs except specified light up Press the Operation button on the main unit Press the Manual button on the remote control Press the Silent button on the remote control Press the Tobacco...

Page 17: ...displayed as described below c Cluster lamp The blue and green LEDs are lit alternately at one second intervals as described below d Others Lit and distinguished as shown in the table below at one second intervals 6 Load output a Odour sensor drive output equivalent intermittent output with the normal stop Refer to 17 Odor sensor drive output b Other outputs OFF 3 Aging mode 1 Outline In this mode...

Page 18: ... by the LED to facilitate confirmation of the microcomputer operation 2 Setting procedure Turn the power on while holding down the Operation selector OFF button on the main unit While holding it down press the AUTO button within five seconds A bleep sound is output and the unit enters the monitor mode 3 Cancellation procedure It can be canceled only by cutting the power supply 4 Display 8 bit data...

Page 19: ...S1 470V 250V 2 5A R126 2W 16k R125 TEMPERATURE FUSE AC 220 240V 50 60 Hz 1 4 SSR1 S26MD01 IN IN BLUE BLUE RED RED WHT RELAY PWB UNIT CONTROL PWB UNIT NOTE 1 Unspecified diode is VHD1SS270A 2 2 Unspecified capacittor is VCKYD21CY103N 16V 0 01µF 3 Parts in parentheses are not used DUST SENSOR Power lamp Clean sign Tobacco Pollen Replace filter Auto Silent Median High Max Clean sign Timer 1H Timer 4H...

Page 20: ...r the inverted lighting The lighting equipment is old and blinking The unit is used in direct sunlight The remote control is defective The PWB is defective The batterys are not mounted on the remote control The batterys of the remote control is dead The replacement time of filter had passed The pre filter is clogged There is an obstacle near the exhaust and suction openings The unit is not assembl...

Page 21: ...ith much lampblack such as kitchen The PWB is defective The PWB is defective The active carbon filter is life expired Odour absorbed into the HEPA filter is emitted Vacuum it off Clean the openings of the dust and the odour sensor Replace it Repair or replace it Clean or replace the sensor Replace the PWB Replace the PWB Replace it The button on the remote control dented Filter reset button is den...

Page 22: ...lnerable to the static electricity Never place the PWB on the mat such as polystyrene foam mirror mat etc which may discharge static electricity Preparation for disassembling Be sure to pull out the plug from the outlet Remove the front panel the pre filter the stamina power carbon and the HEPA filter from the main unit 1 Removing the stand 1 Remove the front panel Take out the pre filter the stam...

Page 23: ...of spacer A and remove relay PWB 5 Removing the fan 1 Loosen the nut and remove the fan washer the rubber washer the fan washer the fan the fan washer T2 and the washer 2 The tie torque of the nut is 1 5 Nm 3 Apply the screw lock Three Bond 1401B to the shaft and tighten the nut To reduce the fan face runout never touch the periphery of the fan when tightening the nut Relay PWB Connector J Spacer ...

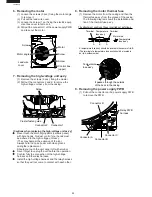
Page 24: ... Confirm fully the connection of the high voltage harness and the relay harness Install the high voltage harness and the relay harness so that they will not come to contact with each other 8 Removing the motor thermal fuse 1 Remove the motor from the casing and then the thermal fuse ass y from the groove of the casing The following diagram shows the installation posi tion of the thermal fuse ass y...

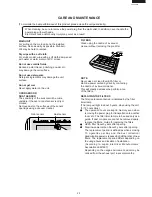
Page 25: ... nozzle of a vacuum cleaner without removing the pre filter NOTE Never wash or clean the HEPA filter or stamina power carbon by directly con tacting the nozzle of a vacuum cleaner This will greatly decrease the perform ance of the filters REPLACING THE FILTERS The filter replacement period is indicated by the filter timer lamp The lamp will light in about 5 years when using the unit for 12 hours d...

Reviews: