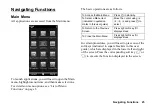
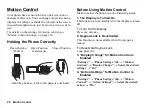
background image

Motion Control

29

Motion Control Functions

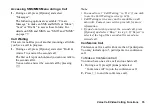
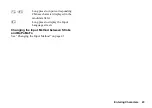
1. Change the Direction of the Screen

When Document Viewer 
or the WAP/Web browser 
is activated, the screen 
automatically changes 
direction to the portrait or 
landscape position 
according to the direction 
the phone is held.

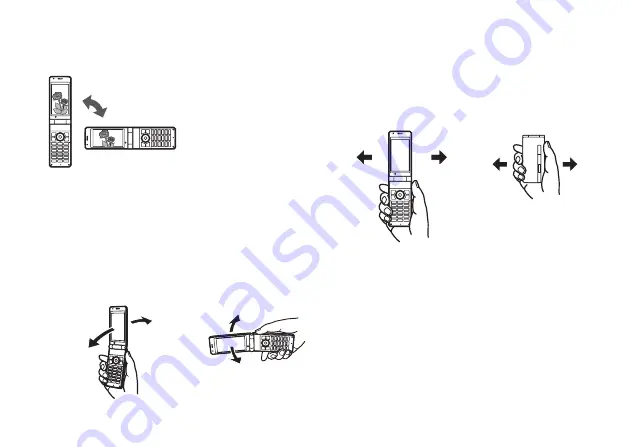
2. Enlarge or Shrink the Contents of the Screen

Enlarge or shrink the font size of the text in messages 
by shaking the phone forward or backward. You can 
also enlarge/shrink pictures being viewed and the 
screen contents of WAP/Web pages or documents 
being viewed with Document Viewer.

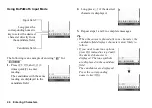
3. Select a Sound File or Picture

Select the previous or next picture, sound or document 
file by shaking the phone once to the left or to the right. 
You can also change the page being viewed.

Shrink

Enlarge

Shrink

Enlarge

Only available for Document 
Viewer and WAP/Web pages.

Open Position

(Portrait)

Open Position

(Landscape)

Open Position

(Portrait)

Closed Position

Only available for sound files.

Summary of Contents for HRO00084

Page 1: ...th the essential requirements and other relevant provisions of Directive 1999 5 EC A copy of the original declaration of conformity can be found at the following Internet address http www sharp mobile com This device can be used indoors only when not jamming lawful radio stations and when protected from interference X XXX ...

Page 2: ...d or registered trademarks of their respective holders Screen layout may differ from that illustrated in this user guide The information described in this user guide is subject to change without notice All the functions described in this user guide may not be supported by all networks We assume no responsibility for downloaded contents information etc from the network Occasionally a few black or b...

Page 3: ...iliates in the United States and or other countries XT9 Mobile Interface is licensed under one or more of the following U S Pat Nos 5 187 480 5 818 437 5 945 928 5 953 541 6 011 554 6 286 064 6 307 548 6 307 549 6 636 162 6 646 573 6 970 599 6 801 190 7 030 863 7 088 345 7 088 861 7 164 367 Australia Pat Nos 727539 746674 747901 Austria Pat Nos AT225534 AT221222 Brazil P I No 9609807 4 Canada Pat ...

Page 4: ...20 5 416 797 5 659 569 5 710 784 5 778 338 This product contains NetFront Browser and NetFront Messaging Client of ACCESS CO LTD ACCESS and NetFront are trademarks or registered trademarks of ACCESS CO LTD in Japan and other countries NetFront Browser Copyright 1996 2007 ACCESS CO LTD NetFront Messaging Client Copyright 2000 2007 ACCESS CO LTD This software is based in part on the work of the Inde...

Page 5: ...dditional license and payment of royalties are necessary for encoding in connection with i data stored or replicated in physical media which is paid for on a title by title basis and or ii data which is paid for on a title by title basis and is transmitted to an end user for permanent storage and or use Such additional license may be obtained from MPEG LA LLC See http www mpegla com for additional...

Page 6: ...or sending up to 300 KB and receiving mail with attachments A colour WAP Web browser for accessing information on the mobile Internet Your own ringtones and ring video clips You can use sound or video clip files as a ringtone or ring video clip A music player that can play back MP3 MPEG 4 and 3GPP format sound files supported codec of MPEG 4 or 3GPP are AMR AAC AAC and AAC e Playback of downloaded...

Page 7: ...vigating Functions 25 Main Menu 25 Shortcut Keys 26 Shortcuts 27 Motion Control 28 Voice Call Video Calling Functions 32 Entering Characters 40 Changing the Input Language 40 Changing the Input Method 41 User Dictionary 45 Entering Pictograms and Symbols 47 Using the Notepad 47 Insert Phonebook Entries 48 Call Manager 49 Sending a Message from the Phonebook 52 Multimedia 57 Camera 64 Launching the...

Page 8: ...152 Connecting WX T930 to Your PC 158 System Requirements 158 3G GSM Modem 158 Handset Manager 160 Music Manager 161 Sync Manager 163 Troubleshooting 164 Safety Precautions and Conditions of Use 166 Conditions of Use 166 Mobile Light LED Properties 167 Environment 169 Precautions Concerning Vehicle Use 170 SAR Taiwan 170 SAR Europe 171 FCC NOTICE 171 Out of Warranty List 174 Index 175 Quick Refere...

Page 9: ... Stopwatch p 117 2 Countdown Timer p 118 3 World Clock p 118 4 Hour Minder p 119 Tab 3 Tools 3 1 Document Viewer p 119 2 Notepad p 120 3 Voice Recorder p 121 4 Scanner p 122 5 Phone Help p 123 6 Scratch Pad p 123 4 Messages 1 Create Message p 78 2 Message p 81 3 Email p 81 4 Alert Inbox 5 Cell Broadcasts p 83 6 Area Info p 84 7 Messaging Settings p 84 8 Memory Status 5 Camera p 64 1 Still Camera p...

Page 10: ...137 12 Master Reset p 139 Tab 2 Call Video Call 1 Voicemail Diverts p 139 2 Video Calling Settings p 141 3 Show Your Number p 142 4 Restrict Calls p 143 5 Minute Minder p 145 6 Auto Answer p 145 7 Call Waiting p 146 8 Display Call Timer p 146 9 Display Call Cost p 146 10 Auto Redial p 146 Tab 3 Network Settings 1 Network Settings p 146 2 Off Line Mode p 147 3 Internet Settings p 148 10 SIM Applica...

Page 11: ...900 1800 1900 GPRS phone Rechargeable Li ion Battery AC Charger Stereo Handsfree Chinese User Guide Optional Accessories Li ion Spare Battery Cigarette Lighter Charger USB Data Cable Handsfree Microphone Unit Stereo Headset The above accessories may not be available in all regions For details please contact FarEasTone ...

Page 12: ...Your Phone 11 ...

Page 13: ...12 Getting Started Getting Started 1 13 14 18 19 17 15 20 21 16 2 5 6 3 7 8 9 10 11 12 4 24 25 26 27 23 22 31 35 34 30 28 29 32 33 ...

Page 14: ...lays Message menu in stand by 8 Shortcut Key E Displays Shortcut menu 9 Send Redial Key D Makes voice calls or accepts calls and displays the call logs in stand by 10 Voicemail Key G Long press to connect to the Voicemail centre Depending on the SIM USIM card 11 Shift Key P Switches character input method as follows on the text entry screen In English mode Abc ABC abc and 123 In XT9 mode XT9 Abc X...

Page 15: ...enu Key g Displays Profile menu in stand by Long press to switch the Silent profile on off 21 Microphone 22 External Display 23 Small Light Flashes when an incoming call or a new message is received or missed if Event Light p 125 or Status Light p 126 is enabled 24 External Connector Used to connect either the charger or a USB data cable 25 Mobile Light Key i When the phone is open and the camera ...

Page 16: ... Cover 31 Camera External Camera 32 Built in Aerial Warning Do not cover the hinge area of the phone with your hand when in use as this may interfere with the performance of the built in aerial 33 Mobile Light Used as an auxiliary light 34 Handsfree Kit Microphone Connector 35 microSD Card Slot ...

Page 17: ...e SIM USIM holder 3 Hold the battery so that the metal contacts of the battery are facing down slide the guides on the top of the battery into the battery slots and then insert it 4 Replace the battery cover Note Make sure that only 3V SIM USIM cards are used Make sure that the standard accessory battery is used 1 2 3 SIM USIM card 5 4 ...

Page 18: ...g the Battery You must charge the battery for at least XXX minutes before using your phone for the first time Using the Charger 1 Open the cover of the external connector and connect the charger horizontally to the external socket located at the bottom of the phone until it clicks 2 Extend the blades of the charger 3 Connect the charger to an AC outlet When the phone is charging the battery indica...

Page 19: ...rger from the AC outlet 2 Push and hold the side buttons of the charger then disconnect the charger from the external socket of the phone 3 Close the cover Note Do not use any non approved chargers as they may damage your phone and invalidate any warranties see Battery on page 167 for details Forcibly disconnecting the charger may cause malfunction To Charge Using the Cigarette Lighter Charger The...

Page 20: ...ger as soon as possible The phone may not be able to continue normal operation if you continue to use it Inserting Removing the Memory Card Note Make sure that the phone is turned off before inserting removing the memory card Be sure to insert the card in the correct direction and orientation Keep all memory cards out of the reach of small children 1 Turn off the phone 2 Open the microSD card slot...

Page 21: ...ing indicators when the memory card is in use Appears when the card is inserted Appears when the card is damaged or unusable Make sure the card is properly inserted Appears when the card is being accessed Appears when the card is being read Appears when the card is being formatted Connecting the Handsfree Kit 1 Open the connector cover 2 Connect the handsfree kit ...

Page 22: ...your PIN code is entered incorrectly three times in a row the SIM USIM card is locked See Enabling Disabling the PIN Code on page 137 If the clock settings have not been entered the date and time entry screen is displayed p 134 To Copy All Phonebook Entries from the SIM USIM Card When you insert the SIM USIM card into your phone for the first time and start the Phonebook application you are asked ...

Page 23: ... Roaming outside network 2 Connection to the server established communicating 3 Voice call incoming in progress 4 Video calling communication mode enabled voice video voice and video 5 Alerts text message and multimedia message Email 6 Mailbox full 7 Voice Calls diverts set to Always Right soft key Centre key Left soft key Indicator area ...

Page 24: ...ting silent vibration enabled silent and vibration enabled 12 Speaker mode speaker phone on microphone muted 13 Memory card inserted 14 Battery level 15 Daily alarm enabled 16 Schedule entry enabled with without reminder alarm 17 Outbox contains unsent messages text message multimedia 18 WAP OTA provisioning alerts WAP alert OTA provisioning alert WAP and OTA provisioning alerts 19 Voicemail messa...

Page 25: ...ng required empty 2 Clock 3 Strength of received signal Service out of range 4 Missed events 5 Voice call incoming 6 Call in progress 7 Alerts messages Delivery Report 8 Alarm enabled Daily alarm Schedule alarm Task alarm 9 Sound file being played 10 Streaming 11 Stopwatch countdown timer 12 OBEX data incoming 13 Voice Recorder activated ...

Page 26: ...ll need to press one of the soft keys indicated in square brackets in this user guide which are displayed in the lower left and right of the screen Press the corresponding soft key A or C to execute the function displayed in the screen To Access the Main Menu Press B in stand by To Select a Menu Item indicated in quotation marks in this user guide Move the cursor using a b c d and press B to selec...

Page 27: ... for the corresponding number on the Main menu For numbers 10 to 12 press B and P 10 Q 11 or R 12 For menus with tabs press d or c when necessary to select the desired tab before pressing the digit keys See List of Menu Functions on page 8 Shortcuts are listed in the headings of this user guide Example p 147 To Access Off Line Mode Sub Menu Off Line Mode Settings Network Settings tab Off Line Mode...

Page 28: ... O Bluetooth To Use the Shortcut Key 1 Press E in stand by 2 Select the desired item or number To Customise the Assigned Shortcuts 1 Press E in stand by 2 Highlight the shortcut you wish to customise from G O 3 Press Options and select Assign The list of the available items is displayed 4 Select the desired item Note To move the item in the list that appears in step 1 highlight the item press Opti...

Page 29: ...tatus 1 The Display is Turned On This function is not available when the display is turned off To Turn On the Display Press any side key 2 Keypad Lock is Deactivated This function is not available when the keypad is locked To Deactivate Keypad Lock Long press P 3 Display Change for Motion Control is Enabled Settings Phone Settings tab Motion Control Display Change Select the desired settings On 4 ...

Page 30: ... by shaking the phone forward or backward You can also enlarge shrink pictures being viewed and the screen contents of WAP Web pages or documents being viewed with Document Viewer 3 Select a Sound File or Picture Select the previous or next picture sound or document file by shaking the phone once to the left or to the right You can also change the page being viewed Shrink Enlarge Shrink Enlarge On...

Page 31: ...pending on the volume and the type of sound some ringtones or alarm tones may not be muted Showing Secret Data Temporarily The hidden data in the Phonebook or Calendar can be displayed temporarily by shaking the phone 1 Enter the handset code in stand by 2 Shake the phone to the left or right The hidden data can be displayed temporarily To hide the data again display the stand by screen and close ...

Page 32: ...when an action is recognised Note Motion control may not function correctly depending on the way the phone is held or shaken When shaking the phone try to keep it as level as possible Do not shake the phone at an angle When using motion control make sure to hold on to the phone firmly and not to shake the phone too strongly Confirm that there is enough space around you to ensure the safety of othe...

Page 33: ...s emergency number can normally be used to make an emergency call in any country with or without a SIM USIM card inserted if a 3G UMTS GSM network is within range International Calls 1 Long press Q until a international dialling prefix sign is displayed 2 Enter the country code followed by the area code without the leading zero and the phone number and press D to dial Adding an Entered Phone Numbe...

Page 34: ...m All Calls Dialled Numbers Missed Calls or Received Calls To switch logs press c or d 3 Highlight the phone number you wish to call 4 Press D to redial a voice call or T to redial a video calling Answering a Voice Call When an incoming call is detected the phone rings 1 Press D or B to answer the call Or press any key except F U Options or Busy when the Any Key Answer function is enabled Set the ...

Page 35: ...ss W or b c to decrease the volume 3 Press B when the volume is set to the desired level Turning the Speaker On and Off You can talk via the loudspeaker on the phone when it is on 1 During a call press B Putting a Call on Hold This function allows you to manage two calls at the same time If you wish to make another call while you are talking to someone you can put the current call on hold to call ...

Page 36: ...d caller You can also answer the second call by pressing D Note You need to set Call Waiting to On if you wish to use the Call Waiting service p 146 Call Waiting service may not be available on all networks Contact your service provider for more information If you do not wish to answer the second call press Options and select Busy in step 1 If Reject is selected the log of the second call is saved...

Page 37: ...n the conference call and press D to dial 3 Press Options and select Conference All to join the conference call If you wish to add other participants repeat steps 1 to 3 To End the Call with a Conference Call Participant 1 During a conference call highlight the person that you wish to disconnect from the conference call 2 Press Options and select End This Call To Have a Private Conversation with O...

Page 38: ...he called party and yours are displayed on the screen Tip If the called party s phone is not video calling enabled you can press F and enter the phone number again to make a voice call Answering a Video Calling When an incoming call is detected the phone rings 1 Press D to answer the call with video or press B or Options and select Hide Picture to answer with voice only Tip If you have subscribed ...

Page 39: ...d select Camera Picture 2 Select Internal Camera External Camera or Alternative Image Internal Camera The image through the sub camera is displayed and sent to the receiver External Camera The image through the camera is displayed and sent to the receiver Alternative Image The camera is turned off and the image selected in Alternative Image of Video Calling Settings p 141 is used Turning the Speak...

Page 40: ...ect Video Calling Settings 2 Select Backlight 3 Select Always On Always Off or As Normal Setting When Always On is selected the backlight will always be on during a video calling When As Normal Setting is selected the backlight will time out depending on the Backlight setting p 129 To Adjust the Video Exposure 1 During a video calling press Options and select Video Calling Settings 2 Select Exposu...

Page 41: ...Press the following keys to Long press the following keys to Changing the Input Language 1 On the text entry screen press Options and select Input Language 2 Select the desired language G Enter full stop comma apostrophe 1 Q Enter space 0 P Switch character case among four modes Abc ABC abc and 123 R Display the pictograms and symbols selection screen G O Enter 1 9 numbers Q Enter space in Numeric...

Page 42: ...ode you can switch input mode as follows by pressing P English XT9 mode English Multi tap mode Traditional Chinese XT9 mode Input Method Input Language English Input Language Traditional Chinese Input Language Simplified Chinese XT9 Mode XT9 Abc XT9 ABC XT9 abc XT9 BoPoMoFo XT9 Stroke XT9 PinYin XT9 Stroke Multi tap mode Abc ABC abc Numeric Abc ABC abc Numeric Abc ABC abc Numeric ...

Page 43: ...o enter characters 5 Press a or b to select the word you wish to input 6 If you wish to clear the word highlight it and long press U 7 Press B to complete the selection Tip If you press Q instead of step 6 a space is inserted next to the selected word XT9 BoPoMoFo and XT9 Stroke Mode In XT9 BoPoMoFo and XT9 Stroke mode keys are as follows XT9 BoPoMoFo and XT9 Stroke Mode Keys Key BoPoMoFo Stroke S...

Page 44: ...Long press to input corresponding Chinese character displayed in the candidate field R Long press to display the Input Language screen Changing the Input Method between Stroke and BoPoMoFo See Changing the Input Method on page 41 ...

Page 45: ...d 2 to complete messages Tip When the cursor is placed after one character the candidate field displays characters most likely to follow If you want to use tone options press R instead in step 2 until the desired character is displayed The tone symbols are displayed in the candidate field The candidates are displayed Press the corresponding numeric key H Long press the corresponding numeric key to...

Page 46: ...ong pressing the corresponding numeric key User Dictionary You can create your own word list for alphabet text and XT9 Chinese input English User Dictionary Note This function is only available when Input Language is set to English To Create a New Entry 1 On the text entry screen press Options and select User Dictionary 2 Select Add New Word 3 Enter a new word To Edit a Word in the List 1 On the t...

Page 47: ...e is set to Traditional Chinese or Simplified Chinese To Create a New Entry 1 On the text entry screen press Options and select Chinese User Dictionary 2 Select Add New Word 3 Enter a new word To Edit a Word in the List 1 On the text entry screen press Options and select Chinese User Dictionary 2 Highlight the desired word 3 Press Options and select Edit 4 Modify the entry word To Delete a Word 1 ...

Page 48: ...ry screen press C To switch the displayed pictogram list on the pictogram input screen press A 2 Select the pictogram or symbol you wish to use and press B Note Pictograms are only available for SMS MMS messages and Notepad Using the Notepad You can use the phrases registered in the Notepad when entering characters For details on creating a Notepad entry see Adding Phrases to the Notepad on page 1...

Page 49: ...int you wish to paste the letters 6 Press Options and select Advanced 7 Select Paste 8 Select the desired item Insert Phonebook Entries You can insert the entries registered in Phonebook when entering characters For details on creating the Phonebook entries see Call Manager on page 49 1 On the text entry screen move the cursor to the point you wish to insert the Phonebook Entry 2 Press Options and...

Page 50: ...tails Selecting the Storage Memory You can choose either the phone or SIM USIM card memory locations to store the new entry Call Manager Phonebook Settings Save to 1 Select from Handset SIM or Choice Tip Choice prompts you to choose the memory every time you save a new entry Registering a New Entry Call Manager Add New If you select the Choice option for the memory to be used the selection is betw...

Page 51: ...anging the List Displayed Call Manager Phonebook Settings Source 1 Select from Handset SIM or Both Finding a Name Call Manager Phonebook 1 Enter the first few letters of the name The first name corresponding to the entered letters is highlighted Sorting the Phonebook Entries When Simplified Chinese is selected you can change the listing order of the Phonebook entries to PinYin order or by differen...

Page 52: ...ess D voice call or T video calling You can also dial from the details screen of the Phonebook On the details screen select the desired phone number and press D voice call or T video calling Dialling a Service Phone Number Certain SIM USIM cards contain service phone numbers that can be dialled Contact your SIM USIM card vendor for more information On the Phonebook screen Service Dialling No is di...

Page 53: ...up on the Group List screen To Add Recipients to a Group Up to 20 recipients can be registered in each list Call Manager Message Groups 1 Select the desired group name 2 Select Assign New Entry 3 Select the desired entry The detailed screen is displayed 4 Select the desired phone number or Email address Tip If you modify the entry assigned in the group you need to re assign it to the group Select ...

Page 54: ...te If you delete a picture in the handset memory the corresponding thumbnail is also deleted You can take a picture for a thumbnail by selecting Take Picture in step 4 Assigning a Ringtone or a Ring Video Clip to Each Entry Call Manager Phonebook 1 Highlight the desired entry 2 Press Options and select Edit 3 Select Tone Video for Voice Call Tone Video for Video Calling or Tone Video for New Messa...

Page 55: ... entry 2 Press Options and select Delete Managing the Phonebook Copying Phonebook Entries between SIM USIM Card and Handset Call Manager Advanced Copy All Entries 1 Select From SIM to Handset or From Handset to SIM Note When you insert the SIM USIM card into your phone for the first time and start the Phonebook application the confirmation screen is displayed automatically asking you if you wish t...

Page 56: ...r Bluetooth wireless settings see Connectivity on page 152 Manage Groups Different ringtones can be set for each group If you do not change a group ringtone the ringtone assigned in the Profiles menu is used Call Manager Manage Groups 1 Highlight the desired group 2 Press Options and select Assign Tone Video 3 Select For Voice Call For Video Calling or For New Message 4 Select Assign Tone 5 Select...

Page 57: ...ted digit key Tip The nine digit keys G O correspond to Speed Dial list numbers To Change the Speed Dial List or the Speed Mail List Call Manager Speed Dial List 1 Select the entry you wish to change 2 Press Options and select Change 3 Select the Call number or Mail address you wish to modify 4 Press Change 5 Select the phone number or Email address to assign If you wish to remove the entry select...

Page 58: ... to change the volume level Pressing H changes the size of the video display in the following order Normal Size Enlarge Full screen Widescreen and Cinema Screen Note that this does not change the Display Size setting Pressing Q displays the help information To Play Back or Resume Playback of the Last File Multimedia Video Player Last Played Video Searching for a File to Be Played Back Multimedia V...

Page 59: ...hlight the file in the playlist and press Options Then select Delete from Playlist Adding a New Playlist You can create a playlist and register desired files in it Multimedia Video Player My Videos 1 Select Handset Memory or Memory Card 2 Press Options and select Add New Playlist 3 Enter the desired playlist name 4 Press B Note To delete the playlist highlight the playlist and press Options Then s...

Page 60: ...ndom Backlight Always On Lit while the file is played back Always Off Unlit while the file is played back even if a key is pressed Normal Settings Works with the main backlight setting p 129 AV Mode Various AV modes are available including Normal Effect 1 Effect 2 Effect 3 and Effect 4 Display Size Normal Size Displays the file in its original size Enlarge Displays the file in an enlarged size Ful...

Page 61: ...es you have accessed Settings The Backlight Display Size and Sound Effect settings Music Player Music Player supports MP3 MPEG 4 and 3GPP format sound files You can access other menus while listening to sound files Playing Back Sound Files Multimedia Music Player My Music 1 Select the item you wish to play back All Music All sound files are displayed Artists The names of all artists are displayed ...

Page 62: ...d files in both the handset and the memory card are displayed in a single view When listening to music using an A2DP compatible Bluetooth handsfree device play back the file from Music Player To select the playback pattern press Options and select Playback Pattern Normal Plays back all files in the selected folder once and stops playback Repeat Continues playback of selected file in the selected f...

Page 63: ...the title Sorting Files Multimedia Music Player My Music All Music 1 Press Options and select Sort 2 Select By Title By Artist By Album or By Genre Sort results are displayed Adding a File to the Playlist You can add files to a playlist Multimedia Music Player My Music All Music 1 Highlight the file you wish to add to the playlist 2 Press Options and select Add to Playlist The playlists are displa...

Page 64: ...a Music Player My Music Playlists 1 Press Options and select Add New Playlist 2 Enter the desired playlist name Note To delete the playlist highlight the playlist and press Options Then select Delete Playlist You can create up to 99 playlists Downloading Music Files Multimedia Music Player Download Music The music file download site is displayed ...

Page 65: ... or video camera used previously is launched from the next time Taking Pictures Camera Still Camera 1 Press B to take the picture The shutter sounds and the still image of the taken picture is displayed 2 Press B to save the picture The taken picture is saved in Gallery To cancel press U To send the taken picture press C in step 2 Note When the video camera is launched press C The portrait or land...

Page 66: ... clip select Send and then select As Message Bluetooth or Infrared For As Message For details see MMS on page 77 For Bluetooth For details see Bluetooth on page 152 For Infrared For details see Infrared on page 155 For further procedures see Creating a New Message on page 78 Note You can only send video clips when For Message is selected for the recording time For details see Selecting the Recordi...

Page 67: ...amera Video Camera Options Record Settings Exposure 1 Press d Bright or c Dark Dark Normal Bright Once the phone has returned to stand by the brightness settings return to default Switching the Focus Mode Camera Still Camera Options Shooting Settings Focus Camera Video Camera Options Record Settings Focus 1 Select the desired option Centre Auto Focus still camera mode only Face Auto Focus still ca...

Page 68: ...ra Options Self timer 1 Select 10sec 5sec or 2sec When you select one of these options the corresponding indicator or is displayed on the screen Select Off to cancel the self timer Selecting the Storage Memory Select the appropriate option Camera Still Camera Options Settings Save New Pictures Camera Video Camera Options Settings Save New Videos 1 Select the desired location from To Handset Memory...

Page 69: ...ra Options Help Mobile Light To Change the Mobile Light Mode Set the mobile light according to your purpose Camera Still Camera Options Mobile Light Camera Video Camera Options Mobile Light 1 Select the desired mode On The light is always on Auto The light turns on if the phone detects that the conditions are dark Low Light still camera mode only Select this mode for macro shooting Off The light i...

Page 70: ...o Ext Camera Common Shortcut Keys If multiple options exist they switch each time you press each of the following keys Still Camera Video Camera D Focus Lock G Focus H Switches Viewfinder between with and without indicators Switches the display modes in the Preview screen I Scan Barcode J Save New Pictures Save New Videos K Picture Size L Scene Microphone M Picture Quality Video Quality N Self tim...

Page 71: ...20 1200 1600 960 1280 768 1366 480 854 480 640 240 320 120 160 Internal Camera 240 320 120 160 Tip Picture Size is also available from the following procedure Camera Still Camera Settings Using Face Auto Focus Faces of up to 5 people can be focused on automatically using this function Camera Still Camera Options Shooting Settings Focus 1 Select Face Auto Focus Note Certain faces may not be recogni...

Page 72: ...ing this mode select Fast or Normal Note When you select Manual to take continuous pictures press B manually at the desired speed Taking Panorama Pictures Camera Still Camera Options Modes Panorama 1 Select On and press B 2 Move the phone slowly to keep the mark aligned with the assisting lines and press B 3 Select Save Note The image is captured automatically if the bar in the lower right turns b...

Page 73: ...ed at 4 seconds 2 Press B to take the picture The progress of the exposure and image processing is displayed The still image of the taken picture is displayed when the image processing is done 3 Press B to save the picture The taken picture is saved in Gallery To cancel press U To send the taken picture press C in step 3 Note When Long Exposure is set to On and is used during the day or in bright ...

Page 74: ...ay after selecting the desired frame Press B to select the frame and display the viewfinder Note Images larger than 240 pixels W 320 pixels H cannot be used Selecting the Scene You can select the appropriate mode by scene when you take a picture Camera Still Camera Options Scene 1 Select from Auto Night Sports Text Pet Against Sun or Portrait Using the Full Screen You can display the preview on th...

Page 75: ...ume p 131 is set to Silent to prevent unauthorised use Tip Shutter Sound is also available from the following procedure Camera Still Camera Settings Settings Saving a Photo in the Background Camera Still Camera Options Settings Background Saving 1 Select On or Off When On is selected the taken picture is automatically saved in Gallery without pressing B again and your phone is ready to take anothe...

Page 76: ...e Selecting the Display Size Camera Video Camera Options Display Size 1 Select Standard or Expand Selecting the Recording Time and Picture Size Camera Video Camera Options Record Time Size 1 Select For Message or Extended Video For Message Limits the size to send a message depending on service providers Extended Video Less than 30 minutes depending on the memory 2 Select the desired picture size I...

Page 77: ...following procedure Camera Video Camera Settings Recording Video Clips with Sound To record a video clip with sound the microphone needs to be activated Camera Video Camera Options Microphone 1 Select On or Off Note The microphone is already turned on in the default setting Select Off to record a video clip without the sound The file size of a video clip can be reduced if the sound is not recorded...

Page 78: ...r half width When the symbol is full width it is counted as two English characters or one Chinese character When the symbol is half width it is counted as one English character Long SMS WX T930 supports Long SMS which allows you to send text messages up to 335 Chinese or 765 English characters If the number of characters in a message exceeds this number the message is automatically delivered by MM...

Page 79: ...ptions and select Change to To Change to Cc or Change to Bcc To add a subject highlight the subject field and press B Then enter the subject in the subject entry screen and press B 4 Place the cursor in the message field 5 Press B to display the message entry screen Enter the message and press B 6 Press Options and select Send Send is not available when no recipients are set After the message is s...

Page 80: ...Phonebook Attach Appointment Others or Flash When selecting Attach Phonebook or Attach Appointment go to step 4 3 Select the desired option and then select the desired file If you wish to attach pictures sounds or video clips that are saved select Saved Pictures Saved Sound or Saved Video If you wish to take new pictures record sounds or video clips select Take Picture Record Voice or Record Video...

Page 81: ...ct Send After the message is sent the message is moved to the Sent box Note The current message size displayed while you are creating the message is an approximation If a message cannot be sent for some reason the message stays in the Outbox and the is displayed in stand by To send the message in the Outbox highlight the message press Options and select Resend Tip To save the message without sendi...

Page 82: ...he motion control setting for Messaging is set to On p 136 you can change the size of the text by shaking the phone forward or backward Storing the Phone Number of a Sender in the Phonebook SMS MMS Messages Message Inbox Email Messages Email Inbox 1 Select a folder 2 Highlight the message from which you wish to store the phone number or Email address 3 Press Options and select Save Address For det...

Page 83: ...ts listed in the original To or Cc lists 4 Select Reply or Reply with History 5 Enter the message 6 Press Options and select Send Send is not available when no recipients are set Forwarding a Message SMS MMS Messages Message Inbox Email Messages Email Inbox 1 Select a folder 2 Highlight the message you wish to forward 3 Press Options and select Forward 4 Perform steps 1 to 6 in Creating a New Mess...

Page 84: ...ages 1 Select the desired subject 2 Scroll the screen to read the message 3 Press U Setting Languages for Cell Broadcast Messages Messages Cell Broadcasts Settings Language 1 Highlight the desired language and press B to check 2 Press Save Subscribing to Cell Broadcasts Select the page of the cell broadcast message that you want Messages Cell Broadcasts Settings Set Info Subjects 1 Select Add Remo...

Page 85: ...elect Edit to edit current signature Auto Delete Sets whether to delete the oldest message automatically when the Inbox Sent or Both Inbox and Sent is full Message List View Switches the mailbox listing Inbox Display Settings Switches the Inbox listing Sent Box Display Settings Switches the Sent box listing Scroll Unit Scroll through messages by Single Line Half Page or Whole Page Message Type Set...

Page 86: ...numbers can be registered If you wish to enter a country code for a message to an international number long press Q until a sign is displayed Reply Path Enables or disables adding a reply path to the message Connection Type Sets the preferred connection type GPRS Preferred CSD Preferred MMS Settings Messages Messaging Settings MMS Settings 1 Select the item you wish to set up MMS Accounts Select t...

Page 87: ...equired to inform the sender that the message has been read Expiry Time This indicates the number of days and hours for which a message you send may remain undelivered to the message recipient During this period the message service centre will continually try to deliver the message to the recipient Slide Duration Sets the duration of the slide Slide Auto Play Enables or disables Slide Auto Play Se...

Page 88: ...ttings Messages Messaging Settings Email Settings To Set an Email Account 1 Select Email Accounts and then select Create New 2 Select the item you wish to set up Account Name Email account name unique name Incoming Server Server Name User ID Password Port Number APOP Authentication and Encryption for the incoming server Outgoing Server Server Name User ID Password Port Number SMTP Authentication a...

Page 89: ... O can be used for speed mail A total of 8 data items can be assigned to these keys For details see page 56 1 Press a digit key in stand by 2 Press A to display the message screen The Email address assigned to the digit key pressed in step 1 is automatically entered in the recipient field To add a subject highlight the subject field and press B Then enter the subject in the subject entry screen an...

Page 90: ...surfing on the mobile Internet where you can get a lot of useful information Normally pages are designed for a mobile phone Your phone is already set up to FET Mobile Internet site for Browser MMS Settings Main Menu FET Mobile Internet Homepage The FET Mobile Internet service page is displayed FET Mobile Internet Bookmarks See page 90 FET Mobile Internet Alert Inbox WAP Push alerts are displayed F...

Page 91: ...otion control setting for Browser is set to On p 136 you can change screen direction to the portrait position or landscape position according to the phone Editing Bookmarks FET Mobile Internet Bookmarks 1 Select the desired URL and press Options You can edit the list of Bookmarks by the following options When a bookmark is highlighted Edit Edits the URL address of the bookmark Add New Bookmark Cre...

Page 92: ...te Folder Creates new folders Browser Settings FET Mobile Internet Browser Settings Font Size Sets the font size for browsing Scroll Settings Sets the scroll units and turns page navigation on off Cursor Settings Sets whether or not to show the cursor and its speed Downloads Sets whether or not to show images or play back sound when accessing a WAP Web page Memory Operation Clears Cache Cookies or...

Page 93: ... Displays the Bookmarks menu See page 90 My Saved Page Displays all the browser screenshots saved in the handset memory Copy Text Copies the text on the WAP Web page Reload Page Reloads the WAP Web page to get updated information Go to URL Allows you to type in the URL of a site directly Handset browser will go to the WAP Web page that you entered Save Items Saves items from the browsing pages Con...

Page 94: ...g for Image Viewer is set to On p 136 you can zoom in or zoom out by shaking the phone forward or backward You can also change the picture being viewed by shaking the phone sideways Tip You can scroll through your pictures with P and R To change the default view of pictures Icon View Inline Display Grid View or Display Preview press Options select Manage Items and then select Change List View Usin...

Page 95: ...tion menus see Common Option Menus on page 97 Video Gallery Video clips that are recorded by your phone s video camera or video clips that are downloaded from mobile Internet sites can be viewed and organised Playing Back Video Clip Files Gallery Video Gallery 1 Select the file you wish to play back To pause playback press B To resume press B again To stop playback press U Note To switch between v...

Page 96: ... not available when playing back from Gallery To switch between viewing handset or memory card content select the first item in the options menu Using the Sound Files as a Ringtone Gallery Sound Gallery 1 Highlight the file you wish to use as a ringtone 2 Press Options and select Set as ringtone Tip For other option menus see Common Option Menus on page 97 Downloading Sound Files Gallery Sound Gal...

Page 97: ...eme Files Gallery Themes Download More The theme file download site is displayed Flash Playing Back Flash Files Gallery Flash 1 Select the file you wish to play back To stop playback press U Note Flash files of up to 150 KB can be played back Using Flash Files as Wallpaper Gallery Flash 1 Highlight the file you wish to use as wallpaper 2 Press Options and select Set as Wallpaper Using the Flash Fi...

Page 98: ...er in the Gallery menu Gallery contains the following folders Gallery Picture Gallery Gallery Video Gallery Gallery Sound Gallery Gallery Themes Gallery Java Gallery Gallery Flash Gallery Other Documents Activating Files with Copyright Protection DRM Some pictures sound files video clips Flash files and theme files have a digital copy protection program which is called DRM Digital Rights Managemen...

Page 99: ...tooth For details see Bluetooth on page 152 For Infrared For details see Infrared on page 155 Note Pictures Sounds Video clips Themes Flash files Other Documents data protected by copyright cannot be sent attached to a message with the exception of Separate Delivery files When pairing you need to enter your passcode when establishing contact with a Bluetooth wireless technology enabled device for ...

Page 100: ...97 2 Highlight the desired file 3 Press Options and select Delete To See the Gallery Details 1 Select the appropriate folder for the desired file type p 97 2 Highlight the file you wish to view the details of 3 Press Options and select Details Selecting Multiple Files You can select more than one item from Gallery for moving copying managing and deleting Note The following procedure applies when e...

Page 101: ... card Memory status covers the following Handset Memory Pictures Videos Sound Gallery Themes Java Gallery Flash Other Documents Others Total and Free Memory Card Pictures Videos Sound Gallery Themes Flash Other Documents Others Total and Free Gallery Memory Status 1 Select Handset Memory or Memory Card M 6 8 ...

Page 102: ...wnloaded 2 Press B to start downloading 3 Press B when finished Note User authentication may be required before downloading the application on some information screens Executing Applications Java Java Gallery 1 Select the title of the application you wish to execute The selected application is executed When using network connection type applications connection to the network can be selected 2 To e...

Page 103: ... Write User Data Sets permission to write entries in your phone such as Phonebook entries mailbox Inbox and Gallery data Use Multimedia Sets permission to use the multimedia recording 4 Select one of the following options Always Ask The confirmation message is displayed every time network access is executed Ask Once The confirmation message is displayed the first time network access is executed Ne...

Page 104: ...ume of the application such as the sound effect to one of the five levels or silent When the profile is set to Silent the General Volume setting p 131 has priority Java Java Settings Application Volume 1 Press a or d to increase the volume or press b or c to decrease the volume and then press B Backlight Java Java Settings Backlight Switch On Off 1 Select from Always On Always Off or Normal Settin...

Page 105: ... or Push Request 2 Select the desired method Call Priority Message Priority Alarm Priority or Request Priority The application is suspended automatically and you can receive a call or a message the alarm will sound or Bluetooth connection will start After finishing the call or receiving the message or when the alarm or Bluetooth connection ends the suspend indicator is displayed letting you know t...

Page 106: ...from after 15 min to after 6 hours Surround 1 You can set surround sound for Java applications Java Java Settings Surround 1 Select On or Off Default Settings Java Java Settings Set to Default 1 Enter your handset code The default handset code is 9999 For details on changing the handset code see Changing the Handset Code on page 138 Clearing All Memory Java Java Settings Memory All Clear 1 Enter y...

Page 107: ... reminder date and time 7 Press Save Note If the date and time settings have not been entered the date and time entry screen is displayed p 134 The reminder will not sound when the profile is set to Silent but will sound when General Volume p 131 is set to Silent You can display the Stamp screen by pressing H in the monthly and 3 month calendar view Select the desired category To Change the Settin...

Page 108: ...w only J Displays the Set Colour screen K Moves the cursor to today L Displays the Find By Subject screen N Displays the Go to Enter Date screen O Displays the Find By Category screen c d Moves the cursor to left the previous day or to right the next day a b Moves the cursor upward last week or downward next week Weekly view P Displays the previous week R Displays the next week Q Displays the Help...

Page 109: ...ettings 2 Select Set Colour 3 Select By Week and then select days of the week you wish to colour 4 Select the desired colour Tip The selected date days are also highlighted on the calendar on the stand by screen Note If the same date is set with both a date colour and a day of the week colour the date is highlighted in the date colour Up to 100 days can be set for the highlights Setting a Holiday ...

Page 110: ... the day you wish to edit 2 Highlight the entry you wish to edit press Options then select Edit 3 Select the desired item and modify the entry 4 Press Save Deleting Schedule Entries 1 In any view press Options and select Delete 2 Select the desired option This Appointment daily view Deletes the selected entry All This Day Deletes all entries for the selected day All This Month monthly and 3 month ...

Page 111: ...oth For details see Bluetooth on page 152 For Via Infrared For details see Infrared on page 155 Note When pairing you need to enter your passcode when establishing contact with a Bluetooth wireless technology enabled device for the first time Receiving a Schedule Entry When the phone receives a schedule entry a confirmation message is displayed in stand by 1 Select Yes The received entry is saved ...

Page 112: ...subject for the alarm setting Repeat Sets the number of times the alarm sounds Assign Tone Video Assigns a tone or video clip file to the alarm Snooze Sets the snooze option Alarm Volume Sets the desired volume The alarm will not sound when Alarm Volume is set to Silent Vibration Sets the vibration pattern of the alarm For details on selecting a vibration see Vibration on page 133 Duration Sets th...

Page 113: ...d New Entry 2 Enter the subject 3 Enter the due date and time 4 Press Save Note If the date and time settings have not been entered the date and time entry screen is displayed p 134 To Select the Reminder Time 1 On the New Entry screen select Reminder 2 Select Reminder Time 3 Select the reminder time When selecting Other enter the desired reminder date and time To Change the Type of Alarm Tone or ...

Page 114: ...lect Alarm Settings 2 Select Vibration 3 Select On Link to Sound or Off To Set for the Silent Profile You can set whether to sound the alarm when the profile is set to Silent Organiser Tools 1 tab Tasks 1 Press Options and select Alarm Settings 2 Select For Silent Profile 3 Select Ring or Do not Ring To Set the Priority 1 On the New Entry screen select Priority 2 Select Normal High or Low To Chang...

Page 115: ... select Find 2 Select By Subject 3 Enter a few letters of the subject and press B Search results are displayed in time order To Search by a Due Date Organiser Tools 1 tab Tasks 1 Press Options and select Find 2 Select By Due Date 3 Enter a desired due date and press B Search results are displayed in time order Sending a Task Entry Organiser Tools 1 tab Tasks 1 Highlight the task entry you wish to ...

Page 116: ...on This Task Deletes the selected entry All Completed Tasks Deletes all checked entries All Tasks Deletes all entries Calculator The calculator function performs the 4 arithmetic calculations using up to 12 digits Organiser Tools 1 tab Calculator Key operations for calculation are as follows To enter a decimal point press P To clear the entered number or function press U To do the calculations pre...

Page 117: ...be converted 2 Press Options and select Currency Converter 3 Select Convert to Domestic or Convert to Foreign Expenses Memo You can record an expenses memo with pre defined or edited categories Recording in the Expenses Memo Organiser Tools 1 tab Expenses Memo Add New Expense 1 Enter the expenses using the digit keys 2 Select the desired category Expenses memo is registered Viewing Totals Organise...

Page 118: ...y Name Organiser Tools 1 tab Expenses Memo Edit Category 1 Select the desired category name 2 Modify the name Stopwatch You can store 4 lap times when using the stopwatch function Organiser Tools 2 tab Stopwatch 1 Press Start Press LAP to view the lap time before the stopwatch stops Last 4 lap times are saved 2 Press Stop Tip You can save a record of lap times and the stop time by pressing Options...

Page 119: ...en press Options and select Edit 2 Modify the desired time World Clock Setting the Time Zone Organiser Tools 2 tab World Clock 1 Press Edit and select Set Time Zone The current time zone is indicated by red line on the world map 2 Press c or d to change the time zone 3 Press Accept To Set the Custom Time Zone Organiser Tools 2 tab World Clock 1 Press Edit and select Set Time Zone 2 Press Custom 3 ...

Page 120: ...of the World Clock Document Viewer You can view PC documents Organiser Tools 3 tab Document Viewer 1 Select the file you wish to view To cancel reading press U or C Note You can view the following types of files with the document viewer PDF pdf Microsoft Excel xls Microsoft Word doc Microsoft PowerPoint ppt For the shortcut keys that can be used in the document viewer refer to the help by pressing...

Page 121: ...e viewed with the document viewer Notepad You can register up to 500 entries for use in text messages and multimedia messages The maximum capacity of the Notepad entry is 8192 characters Adding Phrases to the Notepad Organiser Tools 3 tab Notepad Add New Entry 1 Enter the text 2 Select the desired category Editing Notepad Entries Organiser Tools 3 tab Notepad 1 Highlight the entry you wish to edit...

Page 122: ... Press B to start recording To stop recording before the recording time is over press B 2 Select Save to save the voice clip Note Press a or V or b or W to adjust the sound volume when playing back the recorded file Sending Voice Clips Organiser Tools 3 tab Voice Recorder 1 Press B to start recording To stop recording before the recording time is over press B 2 Select Save and Send Selecting the R...

Page 123: ...ing on the scanned data Save The result is saved Send Message The result is sent as SMS or MMS Save to Notepad The result is saved as text Copy The result is copied To Set the Focus Mode Organiser Tools 3 tab Scanner Scan Barcode 1 Press Options and select Focus 2 Select Auto Focus Macro or Manual Focus To Use Continuous Scanning Organiser Tools 3 tab Scanner Scan Barcode 1 In scanning mode press ...

Page 124: ...1 Select Settings Method Common Functions or Key Operation 2 Press a or b Scratch Pad Scratch Pad can be used as a screen memo for multiple purposes Using the Scratch Pad Organiser Tools 3 tab Scratch Pad 1 Enter the text 2 Press B when finished 3 Select the purpose for using the entry The entry can be used for the following purposes Save to Notepad Save as Sticky Note Save to Calendar Save to Tas...

Page 125: ...124 SIM Application SIM Application You can refer to the information on the SIM USIM card Contact your service provider for further details M 10 ...

Page 126: ...gs Phone Settings tab Profiles 1 Highlight the profile you wish to reset 2 Press Reset 3 Enter your handset code The default handset code is 9999 For details on changing the handset code see Changing the Handset Code on page 138 Event Light You can set the Small Light to flash when receiving an incoming call or a new message Settings Phone Settings tab Profiles 1 Highlight Car Silent or Personal 2...

Page 127: ...ngs tab Profiles 1 Highlight Car Silent or Personal 2 Press Edit 3 Select Any Key Answer 4 Select On or Off Setting the Display You can change the display settings Setting the Wallpaper Your phone includes preset pictures to be used as wallpaper in stand by Pictures taken with the phone s digital camera or images downloaded from a WAP site can also be used as wallpaper Settings Phone Settings tab ...

Page 128: ...1 To Set Saved Pictures Settings Phone Settings tab Display Settings Assign Pictures 1 Select the desired function to set the picture to 2 Select Picture Gallery Flash or Other Documents 3 Select the desired picture 4 After displaying the picture press B 5 Specify the area you wish to display using the navigation keys then press B Note Some pictures cannot be used because of their picture and data...

Page 129: ...w Display Icons or Show Operator Name Setting the Vivid Mode Settings Phone Settings tab Display Settings Vivid Mode 1 Select the desired mode Setting the Greeting Message You can set the message which is displayed when the phone is turned on Settings Phone Settings tab Display Settings Greeting Message 1 Select Switch On Off and then select On or Off Tip If you wish to edit the message select Edi...

Page 130: ... Off Backlight The backlight will turn off if you do not press the keypad for a certain length of time You can specify a desired time to elapse before the backlight turns off which will help conserve battery life Tip When you purchase this phone Backlight is set to 15 seconds To Select the Backlight Time Out Duration Settings Phone Settings tab Display Settings Backlight Time Out 1 Select the desi...

Page 131: ...2 minutes Note To cancel Display Saving Display saving continues until either a key is pressed or there is an incoming alert The first key press only cancels this function You must press another key in order to perform other operations Setting the Dial Number You can set the type of number which is displayed when making a call Settings Phone Settings tab Display Settings Dial Number 1 Select the d...

Page 132: ...nt press b or c at level 1 Assigning a Ringtone or Ring Video Clip for an Incoming Call You can set a ringtone or ring video clip for incoming voice calls and video callings For ringtones you can select from different tones including patterns sound effects and melodies or set a sound in Sound Gallery as the default ringtone For ring video clips you can set a video clip in Video Gallery as the defa...

Page 133: ...Video Clip for an Incoming Call on page 131 5 Press B 6 Select For New Message Java Start or Delivery Report 7 Select Duration 8 Enter the desired duration of message notification in 2 digits using the digit keys 9 Press B Keypad Tones When the keypad tone is set on you will hear a confirmation tone each time you press any key Settings Phone Settings tab Sound Settings System Sounds Keypad Tones 1...

Page 134: ... Close 2 Select Sound or Duration For Sound select Preset Sounds Sound Gallery or Off For Duration select the desired time Charge Full Your phone can be set to emit a sound when it is fully charged Settings Phone Settings tab Sound Settings System Sounds Charge Full 1 Select Sound or Duration For Sound select Preset Sounds Sound Gallery or Off For Duration select the desired time Vibration Setting...

Page 135: ...ur Any Key Answer Settings Phone Settings tab Sound Settings Any Key Answer 1 Select On or Off Surround You can set surround sound Settings Phone Settings tab Sound Settings Surround 1 Select On or Off Date Time You need to set the correct time and date in order for your phone s various time based functions to work correctly Settings Phone Settings tab Date Time 1 Select Set Date Time 2 Enter the ...

Page 136: ...ur To Select the Date Format Settings Phone Settings tab Date Time Date Format 1 Select from D M Y M D Y or Y M D To Select the Calendar Format Settings Phone Settings tab Date Time Calendar Format 1 Select Sunday Saturday or Monday Sunday Language Setting You can change the language displayed on the phone Settings Phone Settings tab Language 1 Select the desired language Tip You can also change t...

Page 137: ...ne sideways Messaging Enables changing the size of the text by shaking the phone forward or backward Browser Enables zooming in or zooming out by shaking the phone forward or backward Document Viewer Enables switching the page by shaking the phone sideways Enables zooming in or zooming out by shaking the phone forward or backward Image Viewer Enables switching the image displayed by shaking the ph...

Page 138: ...ge the PIN Code This allows you to change the PIN code registered on the SIM USIM card Before you change the PIN code select On for PIN Entry Enter the existing PIN code for Change PIN after selecting PIN Entry and enter a new PIN code twice To Change the PIN2 Code PIN2 is a second PIN code used to unlock certain features of a SIM USIM card such as Fixed Dialling and Call Cost metering Not all SIM...

Page 139: ... Lock The History Lock function prevents unauthorised access to Call Log By setting this option on Call Log cannot be viewed until the correct handset code is entered Press Check to lock or Uncheck to unlock Showing Secret Data By setting this option on the hidden data can be displayed Select On to display or Off to hide for Show Secret Data Enter your handset code when you select On The default h...

Page 140: ... page 138 Call Video Call Voicemail Diverts This service can be used to divert incoming calls that you cannot answer Calls can be diverted to another phone number or to your Voicemail system Note This service may not be available on all mobile phone networks Contact your service provider for more information To Activate the Voicemail Service Settings Call Video Call tab Voicemail Diverts Voicemail...

Page 141: ...seconds 4 Press B Note When Voice Calls diverts are set to Always is displayed in stand by To Deactivate the Diverts Service Select the appropriate option Settings Call Video Call tab Voicemail Diverts Deactivate 1 Select from Always When Busy No Answer or Not Reachable 2 Press B To Cancel the Diverts and Voicemail Service Once you have changed the diverts settings you can cancel them all with thi...

Page 142: ...eo Calling Settings Incoming Picture Quality Settings Call Video Call tab Video Calling Settings Outgoing Picture Quality 1 Select Normal Quality Priority or Frame Rate Priority Select Frame Rate Priority to perform faster communication To Assign Hold Guidance Picture You can display an image saved in the phone on your display while you are putting a call on hold Settings Call Video Call tab Video...

Page 143: ...ff 3 Select On or Off To Set the Auto Answer List Register phone numbers to the Auto Answer list Settings Call Video Call tab Video Calling Settings Remote Monitor 1 Enter your handset code 2 Select Auto Answer List 3 Select a blank field 4 Enter the desired number To Set the Answer Time Settings Call Video Call tab Video Calling Settings Remote Monitor 1 Enter your handset code 2 Select Answer Ti...

Page 144: ...lls Restricts all outgoing international calls Only Local Home Restricts all outgoing international calls except to your home country For Incoming Calls Bar All Incoming Calls Restricts all incoming calls Bar if Abroad Restricts all incoming calls when you are outside of the coverage from your registered service provider 3 Select one of the following options All Services Restricts all services Voi...

Page 145: ...ct Edit Dial List 2 Select a blank field 3 Enter your PIN2 code 4 Add a name and a phone number For details on adding a name and phone number see Adding a New Phonebook Entry on page 49 5 Press Save Rejecting an Incoming Call You can register phone numbers you do not wish to answer To Reject the Registered Number Settings Call Video Call tab Restrict Calls Rejected Numbers Switch On Off 1 Select O...

Page 146: ...e Minder Minute Minder function informs you of your talk time by sounding a tone after every minute Settings Call Video Call tab Minute Minder 1 Select On or Off Auto Answer You can set the phone to answer voice calls automatically Settings Call Video Call tab Auto Answer 1 Enter your handset code 2 Select Switch On Off 3 Select On or Off To Set the Answer Time Settings Call Video Call tab Auto An...

Page 147: ...ost Settings Call Video Call tab Display Call Cost 1 Select On or Off Auto Redial Settings Call Video Call tab Auto Redial 1 Select On or Off Network Settings Network Settings To Select a Service Automatically Each time the power is turned on your phone selects a service automatically Settings Network Settings tab Network Settings Select Service 1 Select Auto To Select a Service Manually Settings ...

Page 148: ... wish to edit 2 Select Insert to insert over the selected position Add to End to insert at the end or Delete to delete To Add a New Network Settings Network Settings tab Network Settings Select Network Add New Network 1 Select Add 2 Enter the country code up to 3 digits 3 Enter the network code up to 3 digits 4 Enter a new network name up to 25 characters 5 Select the desired network type 6 Enter ...

Page 149: ...ew Profile Name Browser profile name unique name Proxy Proxy setting for Browser when Use Proxy is On Access Point Access point for Browser when Use Proxy is Off Use Proxy Setting to connect by Proxy or not Home Home page URL when Use Proxy is Off Java Settings Settings Network Settings tab Internet Settings Java Settings Create New Profile Name Profile name for Java application unique name Proxy ...

Page 150: ...s Point Access point Home Home page URL Port Number Port number 1 65535 Authentication Type Authentication type HTTP BASIC or HTTP DIGEST User Name User name for authentication Password Password for authentication Access Point Settings Settings Network Settings tab Internet Settings Access Point Settings Create New Access Point Name Access point name unique name APN APN setting Authentication Type...

Page 151: ...a Settings or Streaming Settings 2 Select the desired profile you wish to activate To Edit View Copy Delete the Browser Java Streaming Proxy Access Point Profile Settings Network Settings tab Internet Settings 1 Select Browser Settings Java Settings Streaming Settings Proxy Settings or Access Point Settings 2 Highlight the desired profile 3 Press Options and select the desired option Edit Modify t...

Page 152: ... and select Create Message For details on creating a message see Creating a New Message on page 78 Deleting a Call Log 1 In the call log list press Options and select Delete or Delete All Call Timers This function lets you check the duration of your calls Checking the Duration of the Last Call and All Calls Call Log Call Timers 1 Select Dialled Calls or Received Calls Resetting Call Timers Call Lo...

Page 153: ...ximum of 16 devices can be searched for Connectivity Bluetooth Search for Devices 1 Select the desired device for pairing 2 Enter the device passcode Note You can search for devices even when the Bluetooth wireless function is off Once pairing is started the phone turns the Bluetooth wireless function on automatically You can only select one device for pairing To change the paired device see To Ac...

Page 154: ...h Paired Devices 1 Select the desired device you wish to activate To Only Connect the Desired Service Connectivity Bluetooth Paired Devices 1 Highlight the desired device 2 Press Options and select Select service 3 Select Handsfree function or Audio function To Give Priority to the Handsfree Device and or the Audio Device Connectivity Bluetooth Paired Devices 1 Highlight the desired device 2 Press...

Page 155: ...onfirmation screen to deactivate the handsfree function is displayed Select Yes to deactivate Bluetooth Wireless Settings With this setting you can rename your phone prevent other devices from recognising your phone and turn the Bluetooth wireless function off automatically to save battery power etc To Rename Your Phone You can rename your phone The name is shown on other devices when your phone i...

Page 156: ...On or Off To Turn Off Automatically Connectivity Bluetooth Bluetooth Settings Bluetooth Timeout 1 Select the desired time Your phone turns the function off automatically after the specified time To See Your Phone Details Connectivity Bluetooth My Phone Details Infrared In order to use the Infrared function you need to search for other infrared enabled devices to establish contact with your phone K...

Page 157: ...ss Storage mode also activates offline mode Mass Storage is not available when the battery is low a Java application is paused Music Player is active or a memory card is not inserted in your phone USB Charge You can set the phone to charge via USB connected to a PC Connectivity USB Charge 1 Select Enable or Disable Card Settings Formatting Memory Card Connectivity Card Settings Format Card 1 Enter...

Page 158: ...ct Yes to start backing up the data Restoring a Backup File Connectivity Card Settings Backup Restore Restore 1 Enter your handset code The default handset code is 9999 For details on changing the handset code see Changing the Handset Code on page 138 2 Check off the desired items to restore and press OK To restore all files press Options and select Check All to check off all items Then press OK 3...

Page 159: ... are required 3G GSM Modem You can use WX T930 as a 3G GSM modem to access the Internet from your PC Connect your phone to your PC via Bluetooth wireless technology or USB interface Software installation on your PC is required Modem via the USB Data Cable 1 Insert the CD ROM into your PC s CD ROM drive The WX T930 CD ROM screen is displayed If the WX T930 CD ROM screen is not displayed double clic...

Page 160: ... T930 CD ROM screen is displayed If the WX T930 CD ROM screen is not displayed double click Launcher exe in your CD ROM 4 Select the modem driver from the on screen instructions of your CD ROM and install modem driver software following the on screen instructions of your CD ROM 5 Follow the on screen instructions to use your phone as a modem driver When the on screen instructions ask for the modem...

Page 161: ... CD ROM and start installation of Handset Manager software following the on screen instructions of your CD ROM If you have not installed the USB driver follow steps 2 and 3 on page 158 3 Follow the on screen instructions to complete installation During installation the on screen instructions ask you to select an interface Select the USB data cable as an interface 4 Power on your phone and attach t...

Page 162: ...e 6 Follow the on screen instructions of Handset Manager Note Some large files may not be able to be transmitted from the PC to the phone Applications Camera Gallery etc cannot be run when the phone is connected to the PC via Bluetooth wireless technology interface or USB data cable If you have already installed Sharp Handset Manager you need to uninstall the previous one If you have trouble with ...

Page 163: ...ds the media files in Library or the playlist with keyword entry Media Management in PC Media files in PC can be easily explored in 2 main columns Add Playlist Creates a new playlist Add Smart Playlist Creates a new smart playlist Remove Playlist Removes a playlist Media Management in Handset Media files in Handset can be easily explored in 2 main columns Previous Browse Search Media File Input Wi...

Page 164: ...brary go to Advanced then search music tracks Once you have created your list drag the list to the WX T930 area on Music Manager and the files will be uploaded to the WX T930 If one or more of the files is already stored on the handset Music Manager will not upload them again the playlist will play the track already uploaded Music Manager also allows you to import existing playlists M3U file type ...

Page 165: ...se contact your dealer The display is difficult to read Adjust the backlight brightness for the display Phone functions do not work after the phone is turned on Check the radio signal strength indicator as you may be outside the service area Check to see if any error message is displayed when you turn your phone on If so contact your dealer Make sure the SIM USIM card is correctly inserted Call qu...

Page 166: ...ervice Check where your account has been registered and where the service is available Limited memory available Delete any unnecessary data Problem Solution Cannot connect to Multimedia Messaging Service provider MMS settings and configuration may be missing or incorrect or the network does not support it Check your service provider s access point number Contact your service provider to confirm th...

Page 167: ... the opposite side of your body from where it is located The phone should be kept at least 6 inches 15 24 cm from a pacemaker ANYTIME the phone is switched on Do not switch on your phone near gas or flammable substances Observe the rules concerning the use of mobile phones at gasoline stations chemical plants and at all sites where a risk of explosion exists Caring for your phone Do not allow chil...

Page 168: ...handset Battery Use your phone only with batteries chargers and accessories recommended by the manufacturer The manufacturer disclaims any liability for damage caused by the use of other chargers batteries or accessories Network configuration and phone usage will affect talk time and stand by time Using the games or camera will hasten battery consumption When the battery charging alert is displaye...

Page 169: ...ime to buy a new battery CAUTION RISK OF EXPLOSION IF BATTERY IS REPLACED BY AN INCORRECT TYPE DISPOSE OF USED BATTERIES ACCORDING TO THE INSTRUCTIONS See Battery Disposal on page 17 Aerial Care Do not cover the hinge area of the phone p 15 No 31 with your hand when in use as this may interfere with the performance of the built in aerial Call quality may deteriorate leading to shortened talk time ...

Page 170: ...ay be lost or corrupted under various circumstances Before connecting the phone with a PC or a peripheral unit read the operation manual for the other unit carefully If the phone s battery has been removed for some time or the phone has been reset the unit s clock and calendar may be reinitialised The date and time should be updated in this case Do not place magnetic cards near your phone as it ma...

Page 171: ...ured and tested so as not to exceed the limits for exposure to electromagnetic fields as required by the NCC These limits are part of comprehensive guidelines developed by independent scientific organisations The guidelines include a substantial safety margin designed to assure the safety of the phone user and others and to take into account variations in age and health individual sensitivities an...

Page 172: ...ified power In use however your Sharp mobile phone may operate at less than full power because it is designed to use only sufficient power to communicate with the network FCC NOTICE This device complies with part 15 of the FCC Rules Operation is subject to the following two conditions 1 This device may not cause harmful interference and 2 this device must accept any interference received including...

Page 173: ...include a substantial safety margin designed to assure the safety of all persons regardless of age and health The exposure standard for wireless mobile phones employs a unit of measurement known as the Specific Absorption Rate or SAR The SAR limit set by the FCC is 1 6 W kg Tests for SAR are conducted using standard operating positions specified by the FCC with the phone transmitting at its highes...

Page 174: ...rious positions they all meet the government requirement for safe exposure The FCC has granted an Equipment Authorization for this model phone with all reported SAR levels evaluated as in compliance with the FCC RF emission guidelines SAR information on this model phone is on file with the FCC and can be found under the Display Grant section of http www fcc gov oet fccid after searching on FCC ID ...

Page 175: ...g but not limited to lifetime and breakage of or damage to aerials unless the defect was caused directly by defects in materials or workmanship iii Products in respect of which the product serial number or the IMEI number has been removed erased defaced altered or made illegible iv Defects caused by the fact that the Product was used with or connected to a product or an accessory not manufactured ...

Page 176: ...Focus 70 Focus Mode 66 ISO Sensitivity 70 Long Exposure 72 Mobile Light 68 Panorama 71 Picture Quality 67 Picture Size 70 75 Recording Time 75 Recording Video Clips 65 76 Review 68 Scene 73 Set Send Key 75 Settings 66 Shortcut Keys 69 Switching Modes 64 Taking Pictures 64 Video Quality 67 Cell Broadcasts 83 Characters Changing the Input Method 41 Cutting Copying Pasting Text 48 Entering Characters...

Page 177: ...New Entry 49 Dialling from an Entry 51 Editing Entries 53 Manage Groups 55 Message Groups 52 Saving a Number 50 Saving an Address 81 Saving an Image 94 Searching the List 50 Sending a Message 52 Storage Memory 49 Thumbnail 53 Phonebook Lock 138 Pictures 93 PIN PIN2 Code 137 Power On and Off 21 S Safety Precautions 166 Screensavers 105 Settings 125 Date Time 134 Display 126 Font 128 Internet 148 La...

Page 178: ...Index 177 X XT9 Text Input Using BoPoMoFo Input mode 44 Using Stroke mode 45 Using XT9 English Mode 42 ...

Page 179: ...178 Index ...

Page 180: ...Message Inbox Drafts Sent Outbox Templates Create Email Inbox Drafts Sent Outbox Templates Switch On Off Read Messages Settings On Off General Settings SMS Settings MMS Settings Email Settings Speed Mail List Up Down Left Right A C Basic Operation Power On Off Long press F Make a call Enter number press D Answer a call Press D End a call Press F Phonebook Storing name and number 1 Enter the phone ...

Page 181: ...ery 6 6 Flash 6 7 Other Documents 6 8 Memory Status a b a b a b 7 Multimedia 7 1 Video Player 7 2 Streaming Player 7 3 Music Player 7 4 Java 7 5 Camera c d 8 Call Manager 8 1 Phonebook 8 2 Add New 8 3 Call Voicemail 8 4 Manage Groups 8 5 My Card 8 6 Speed Dial List 8 7 Message Groups 8 8 Phonebook Settings 8 9 Service Dialling No 8 10 Advanced c d 9 Settings Tab 1 Phone Settings 9 1 Profiles 9 2 D...

Page 182: ...l Maker SHARP CORPORATION Importer FarEasTone Telecommunications Co Ltd Address 468 Ruei Guang Rd Nei Hu Taipei Taiwan Tel 886 2 8793 5000 www fetnet net FarEasTone mobile customers please dial 888 for customer services ...

Reviews: