background image

E-5

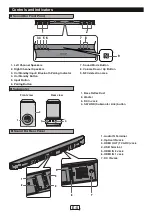
Front view

Rear view


„

Subwoofer


„

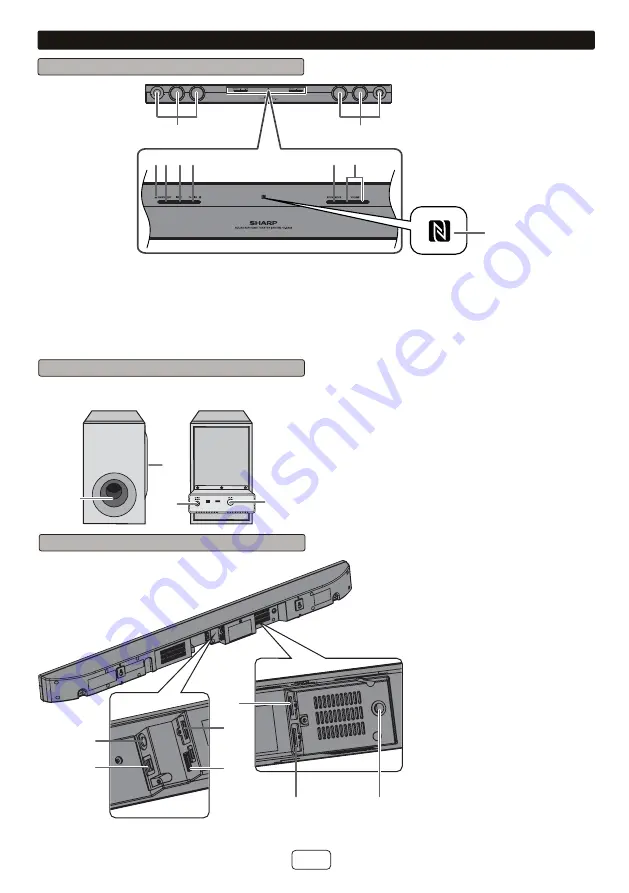
Sound Bar Rear Panel

1.  Bass Reflex Duct

2. Woofer

3.  DC In Jack

4.  SW LINK (Subwoofer Link) button

1.  Audio IN Terminal

2.  Optical IN Jack

3.  HDMI OUT (TV ARC) Jack

4. USB Terminal

5.  HDMI IN 2 Jack

6.  HDMI IN 1 Jack

7. DC IN Jack

2

1

3

4

1

2

3

5

6

7

4

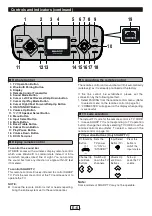
Controls and indicators


„

Sound Bar Front Panel

9

1

3 4 5 6

7

8

2

1.  Left Channel Speakers

2.  Right Channel Speakers

3.  On/Standby/Input/ Bluetooth Pairing Indicator

4. On/Standby Button

5. Input Button

6. Pairing Button

7.  Sound Mode Button

8.  Volume Down / Up Button

9.  NFC detection area

Summary of Contents for HT-SB38

Page 1: ...ED LCD and Plasma HT SB38 Sound Bar Home Theater system consisting of HT SB38 sound bar system and CP SW38 active subwoofer system Accessories The following accessories are included Remote Control RRMCGA388AW01 HDMI Cable x 1 QCNWGA078AWPZ AC DC adaptor x 2 RADPAA100AWZZ AC power cord x 2 QACCDA005AWZZ Pattern Paper TCAUHA034AWZZ NFC tag x 1 GCASP9349AW01 Velcro tape hook type x 1 PSHEZA373AW01 Ve...

Page 2: ...DQ H SHULHQFHG UDGLR 79 WHFKQLFLDQ IRU KHOS Warning KDQJHV RU PRGL FDWLRQV WR WKLV XQLW QRW H SUHVVO DSSURYHG E WKH SDUW UHVSRQVLEOH IRU FRPSOLDQFH FRXOG YRLG WKH XVHU V DXWKRULW WR RSHUDWH WKH HTXLSPHQW FCC Radiation Exposure Statement 7KLV GHYLFH FRPSOLHV ZLWK WKH OLPLWV IRU D ODVV GLJLWDO GHYLFH SXUVXDQW WR 3DUW RI WKH 5XOHV W PXVW QRW EH FR ORFDWHG RU RSHUDWLQJ LQ FRQMXQFWLRQ ZLWK DQ RWKHU DQW...

Page 3: ...WR WKLV SURGXFW WKURXJK RSHQLQJV DV WKH PD WRXFK GDQ JHURXV YROWDJH SRLQWV RU VKRUW RXW SDUWV WKDW FRXOG UHVXOW LQ D UH RU HOHFWULF VKRFN 7R SUHYHQW UH RU VKRFN KD DUG GR QRW H SRVH WKLV DSSOL DQFH WR GULSSLQJ RU VSODVKLQJ 1R REMHFWV OOHG ZLWK OLTXLGV VXFK DV YDVHV VKDOO EH SODFHG RQ WKH DSSDUDWXV DPDJH 5HTXLULQJ 6HUYLFH 8QSOXJ WKLV SURGXFW IURP WKH ZDOO RXWOHW DQG UHIHU VHUYLFLQJ WR TXDOL HG VHUY...

Page 4: ...rranties granted by Sharp and shall be the sole and exclusive remedy available to the purchaser Correction of defects in the manner and for the period of time described herein shall constitute complete fulfillment of all liabilities and responsibilities of Sharp to the purchaser with respect to the Product and shall constitute full satisfaction of all claims whether based on contract negligence st...

Page 5: ... service to your local SHARP service facility z This unit should only be used within the range of 41 F 95 F 5 C 35 C z SHARP is not responsible for damage due to improper use Refer all servicing to a SHARP authorised service center Warnings z The supplied AC DC adaptor contains no user serviceable parts Never remove covers unless qualified to do so It contains dangerous voltages always remove mains...

Page 6: ...UT TV ARC Jack 4 USB Terminal 5 HDMI IN 2 Jack 6 HDMI IN 1 Jack 7 DC IN Jack 2 1 3 4 1 2 3 5 6 7 4 Controls and indicators Sound Bar Front Panel 9 1 3 4 5 6 7 8 2 1 Left Channel Speakers 2 Right Channel Speakers 3 On Standby Input Bluetooth Pairing Indicator 4 On Standby Button 5 Input Button 6 Pairing Button 7 Sound Mode Button 8 Volume Down Up Button 9 NFC detection area ...
Page 7: ...control at the TV remote sensor to operate the TV NOTE z In case the remote control is lost or needs repairing bring the entire system set to the service center Connecting the remote control The remote control and sound bar will link automatically wirelessly as it is already pre linked at the factory If the link cannot be established please set the connection by the following method 1 Select PAIRI...

Page 8: ...idents resulting from improper installation Driving screws SHARP designed the sound bar so you may hang it on the wall Use proper screws not supplied See below for size and type 1 8 3 2 mm 3 8 9 mm 7 8 Min 22 mm 3 16 5 mm Installing the sound bar 1 L WKH SDWWHUQ SDSHU WR WKH ZDOO LQ KRUL RQWDO SRVL WLRQ DV EHORZ 44 mm 509 mm Wall surface Pattern paper supplied 21 5 8 548 mm 2 0DNH D KROH RQ WKH ZD...

Page 9: ...eful to prevent the sound bar from falling Safety wires not supplied Sound bar Screw eye not supplied Wall When placing on the shelf table Rack table Screw eye not supplied Safety wires not supplied Screw eye not supplied Sound bar When mounting on the wall ...

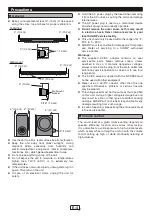
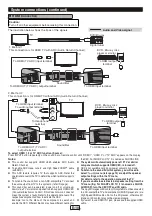
Page 10: ...e AC DC adaptor 1 Plug the AC power cord into the AC DC adaptor 2 Plug the AC DC adaptor cable into the DC INPUT jack on the sound bar and subwoofer 3 Plug the AC power cord into an AC outlet Notes Unplug the AC DC adaptor from the AC outlet if the system will not be used for a prolonged period of time Use only the supplied AC DC adaptor Using other AC DC adaptor may cause an electric shock or fire...

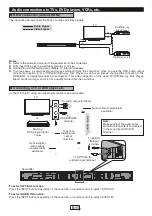
Page 11: ...on ARC compatible TV connect the audio output from TV to this system s refer this page z This sound bar can be operated power on off or volume up down via a TV or similar component which supports HDMI CEC Consumer Electronics Control If this does not work it does not mean this system is faulty Refer to the operation manual of the respective component on how to activate the CEC Example Go to the Me...

Page 12: ...his effect depends on the used TV DVD Blu ray Disc Player Brand model and age and it is not a quality matter from the sound bar Connecting a TV or DVD player etc Connect to the TV using an optical digital cable or an audio cable To audio output terminals Sound Bar TV or Audio cable commercially available To AUDIO IN input terminals To OPTICAL IN optical input terminal Blu Ray DVD player Digital Tu...

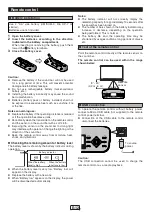
Page 13: ...ount of battery level The battery level is shown by the battery indicator during operation Battery indicator When the battery level is high When the battery level is very low Battery indicator When the battery level is high When the battery level is very low z When the battery level is very low Battery low will appear on the display z Replace the battery with a new one z When Battery low appears o...

Page 14: ...er consumption mode Sound bar indicator turns off 2 To return to the standby mode perform step 1 above The next time the unit is turned on and off again it will enter standby mode z During standby mode NFC function is activated once your device touches the supplied NFC tag when there is no HDMI connection Pairing with the Subwoofer The sound bar and subwoofer will link automatically wirelessly whe...

Page 15: ...until the desired sound mode is displayed CINEMA for cinema sound effect MUSIC for standard sound effect GAME for game sound effect SPORT for sport broadcasting NEWS for news NIGHT for night BYPASS for flat sound effect Bass and Treble Control remote control Bass Control 1 Press the BASS TREBLE button to select bass 2 Within 5 seconds press the VOL or or button to adjust the bass Treble Control 1 P...

Page 16: ...ARC function enables an HDMI ARC capable TV to send the audio stream to the HDMI OUT jack of the receiver To use this function you must select the TV ARC input and your TV must supports the ARC 3D sound mode 3D creates 3D sound through speakers regardless of the type of sound source whether it is stereo or multichannel It simulates sound transmission characteristics using digital signal processing...

Page 17: ... manual of the device for detail The NFC tags can be placed anywhere convenient to you The velcro tapes supplied will help to secure the tags onto the desired location Caution z Make sure that the NFC tag is placed on a flat and level surface z If you choose not to use the velcro tape do not place the NFC tag near metal surface to avoid connection interference during tagging Important z NFC tag pro...

Page 18: ...stablish Bluetooth connection with this unit via NFC or manual connection Listening to Bluetooth enabled devices Bluetooth Bluetooth wireless technology is a short range radio technology that enables wireless communication between various types of digital devices such as mobile phone or computer It operates within a range of about 32 feet 10 meters without the hassle of having to use cables to con...

Page 19: ... or metallic wall is between the device and the sound bar the system may not operate at all because the wireless signal cannot penetrate metal z If this unit or the source device is turned off before Bluetooth connection is completed pairing will not be completed and the pairing information will not be memorized Repeat step 1 onwards to start pairing again z To pair with other devices repeat steps...

Page 20: ... Press the button to select NORMAL and disappears Caution After performing repeat play be sure to press the button Otherwise the device will play continuously Random play The tracks on the device can be played in random order automatically To random play all tracks Press the button repeatedly to select RANDOM To cancel random play Press the button to select NORMAL Notes I RX SUHVV WKH EXWWRQ GXULQ...

Page 21: ...c Player Brand model and age and it is not the sound bar problem z Wireless connection cannot be established z Check the distance between the sound bar and subwoofer less than 32 feet 10 meters z Make sure there is no other wireless devices near the unit Symptom Possible cause z Wireless connection cannot be established z Make sure there is no obstacles especially metal blocking between the sound ...

Page 22: ...ower on Factory reset clearing all memory Make sure to disconnect all output and input cables attached to the sound bar before performing the factory reset 1 Press the ON STANDBY button on the sound bar to enter the power standby mode 2 While pressing the SOUND MODE button press and hold the ON STANDBY button until RESET appears 3 Press the ON STANDBY button again PAIRING indicator will turn red C...

Page 23: ... 4K x 1 Type 2 Way speaker system 2 1 4 5 7 cm woofer 1 2 5 cm Soft Dome Bluetooth Frequency band 2 400GHz 2 480GHz Compatible Bluetooth Profile A2DP Advanced Audio Distribution Profile AVRCP Audio Video Remote Control Profile BLUETOOTH 4 0 BLE REMOTE CONTROL Bluetooth 2 1 EDR Maximum input power 60 W Rated input power 30 W Impedance 6 ȍ USB MP3 WMA USB host interface z Complies with USB 1 1 Full Spe...

Reviews: