background image

34

KB-3411JS
KB-3411JK
KB-3411JW

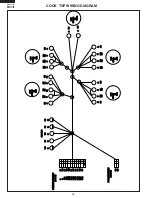
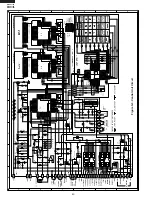
COOK  TOP WIRING DIAGRAM

YYLL

WW

YYLL

WW

WW

HH

TT

WW

AA

RRMM

EERR

((CC

RR))

CC

EENN

TTEE

RR  

RREE

AA

RR

11  

ZZ

OO

NN

EE

WW

HH

TT

PP11

22aa

((JJ

SSTT

  VV

LLPP

--11

22VV

))

TTOO

  IINN

FFII

NN

IITT

EE  

SSWW

  HH

AA

RRNN

EESS

SS

((JJ

SSTT

  EE

LLPP

--00

22VV

))

TTOO

  DD

RRAA

WW

EERR

  HH

AA

RRNN

EESS

SS

11

22

1122

BBRR

NN

BBLL

KK

YYLL

WW

BBLL

UU

WW

HH

TT

SSUU

RRFF

AA

CC

EE  

LLAA

MM

PPSS

LLEE

FFTT

  FF

RROO

NN

TT

SSMM

AA

LLLL

LLEE

FFTT

  RR

EEAA

RR

LLAA

RRGG

EE

11  

ZZ

OO

NN

EE

11  

ZZ

OO

NN

EE

((LL

RR))

((LL

FF))

WW

HH

TT

22aa

PP11

BBLL

KK

YYLL

WW

YYLL

WW

YYLL

WW

BBLL

UU

BBRR

NN

22aa

PP11

WW

HH

TT

YYLL

WW

BBLL

KK

YYLL

WW

BBLL

UU

BBLL

KK

RRII

GG

HH

TT  

FFRR

OO

NN

TT

LLAA

RRGG

EE

RRII

GG

HH

TT  

RREE

AA

RR

SSMM

AA

LLLL

22  

ZZ

OO

NN

EE

11  

ZZ

OO

NN

EE

((RR

FF))

((RR

RR))

YYLL

WW

22aa

11bb

BBRR

NN

YYLL

WW

YYLL

WW

WW

HH

TT

BBLL

KK

BBLL

UU

22bb

22bb

BBLL

UU

BBLL

KK

RREE

DD

YYLL

WW

PP11

BB

WW

HH

TT

YYLL

WW

BBLL

UU

BBRR

NN

LL22

RRFF

LLFF

LLRR

RRRR

22aa

11bb

PP11

AA

11

22

33

44

55

66

77

88

99

1100

1111

PP11

11bb

22bb

11bb

22bb

BBLL

KK

WW

HH

TT

RREE

DD

WW

HH

TT

WW

HH

TT

BBLL

KK

WW

HH

TT

BBRR

NN

YYLL

WW

WW

HH

TT

BBRR

NN

LL11

LL22

44  

((RR

FF))

44aa

((RR

FF))

HH

11((

RRRR

))

HH

11((

LLFF

))

HH

11((

LLRR

))

HH

22((

RRFF

))

HH

22((

RRRR

))

HH

22((

LLFF

))

HH

22((

LLRR

))

Summary of Contents for KB-3411JK

Page 1: ...ay result in a severe possibly fatal electrical shock High Voltage Capacitor High Voltage Power Transformer High Voltage Rectifier and Heat sink etc and Magnetron High Voltage Harness etc S25R247KB341J KB 3411JS KB 3411JK KB 3411JW FREE STANDING RANGE WITH MICROWAVE DRAWER MODELS SUPPLEMENTAL SERVICE MANUAL TABLE OF CONTENTS Page PRECAUTIONS TO BE OBSERVED BEFORE AND DURING SERVICING TO AVOID POSS...

Page 2: ...and transmission systems shall be repaired replaced or adjusted by procedures described in this manual before the oven is released to the owner e A microwave leakage check to verify compliance with the Federal Performance Standard should be performed on each oven prior to release to the owner BEFORE SERVICING Before servicing an operative unit perform a microwave emission check as per the Microwav...

Page 3: ...remove neccessary covers 2 Open the drawer and keep it open 3 Discharge high voltage capacitor 4 Disconnect the leads to the primary of the power transformer 5 Ensure that the leads remain isolated from other components and oven chassis by using insulation tape 6 After that procedure reconnect the power supply cord When the testing is completed 1 Disconnect the power supply cord and then remove co...

Page 4: ...use 3 Never interfere with the proper operation of any safety device 4 USE ONLY REPLACEMENT PARTS CATALOGED FOR THIS APPLIANCE SUBSTITUTIONS MAY DEFEAT COMPLIANCE WITH SAFETY STANDARDS SET FOR HOME APPLIANCES 5 GROUNDING The standard color coding for safety ground wires is GREEN or GREEN with YELLOW STRIPES Ground leads are not to be used as current carrying conductors It is EXTREMELY important th...

Page 5: ...container shall be a low form of 600 ml 20 oz beaker with an inside diameter of approx 8 5 cm 3 1 2 in and made of an electrically nonconductive material such as glass or plastic The placing of this standard load in the oven is important not only to protect the oven but also to insure that any leakage is measured accurately 3 Set the cooking control on Full Power Cooking Mode 4 Close the drawer an...

Page 6: ...4 KB 3411JS KB 3411JK KB 3411JW NOTES ...

Page 7: ...are ensured A The door is tightly closed B The door brackets and hinges are not defective C The door packing is not damaged D The door is not deformed or warped E There is not any other visible damage with the oven Servicing and repair work must be carried out only by trained service personnel DANGER Certaininitialpartsareintentionallynotgroundedandpresent a risk of electrical shock only during se...

Page 8: ... 8 Cubic Feet Depth 18 Cook Top Heating Elements Two 6 1200W One 8 2000W One 6 9 1200 2400W Control Complement Touch Control System Clock 1 00 12 59 Timer 0 99 min 99 seconds Bake pad Broil pad Self Clean pad Timed Cook pad Number selection pads Delay Start pad Stop Clear pad Oven Light pad Control Lock pad Setup Custom Help Cooktop warm Set off On Control lock on off Convection Timer Hold to Clea...

Page 9: ...Power P 80 approx 80 of Full Power P 70 approx 70 of Full Power P 60 approx 60 of Full Power P 50 approx 50 of Full Power P 40 approx 40 of Full Power P 30 approx 30 of Full Power P 20 approx 20 of Full Power P 10 approx 10 of Full Power P 0 No power throughout the cooking time START MINUTE PLUS pad Defrost pad Number selection pad Micro warm Power Level pad Timer Clock pad Stop Clear pad Sensor R...

Page 10: ...range Cut and discard the copper ground strap and plate KEEP the ground screw 4 Connect the green ground wire lead with the eyelet to the frame of the range with the ground screw using the same hole in the frame where the ground screw was originally installed See Figure 8 5 Make sure all screws are tightened securely and replace the rear access cover See Figure 6 3 WIRE CONNECTION INSTRUCTIONS For...

Page 11: ...ain relief clamp must be installed at this location It requires 1 3 8 inches 3 5 cm diameter cord kit hole Connect green insulated copper ground wire with ground screw here Cut ground strap Discard ground strap ground plate Connect neutral white or center here Connect line 1 here Connect line 2 here b l a c k Note Install strain relief clamp Center or white wire must always be attached to the cent...

Page 12: ...range Failure to install the Anti Tip bracket will allow the range to tip over if excessive weight is placed on an open door or if a child climbs upon it Serious injury might result from spilled hot liquids or from the range itself If range is ever moved to a different location the Anti Tip bracket must also be moved and installed with the range Instructions are provided for installation in wood o...

Page 13: ...11 KB 3411JS KB 3411JK KB 3411JW KB 3411JW ...

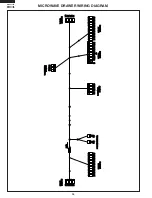
Page 14: ...E ELEMENT H1 P L1 L2 1b H RR LR RF LF 2b S 1b H 2b S 1b H 2b S 1b H 2b S OVEN THERMAL CUT OUT MG THERMAL CUT OUT CM RY9 CONV MOTOR D1 D5 D3 C3 C7 C5 E6 E5 E3 RY6 SECONDARY INTELOCK SWITCH VOLTAGE SWITCH DM MICROWAVE DRAWER DOOR OPEN CLOSE MOTOR DOOR POSITION SWITCH FRONT M14 M13 DOOR POSITION SWITCH REAR BOTTOM HEATER OVEN THERMAL CUT OUT THERMAL OVEN A2 A4 A6 A1 M1 DOOR SENSING SWITCH M3 F3 F2 F1...

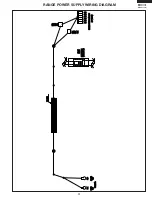
Page 15: ... LF 2b S 1b H 2b S 1b H 2b S 1b H 2b S 2a 2a 2a 2a 1a 2 P1 4 PROTECTOR LEFT FRONT SURFACE ELEMENT 1a 2 P1 4 PROTECTOR RIGHT REAR SURFACE ELEMENT 1a PROTECTOR 1a 2 P1 4 PROTECTOR WARMER SURFACE ELEMENT L2 BLK YLW BLK YLW WHT BLK ORG RED YLW RED RED BLK WHT WHT RED BRN RED YLW RED RED YLW ORG YLW YLW WHT YLW RED YLW RED RED RED BLK BLK BLK RED RED RED YLW YLW YLW YLW YLW WHT YLW BLU BLK YLW YLW YLW ...

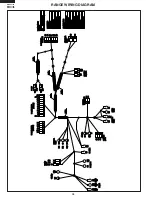
Page 16: ...OTOR L L N O COM N O COM C1 E2 E1 RY11 CONTROL UNIT M6 N1 N2 N3 N4 N5 M7 SWITCHING POWER SUPPLY UNIT N OVEN THERMAL CUT OUT MG THERMAL CUT OUT SECONDARY INTELOCK SWITCH VOLTAGE SWITCH DM MICROWAVE DRAWER DOOR OPEN CLOSE MOTOR DOOR POSITION SWITCH FRONT M14 M13 DOOR POSITION SWITCH REAR A2 A4 A6 A1 M1 DOOR SENSING SWITCH M3 F3 F2 F1 RY B RY C L1 LOW VOLTAGE TRANSFORMER RED BLK BLU BLK BLK BRN GRY Y...

Page 17: ...OCK MOTOR SWITCH THERMISTOR M11 M10 M9 M8 M4 DOOR SWITCH M5 CONTROL UNIT L1 L2 N CM RY9 CONV MOTOR D1 D5 D3 C3 C7 C5 E6 E5 E3 RY6 BOTTOM HEATER OVEN THERMAL CUT OUT THERMAL OVEN RY B RY C RED RED BLK RED RED BLK RED YLW RED BLK ORG ORG BRN BRN BLK WHT WHT YLW WHT WHT ORG RED BLU WHT YLW WHT BRN RED BLK GRY BLK WHT WHT BLU BLK RED RED BLK RED WHT WHT BLK BLK BLK BLK WHT BLK RED ORG ...

Page 18: ...In addition the synchronizing signal is available in order to compose a basic standard time in the clock circuit Symbol Voltage Application VC 5V LSI IC1 12 Relay Circuit A circuit to drive the magnetron fan motor stirrer motor convection motor door lock motor bottom heater top heater convection heater and light the oven lamp 13 Buzzer Circuit The buzzer is responsive to signals from the LSI to em...

Page 19: ...rnal clock oscillation frequency setting input The internal clock frequency is set by inserting the ceramic filter oscillation circuit with respect to Xout terminal 13 XOUT OUT Internal clock oscillation frequency control output Output to control oscillation input of Xin 14 VCC IN Power source voltage 5V VC voltage of power source circuit input 15 P60 IN Plus signal coming from the Microwave drawe...

Page 20: ... OFF 41 P13 OUT Oven lamp Oven driving signal To turn on and off relay RY7 H level During oven lamp ON L level During oven lamp OFF 42 P12 OUT Fan motor Oven driving signal To turn on and off relay RY6 H level During fan motor ON L level During fan motor OFF 43 P11 OUT Fan motor Drawer driving signal To turn on and off relay RY5 H level During fan motor ON L level During fan motor OFF 44 P10 OUT T...

Page 21: ...osed L level signal 0V 60 INT0 IN Signal to synchronize LSI with commercial power source frequency This is the basic timing for all real time processing of LSI 61 AVSS IN A D converter power source voltage The power source voltage to drive the A D converter in the LSI 62 VREF IN Reference voltage input terminal A reference voltage applied to the A D converter in the LSI Connected to 5V 63 AN7 IN A...

Page 22: ... dedicated bit is used and that the iron temperature is adjusted accordingly 3 Soldering As the melting point of lead free solder Sn Ag Cu is higher and has poorer wettability flow to prevent damage to the land of the PWB extreme care should be taken not to leave the bit in contact with the PWB for an extended period of time Remove the bit as soon as a good flow is achieved The high content of tin...

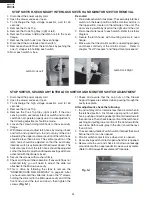
Page 23: ...ens Fig 1 6 Remove all screws from Control Panel Mold Fig 2 7 Slide Control Panel Mold to left to unlock and lift Fig 2 8 Remove Gasket from Key Fixing Angle Fig 3 9 Lift Key Fixing Mold and carefully unhook all Molex s ground wire and C P wiring Fig 3 WARNING Follow all safety precautions beginning on Page 2 before proceeding Control Panel Mold Gasket Key Fixing Angle Fig 2 Fig 3 NOTE When reasse...

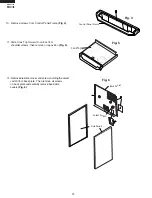
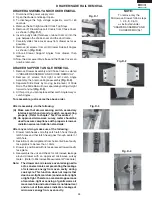
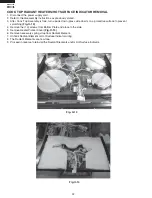
Page 24: ...ws holding the select switch from back plate Then remove all screws on back plate and carefullyremove back side panels Fig 6 Fig 6 10 Remove screws from Control Panel Frame Fig 4 11 Slide Cook Top forward to unlock from shoulder screws then remove or reposition Fig 5 CookTop Control Panel Frame Fig 4 Fig 5 ...

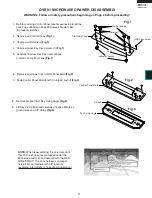
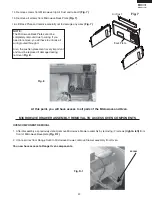
Page 25: ...CESS OVEN COMPONENTS Fig R 1 screw Air Duct Back Plate At this point you will have access to all parts of the Microwave and Oven 14 Remove screws from Microwave top Air Duct and take off Fig 7 15 Remove all screws from Microwave Back Plate Fig 7 16 Lift Back Plate and remove carefully not to damage any wires Fig 7 The Microwave Back Plate cannot be completely removed due to wiring If you need to r...

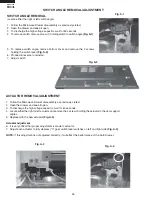
Page 26: ...d by the upper and lower position of the latch hook should be less than 0 5mm The vertical position of the latch hook should be adjusted so that the secondary interlock switch is activated with the drawer closed The horizontal position of the latch hook should be adjusted so that the monitor switch and drawer sensing switch are activated with the drawer closed 8 Secure the screws with washers firm...

Page 27: ...sure that drawer sensing switch secondary interlock switch and monitor switch are operating properly Refer to chapter Test Procedures B An approved microwave survey meter should be used to assure compliance with proper microwave radiation emission limitation standards After any servicing make sure of the following 1 Drawer latch heads smoothly catch latch hook through latch holes and that latch he...

Page 28: ...ITCH ANGLE REMOVAL ADJUSTMENT Fig S 1 Fig S 2 ACTUATOR REMOVAL ADJUSTMENT 1 Follow the Microwave Drawer disassembly as previously stated 2 Open the drawer and keep it open 3 To discharge the high voltage capacitor wait for 60 seconds 4 Locate either the right or left actuator and remove the 2 screws holding the actuator to the door support angles 5 Replace with the new actuator Fig A 3 Actuator ad...

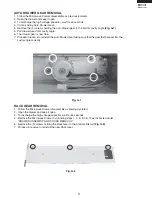
Page 29: ...er gear is now free 7 Proceed in reverse to reinstall the Auto Drawer Gear taking care that the gear teeth are set into the cavity angle correctly Fig G 1 RACK GEAR REMOVAL 1 Follow the Microwave Drawer disassembly as previously stated 2 Open the drawer and keep it open 3 To discharge the high voltage capacitor wait for 60 seconds 4 Remove the Microwave Drawer by following steps 1 2 5 8 9 10 as in...

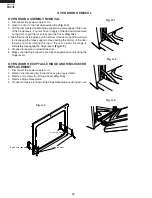
Page 30: ...ling the bottom of the door toward you while rotating the top of the door toward the range to completely disengage the hinge levers Fig O 3 5 Proceed in reverse to reinstall the door 6 Make sure the hinge supports are fully engaged before unlocking the hinge levers OVEN DOOR RECEPTACLE HINGE AND HINGECOVER REPLACEMENT 1 Disconnect the power supply cord 2 Refer to the disassembly instructions as pr...

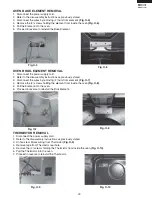
Page 31: ...structions as previously stated 3 Disconnect the wires by removing 2 nuts from element Fig O 7 4 Remove the 2 screws holding the element from inside the oven Fig O 8 5 Pull the Element into the oven 6 Proceed in reverse to reinstall the Broil Element Fig O 5 Fig O 7 THERMISTOR REMOVAL 1 Disconnect the power supply cord 2 Refer to the disassembly instructions as previously stated 3 Unhook rear Mole...

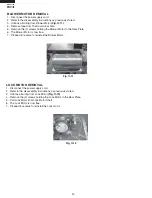
Page 32: ... Blower Motor to the Rear Plate 6 The Blower Motor is now free 7 Proceed in reverse to reinstall the Blower Motor Fig O 11 LOCK MOTOR REMOVAL 1 Disconnect the power supply cord 2 Refer to the disassembly instructions as previously stated 3 Unhook all wiring from Lock Motor Fig O 12 4 Remove the 2 screws holding the Lock Motor to the Rear Plate 5 Pull Lock Motor from Lock Motor Shaft 6 The Lock Mot...

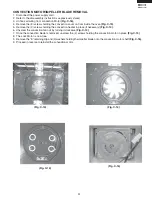
Page 33: ...Fig C 13 5 Remove the 2 screws holding the convection heater in place if necessary Fig C 14 6 Unscrew the convection fan nut by turning it clockwise Fig C 14 7 Once the convection blade is removed unscrew the 4 screws holding the convection motor in place Fig C 15 8 The Lock Motor is now free 9 Remove the E retaining clip and 2 washers holding the impeller blade on to the convection motor shaft Fi...

Page 34: ...de down glass side down on a protective surface to prevent scratching Fig O 13 4 Remove the 10 screws from Bottom Plate and place to the side 5 Remove Heater Protect Cover Fig O 14 6 Remove necessary spring strap from Radiant Element 7 Unhook Radiant Element or Hot Surface Indicator wiring 8 The Radiant Elements are now free 9 Proceed in reverse to reinstall the Radiant Elements and or Hot Surface...

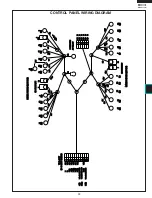
Page 35: ...LF LF LF LF RF RF RF L2 1 2 3 4 5 6 7 8 9 10 11 12 BLK WHT RED WHT WHT BLK WHT WHT w BRN STRIPE or BRN WHT VLR 12V TO COOKTOP HARNESS L1 L2 4 RF 4a RF H1 RR H1 LF H1 LR 2 RF H2 RR H2 LF H2 LR H2 RR H1 RR L2 RR L1 RR RED YLW L1 LR L2 LR H2 LR H1 LR RF RF RF S2 P RF RR YLW S1 RF P LF P LR 1 2 3 4 5 6 BLK BLK BLK RED RED RED RED WHT RED L1 L1 L1 L2 L2 L2 GRN GRN YLW YLW YLW YLW YLW P P WHT or w YLW S...

Page 36: ...W W Y Y L L W W B B L L U U B B R R N N 2 2 a a P P 1 1 W W H H T T Y Y L L W W B B L L K K Y Y L L W W B B L L U U B B L L K K R R I I G G H H T T F F R R O O N N T T L L A A R R G G E E R R I I G G H H T T R R E E A A R R S S M M A A L L L L 2 2 Z Z O O N N E E 1 1 Z Z O O N N E E R R F F R R R R Y Y L L W W 2 2 a a 1 1 b b B B R R N N Y Y L L W W Y Y L L W W W W H H T T B B L L K K B B L L U U ...

Page 37: ... O P P W W B B C C N N D D T T O O P P W W B B C C N N E E T T O O P P W W B B C C N N C C J J S S T T V V H H R R 7 7 N N J J S S T T V V H H R R 5 5 N N J J S S T T V V H H R R 7 7 N N J J S S T T V V H H R R 4 4 N N E E A A R R T T H H J J S S T T V V L L P P 1 1 2 2 V V J J S S T T V V L L P P 0 0 6 6 V V R R Y Y 2 2 R R Y Y 3 3 R R Y Y 1 1 C C O O M M N N O O C C O O M M C C O O M M N N O O N...

Page 38: ...L K K B B L L K K W W H H T T B B L L K K B B L L K K B B L L K K B B L L K K B B L L K K T T O O C C P P U U C C N N L L 6 6 5 5 4 4 3 3 2 2 1 1 4 4 3 3 1 1 2 2 W W H H T T G G R R N N 6 6 5 5 4 4 3 3 2 2 1 1 R R E E D D R R E E D D O O R R G G O O R R G G B B L L K K R R E E D D B B R R N N Y Y L L W W G G R R N N R R E E D D B B L L K K Y Y L L W W B B R R N N W W H H T T O O R R G G O O R R G ...

Page 39: ... E F F T T L L 1 1 R R I I G G H H T T L L 2 2 B B L L K K R R E E D D B B L L K K B B L L K K B B L L K K R R E E D D R R E E D D R R E E D D 6 6 5 5 3 3 1 1 2 2 4 4 I I N N F F I I N N I I T T E E S S W W I I T T C C H H H H A A R R N N E E S S S S B B L L K K B B L L K K B B L L K K R R E E D D R R E E D D R R E E D D T T E E R R M M I I N N A A L L J J S S T T V V L L P P 6 6 V V U U L L T T A...

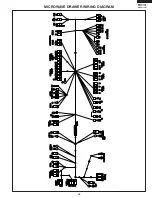
Page 40: ...L K K O O R R G G R R E E D D B B R R N N R R E E D D B B L L K K Y Y L L W W W W H H T T 8 8 7 7 4 4 2 2 1 1 3 3 5 5 6 6 9 9 1 1 0 0 1 1 1 1 1 1 2 2 T T O O D D R R A A W W E E R R H H A A R R N N E E S S S S J J S S T T V V L L R R 0 0 6 6 V V R R E E D D R R E E D D W W H H T T B B L L K K 3 3 1 1 2 2 B B R R N N B B L L K K 6 6 4 4 5 5 L L 2 2 N N L L 1 1 1 1 2 2 3 3 4 4 5 5 6 6 V V O O L L T ...

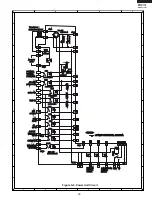
Page 41: ... 4 H 5 H 6 H 7 H 8 H 9 H 10 H 11 H 12 Transformer AC 120V 60Hz POWER TRANS FORMER OL SM DRAWER COM OVEN COM TOP H BOTTOM HEATER RELAY CONVECTION HEATER RELAY 24V 0V DRAWER FM FM OL OVEN OVEN OVEN LOCK MOTOR 0 1uF 50V NOTE IF NOT SPECIFIED 1SS270A 10G471K HZ20 1 DU18D1 1P M R S R2 150 1W CN C CN E CN J CN H KTC1027 DU18D1 1P M R DU18D1 1P M R DU18D1 1P M R 150 1W 150 1W R3 R4 E 7 H 15 D14 RY10 D 5 ...

Page 42: ...40 KB 3411JS KB 3411JK KB 3411JW 6 4 5 1 2 3 6 4 5 1 2 3 A B C D E F G H A B C D E F G H Figure S 3 Control Unit Circuit ...

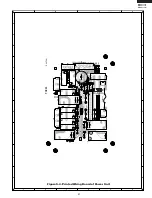
Page 43: ... Printed Wiring Board of Power Unit Q P W B F A 8 4 4 D R Z Z FA844 S 0 4 7 0 8 1 CNE 1 7 1 6 RY4 RY2 RY6 RY7 RY8 VRS1 D13 CNA CNJ 1 6 RY5 RY1 D9 D10 D8 R2 R3 R1 C1 C2 D16 D17 D15 RY11 RY10 D14 D18 D4 D1 D3 D2 ZD1 15 CNH R4 3 CNB FUSE 2 5A 1 1 D11 D12 D7 Q1 E C B 1 5 7 CNC RY3 RY9 CND D5 D6 3 1 2 DIP ...

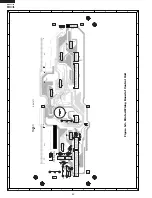
Page 44: ...Figure S 5 Printed Wiring Board of Control Unit E 1 6 B C Q7 S1 S23 C1 C4 S24 R40 C4 C5 C3 C0 C6 C3 C5 C8 Q4 Q3 I C O I C O R8 S0 WHA 6 4 2 1 3 FA843 S047071 5 CF2 CNY CNN CNM CNX CF1 SP 5 14 1 8 9 1 2 LCD1 LCD2 R5 Q2 1 1 9 CF3 C90 R100 CNF LD10 8 2 6 1 3 15 CNK CNZ CNL C21 B C E R6 2 8 9 1 ...

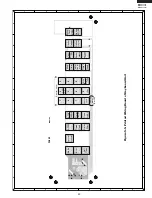
Page 45: ...en Light Power Level MicroWarm Sensor Popcorn MicroWarm Defrost Sensor Cook OPEN Sensor Reheat Defrost Sensor Cook Reheat CLOSE Control Lock Control Lock Stop Clear Timer Clock Setup Custom Help START Minute Plus On Cooktop warm Set Off Timer 3Minut Plus Speed Cook Convection Self Clean B r o i l 1 2 3 4 5 6 7 8 0 9 Figure S 5 Printed Wiring Board of Keyboard Unit ...

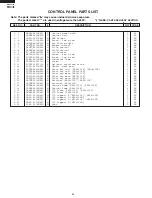
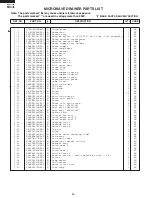
Page 46: ...3 XOTSE40P12000 M Screw 6 AA 1 13 XCTSF50P12000 M Optional oversized screw 6 AA 1 14 PSEL B001MRE0 M Gasket dark gray 1 AN 1 15 FUNTKB441MRK0 M Glass key unit KB3411JS KB3411JK 1 BP 1 15 FUNTKB442MRK0 M Glass key unit KB3411JW 1 BP 1 16 HDECQB001MRR0 M Glass key deco KB3411JS 1 AK 1 16 HDECQB056MRR0 M Glass key deco KB3411JK 1 AK 1 16 HDECQB057MRR0 M Glass key deco KB3411JW 1 AK 1 17 LRTNPB001MRF0...

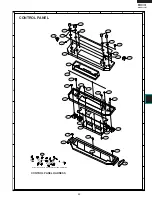
Page 47: ...B C D E F G H CONTROL PANEL CONTROL PANEL HARNESS Actual wire harness may be different from illustration 1 9 1 15 1 5 1 3 1 8 1 7 1 8 1 6 1 12 1 2 1 12 1 20 1 19 1 21 1 13 1 13 1 11 1 11 1 11 1 11 1 4 1 4 1 4 1 4 1 18 1 18 1 17 1 17 1 16 1 1 1 22 1 22 1 13 1 13 1 10 1 14 1 13 ...

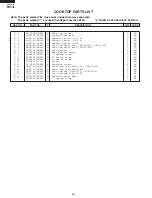
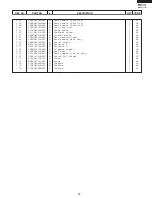
Page 48: ...Y0 M Cook top glass assy KB3411JS KB3411JK 1 CD 2 6 FANG B010MRY0 M Cook top glass assy KB3411JW 1 CF 2 7 PFPF B006MRE0 M Heat protect 1 AH 2 8 PCOVPB122MRP0 M Heat protect cover 1 BD 2 9 MLEVPB018MRE0 M 6 spring strap 2 AH 2 10 MLEVPB020MRE0 M 8 spring strap 1 AH 2 11 MLEVPB021MRE0 M 9 spring strap 1 AH 2 12 XOTSE40P12000 M Screw 6 AA 2 13 LX CZB027MRE0 M Shoulder screw 4 AA 2 14 HDEC B014MRF0 M ...

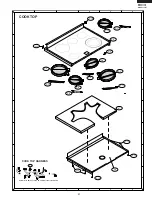
Page 49: ...W 6 4 5 1 2 3 6 4 5 1 2 3 A B C D E F G H A B C D E F G H 2 6 2 2 2 4 2 5 2 11 2 3 2 9 2 4 2 9 2 10 2 7 2 8 2 13 2 12 Actual wire harness may be different from illustration 2 1 2 12 2 13 2 15 2 14 2 16 2 17 COOK TOP HARNESS COOK TOP ...

Page 50: ...ition angle 1 AK 3 25 FC QZB048MRK0 M HVC assy 1 AP 3 26 LBNDKB007MRP0 M HVC band 1 AB 3 27 LX BZA041WRE0 M Screw 6 AA 3 28 XOTSE40P12000 M Screw 68 AA 3 29 LANGTB114MRP0 M Partition angle L 1 AK 3 30 LANGQA581WRPZ M Noise unit angle 1 AD 3 31 XOTSE40P16000 M Screw 4 AA 3 32 XOTSD40P12RV0 M Power unit assy screw 4 AA 3 33 DDORFB099MRK0A M Door assy KB3411JS 1 BR 3 33 DDORFB100MRK0 M Door assy KB34...

Page 51: ...er motor 4 AH 3 63 TCAUHB009MRR0 M User caution label 1 AA 3 64 FANGTB012MRK0 M Auto drawer gear assy 1 BH 3 65 LANGTB105MRP0 M Switch angle 2 AE 3 66 MACT B001MRF0 M Actuator R 1 AD 3 67 MACT B002MRF0 M Actuator L 1 AD 3 68 DPWBFC441WRKZ M SW power supply 1 CM 3 69 NGERRB002MRF0 M Rack gear 2 BS 3 70 FROLPB029MRK0 M Door support roller assy 1 AG 3 71 LHLD B031MRF0 M Switch PSU holder 1 AC 3 72 XO...

Page 52: ...3 10 3 8 3 7 3 29 3 5 3 53 3 52 3 50 3 51 3 49 3 48 3 40 3 22 3 1 3 15 3 24 3 25 3 26 3 62 3 44 3 45 3 30 3 56 3 46 3 11 3 14 3 21 3 21 3 60 3 34 3 59 3 33 3 58 3 13 3 18 3 31 3 31 3 28 3 32 3 42 3 28 3 32 3 41 3 41 3 42 3 42 3 41 3 28 3 28 3 28 3 28 3 61 3 28 3 28 3 27 3 28 3 28 3 27 3 42 3 28 3 28 3 28 3 32 3 28 3 61 3 28 3 28 3 28 3 28 3 28 3 28 3 28 3 28 3 10 3 10 3 28 3 10 3 28 3 6 3 6 3 38 3...

Page 53: ...000 M Screw 37 AA 4 28 TCAUAB048MRR0 M DHHS caution label 1 AB 4 29 GCABDB009MRP0 M Rear plate 1 BE 4 30 QCNCYB001MRE0 M Terminal block kit 1 AK 4 31 FANG B003MRE0 M Latch motor assy 1 AZ 4 32 LANGQB066MRP0 M Ground plate 1 AD 4 33 LX BZA041WRE0 M Screw 4 AA 4 34 TCAUAB057MRR0 M Anti tip label 1 AA 4 35 LX CZB029MRE0 M Terminal screws 2 AA 4 36 LBNDKB012MRP0 M Element support hanger 2 AD 4 37 RHET...

Page 54: ...4 28 4 31 4 17 4 10 4 2 4 24 4 34 4 1 4 23 4 4 4 25 4 19 4 30 4 41 4 14 4 21 4 48 4 29 4 43 4 11 4 13 4 12 4 46 4 20 4 16 4 22 4 15 4 18 4 8 4 9 4 5 4 9 4 8 4 38 4 37 4 36 4 44 4 27 4 27 4 27 4 27 4 35 4 27 4 39 4 33 4 27 4 27 4 27 4 39 4 45 4 45 4 39 4 39 4 39 4 39 4 39 4 6 4 7 4 49 4 49 4 53 4 51 4 54 4 39 4 52 4 39 4 50 4 39 x8 4 3 4 56 4 55 4 57 4 27 4 27 4 27 4 59 4 58 OVEN UNIT ...

Page 55: ... SECTION REF NO PART NO DESCRIPTION Q TY CODE 5 1 DDORFB092MRK0 M Door assy KB3411JS 1 BY 5 1 DDORFB096MRK0 M Door assy KB3411JK 1 BY 5 1 DDORFB097MRK0 M Door assy KB3411JW 1 BY 5 2 PPACGB021MRE0 M Oven door seal gasket 1 AW 5 3 JHNDPB053MRF0 M Door handle KB3411JS 1 BB 5 3 JHNDPB056MRF0 M Door handle KB3411JK 1 BB 5 3 JHNDPB057MRF0 M Door handle KB3411JW 1 BB 5 4 XOTWW40P12000 M Screw 6 AA ...

Page 56: ...54 KB 3411JS KB 3411JK KB 3411JW 6 4 5 1 2 3 6 4 5 1 2 3 A B C D E F G H A B C D E F G H 5 1 5 3 5 2 5 4 5 4 5 4 OVEN DOOR ...

Page 57: ...3MRK0 M Operation manual 1 AM 6 5 TINSEB390MRR0 M Installation sheet 1 AG 6 6 FAMI B007MRK0 M Extended rack assy 1 BM 6 7 FANGKB024MRK0A M Anti tip kit 1 AV 6 8 TINSEB392MRR0 M Anti tip template 1 AD 6 9 FANG B004MRT0 M Back splash KB3411JS 1 BQ 6 9 FANG B005MRT0A M Back splash KB3411JK 1 BQ 6 9 FANG B006MRT0A M Back splash KB3411JW 1 BQ 6 10 UAMI B014MRM0 M Broiler pan rack 1 AR 6 11 PCUSGB052MRF...

Page 58: ...ASSY x 2 BOILER PAN INSTALLION MANUAL OPERATION MANUAL ANTI TIP TEMPLATE ANTI TIP KIT PACKING CASE Non replaceable items BACK SPLASH HOLDER BACK SPLASH OVEN RACK 6 9 6 7 6 1 6 8 6 4 6 5 6 6 6 2 BOILER INSERT 6 3 BOILER PAN RACK 6 10 6 12 6 11 6 13 2 14 2 15 PACKING ...

Page 59: ...57 KB 3411JS KB 3411JK KB 3411JW NOTES ...

Page 60: ...PYRIGHT 2005 BY SHARP CORPORATION ALL RIGHTS RESERVED No part of this publication may be repro duced stored in retrieval systems or trans mitted in any form or by any means elec tronic mechanical photocopying recording orotherwise withoutpriorwrittenpermission of the publisher ...

Reviews: