4-39
FACSIMILE
Contents
TRANSMISSION USING THE SPEAKER
When the speaker is used to dial, the fax is sent after the number is dialled and the connection is established. If a person
answers, you will be able to hear his or her voice, but you will not be able to speak.
1
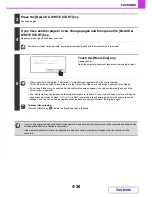
Place the original.
Place the original face up in the document feeder tray, or face
down on the document glass.
When the document glass is used, only one page can be
transmitted.
2
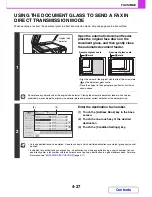
Enter the destination fax number.
(1) Touch the [Speaker] key.
You will hear the dial tone through the machine's speaker.
(2) Touch the [Address Book] key in the base
screen.
(3) Touch the one-touch key of the desired
destination.
A group key cannot be used.
• In addition to specification by one-touch key, a destination can also be specified using a search number. You can
also directly enter a fax number with the numeric keys or look up a destination in a global address book. For more
information, see "
ENTERING DESTINATIONS
" (page 4-17).
• After touching the [Speaker] key, you can touch the [Speaker Volume] key to adjust the volume of the speaker. The
speaker volume changes each time the [Speaker Volume] key is touched. Adjust the volume to the desired level.
3
Wait until the connection is made and then press the [BLACK & WHITE START]
key.
Transmission begins.
To cancel transmission...
Touch the [Speaker] key before the [BLACK & WHITE START] key is pressed. The line will be disconnected and
transmission will stop.
• When the speaker is used, transmission takes place without scanning the original into memory.
• A destination that includes an F-code (sub-address and passcode) cannot be used.
• A one-touch key that has multiple destinations or has a non-fax destination cannot be used.
System Settings (Administrator): Speaker Settings
The default volume level of the speaker can be changed in the "Speaker Settings".
1
2
III III
GGG GGG
EEE EEE
CCC CCC
AAA AAA
JJJ JJJ
HHH HHH
FFF FFF
DDD DDD
BBB BBB
10
5
15
Speaker Volume
To
Cc
Telephone mode.
Fax Manual
Reception
Resend
Speaker
Condition
Settings
ABCD
Freq.
EFGH
IJKL
MNOP
QRSTU
VWXYZ
etc.
Sort Address
(3)
(1)
Summary of Contents for MX-2010U
Page 11: ...Conserve Print on both sides of the paper Print multiple pages on one side of the paper ...
Page 35: ...Organize my files Delete a file Delete all files Periodically delete files Change the folder ...
Page 283: ...3 19 PRINTER Contents 4 Click the Print button Printing begins ...
Page 832: ...MX2010 EX ZZ Operation Guide MX 2010U MX 2310U MODEL ...


